Introduction
SocialiFied
Thank you so much for purchasing our item.
- Version: 1.6
- Author: iOSAppsWorld
- Created: 1 October 2022
- Update: 18 January 2023
If you have any questions that are beyond the scope of this help file, Please feel free to email via Support.
Basic
As This is complete system with lots of modules for web and mobile apps, it is compulsory to have some basic knowledge in both server side and mobile app development if you want to do the installation, setup and publishing with your branding yourself.
- Flutter SDK and JDK with path setup in your IDE.
- Real server related knowledge like apache or local machine server,nodejs we preferred to use a real server.
- Server related knowledge and we preferred cPanel in your server for quick installation
- Basic knowledge in PHP, Yii2, Nodejs and Flutter if you want to do some customization yourself (Not compulsory).
- basic knowledge about google cloud and firebase.
Server
- Requires PHP v7.3+ and MySQL.
- Mod_rewrite Apache
- Ctype PHP, JSON, PDO, XML, Zip, Gd Extension
- Nodejs v14.19.3
Mobile app
- Android studio or VC code
- Flutter SDK setup (version 3.3.0 Stable)
- JDK with path setup (only for vs code)
- Xcode 13.2+ for IPA file build
- Android studio for APK file build
Install on server
After download the code from codecayon, upload the backend code zip file (socialified_v7.zip) in your server root and extract the zip file. Backend admin panel can be installed on a domain or subdomain: For Example, yourdomain.com OR xyz.yourdomain.com.
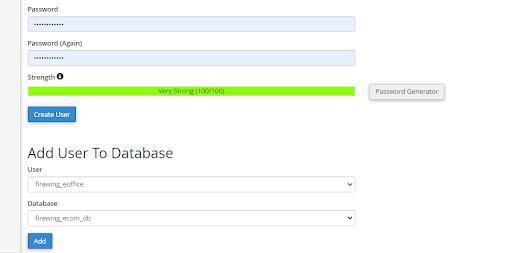
Database setup
Step 1Create a new database from your server MYSQL database
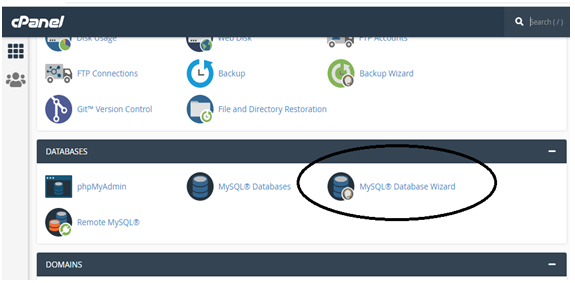
Create a DB user to the database and link that database to the DB user
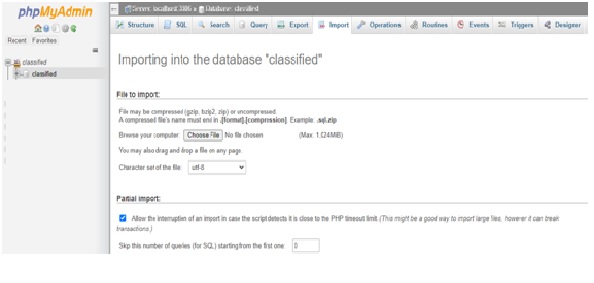
Import Mysql database file into your database. database file can be find in doc/db folder in given code.
For new setup use socialified_new_sertup_1.7.sql file
eg. For update use socialified_update_1.6 to1.7.sql file
Db configuration can be updated in common/config/main-local.php.
Update dbname, username and password.
<?php
              return [
                  'components' => [
                      'db' => [
                          'class' => 'yii\db\Connection',
                          'dsn' => 'mysql:host=localhost;dbname=DB_NAME####',
                          'username' => '#####',
                          'password' => '######',
                          'charset' => 'utf8',
                      ],
                      'mailer' => [
                          'class' => 'yii\swiftmailer\Mailer',
                          'viewPath' => '@common/mail',
                          'transport' => [
                              'class' => 'Swift_SmtpTransport',
                              'host' => 'smtp-relay.sendinblue.com',  // e.g. smtp.mandrillapp.com or smtp.gmail.com
                              'username' => '############',
                              'password' => '###########',
                              'port' => '587', // Port 25 is a very common port too
                              'encryption' => 'tls', // It is often used, check your provider or mail server specs
                          ],
                      ],


                  ],
              ];
Site Url and Envato purchase code
Site url can be update fromcommon/config/params.php
<?php

              'adminEmail' => 'admin@SocialiFied.co',
              'supportEmail' => 'support@SocialiFied.com',
              'senderEmail' => 'admin@SocialiFied.co',
              'senderName' => 'SocialiFied',

              'siteMode' => 2, // 1 for live, 2 for testing , 3 demo
              'siteUrl' => 'http://example.com',// domain here
              'enventoPurchaseCode' => '##########', // envato purchase code
              'storageSystem'=> 1,// storage system (local storage =1, AWS S3=2, AZURE=3)
              's3' => [
                  'key' => '##############',
                  'secret' => '##############',
                  'region' => '##############',
                  'defaultBucket' => '#########', //name
                  'storageUrl'=>'https://[bucket_name].s3.amazonaws.com'  //aws s3 storage url


              ],
All done for appache srever, your software is ready to run.
Admin Url : youdomin.com/backend/web/index.php
Login information :
Username : admin
Password : 123456
Nodejs Chat Socket Setup
We are using nodeJs socket programming for chat, Use following instruction for socket setup
All nodeJs chat code will be in /chat forder
Nodejs v14.19.3 must be installed on your server
To confirm you have nodejs install, try to run command in your console :
node -v Step 2
You can update configuration filechat/config.json with given fields
{
  "port":4000,  //server port
    "live":{    // add your db information
      "host": "localhost",
      "user": "######",
      "password": "######",
      "database": "#######"
    },
    "dev":{ // leave it blank
      "host": "####",
      "user": "#####",
      "password": "####",
      "database": "###"
    }
  },
  "encryptionKey":"##########################", // enter key for encryption chat eg. bbC2H19lkVsQDf74rtNMQdddFloLyws
  "storageUrl":"https://[bucket_name].s3.amazonaws.com   OR  https://yoursite.com/uploads",  //Use bucket url for AWS S3 OR use https://yoursite.com/upload for local storage   Check For S3
  "pushNotification":{
      "databaseURL": "https://q#############.firebaseio.com"         See here
  },
  "voipNotification":{                                               Check documentation to create
    "key": "cert/AuthKey_#####.p8", // .p8 file
    "keyId": "########", //67J4MZG469
    "teamId": "########", // T937GPNTUY
    "bundleId":"###########"  //com.example.app
  }
Step 3
Firbase Setup
serviceAccountKey.json and put the file in
/chat folder 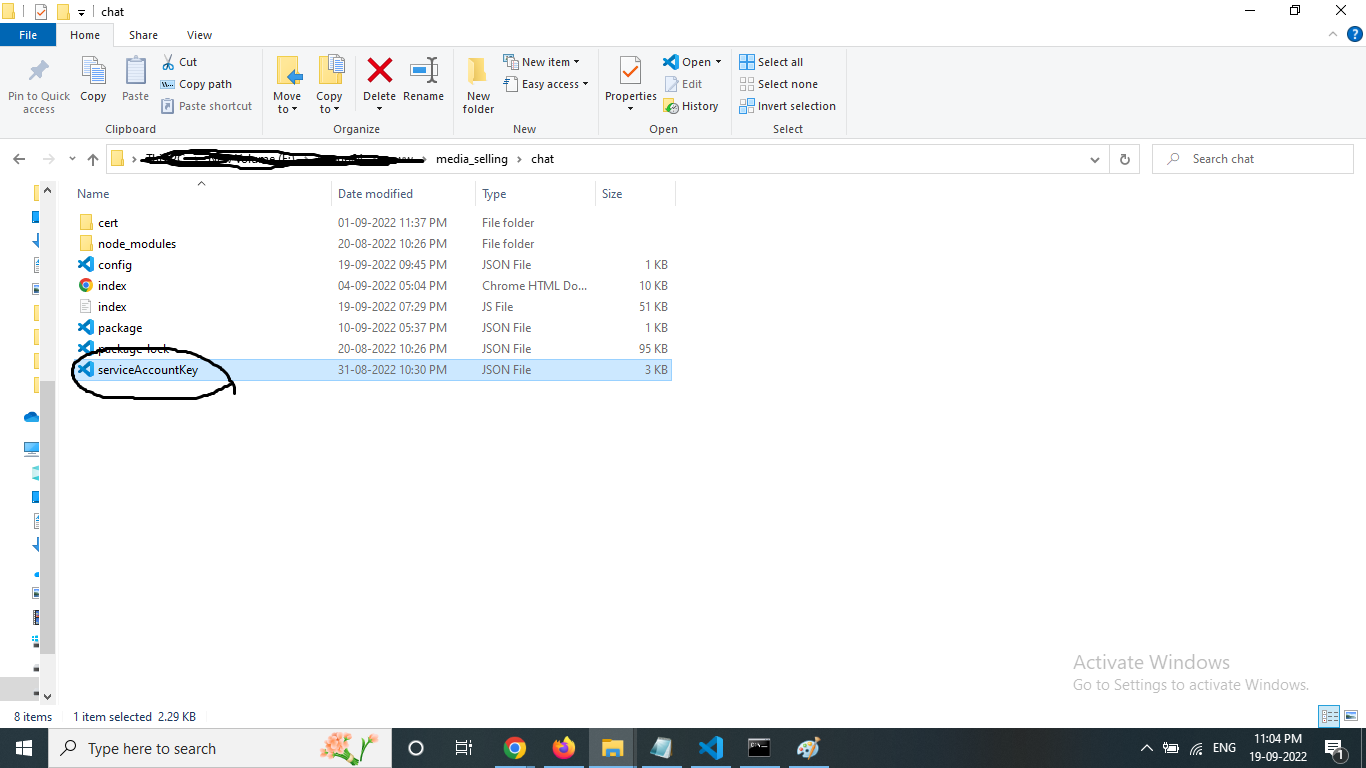 Step 4
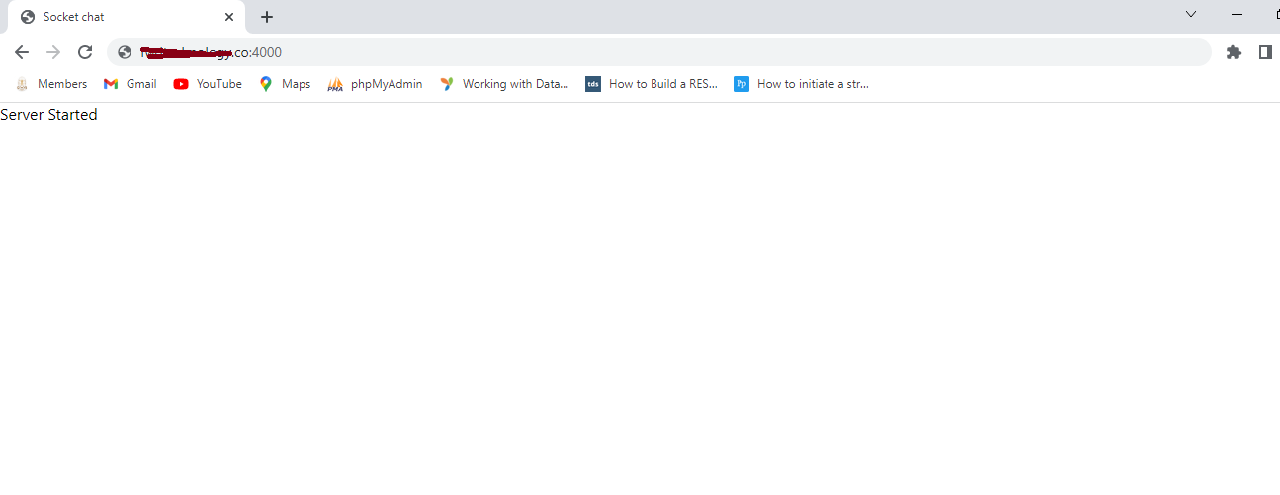
Start node server
After installing all dependencies and updated the configuration, you must start node server :
Open a terminal and nvigate to the /chat folder that contain the file "index.js"
Run following command to start server :
          cd /path/to/your/root forlder/chat
          node index.js
For running server all time you can install forever package More Detail
Run following command to run server with forever:
          cd /path/to/your/root forlder/chat
          forever start index.js
Mandatory setup
Mail Configuration
Mail Configurations part admin can set his Mailer host, user name and his own encryption method and password for this SMTP Mail setup. This configuratin is used for sending mails.
MAil configuration can be updated in common/config/main-local.php.
<?php
        return [
            'components' => [
                'db' => [
                    'class' => 'yii\db\Connection',
                    'dsn' => 'mysql:host=localhost;dbname=DB_NAME####',
                    'username' => '#####',
                    'password' => '######',
                    'charset' => 'utf8',
                ],
                'mailer' => [
                    'class' => 'yii\swiftmailer\Mailer',
                    'viewPath' => '@common/mail',
                    'transport' => [
                        'class' => 'Swift_SmtpTransport',
                        'host' => 'smtp-relay.sendinblue.com',  // e.g. smtp.mandrillapp.com or smtp.gmail.com
                        'username' => '############',
                        'password' => '###########',
                        'port' => '587', // Port 25 is a very common port too
                        'encryption' => 'tls', // It is often used, check your provider or mail server specs
                    ],
                ],


            ],
        ];
Storage Setting
We are giving following three option to store media files. You can choose one storage system according to your requirements
Local server storage setting
Storage system can update be update fromcommon/config/params.phpset storageSystem=1 for local storage
<?php

        'adminEmail' => 'admin@SocialiFied.co',
        'supportEmail' => 'support@SocialiFied.com',
        'senderEmail' => 'admin@SocialiFied.co',
        'senderName' => 'SocialiFied',

        'siteMode' => 2, // 1 for live, 2 for testing , 3 demo
        'siteUrl' => 'http://example.com',// domain here
        'enventoPurchaseCode' => '##########', // envato purchase code
        'storageSystem'=> 1,//  storage system ( local storage =1, AWS S3=2, AZURE=3)
        's3' => [
            'key' => '##############',
            'secret' => '##############',
            'region' => '##############',
            'defaultBucket' => '#########', //name
            'storageUrl'=>'https://[bucket_name].s3.amazonaws.com'  //aws s3 storage url

        ],
        'azureFs' => [
            'accountName' => '###########',
            'accountKey' => '##########',
            'container' => '#######'

        ],
Firebase key Setting
We are using firebase to send push notification.
Firbase srever key can update be update fromcommon/config/params.php<?php
'adminEmail' => 'admin@SocialiFied.co',
'supportEmail' => 'support@SocialiFied.com',
'senderEmail' => 'admin@SocialiFied.co',
'senderName' => 'SocialiFied',
'siteMode' => 2, // 1 for live, 2 for testing , 3 demo
'siteUrl' => 'http://example.com',// domain here
'enventoPurchaseCode' => '##########', // envato purchase code
'storageSystem'=> 1,// storage system ( local storage =1, AWS S3=2, AZURE=3)
's3' => [
'key' => '##############',
'secret' => '##############',
'region' => '##############',
'defaultBucket' => '#########', //name
'storageUrl'=>'https://[bucket_name].s3.amazonaws.com' //aws s3 storage url
],
'azureFs' => [
'accountName' => '###########',
'accountKey' => '##########',
'container' => '#######'
],
'testOtp' => '###',
'apiKey.firebaseCloudMessaging'=> '##############', See here
'user.passwordResetTokenExpire' => 3600,
Agora key Setting
Setup Agora api key for audio video calling. You can get your keys.
See here
After Getting the App ID, and App Certificate keys, update it from admin panel setting:
Admin > Setting > App Setting
Amazone S3 Setup
We are using amazone s3 for storage files and images.
Step 1Create Bucket
You can create bucket on s3 to follow this URL:
https://docs.aws.amazon.com/quickstarts/latest/s3backup/step-1-create-bucket.html
.
After create bucket. You have to create folders :
chat, collection, competition, image, user, story,gift, verification and user

Update AWS S3 Access key and secret access key
Use following url to create secret keys:https://docs.aws.amazon.com/powershell/latest/userguide/pstools-appendix-sign-up.html#get-access-keys.
After generate the keys and secret, update it with bucket name on
common/config/params.php
<?php

            'adminEmail' => 'admin@SocialiFied.co',
            'supportEmail' => 'support@SocialiFied.com',
            'senderEmail' => 'admin@SocialiFied.co',
            'senderName' => 'SocialiFied',

            'siteMode' => 1, // 1 for live, 2 for testing
            'siteUrl' => 'http://example.com',// domain here
            'storageSystem'=> 2,  // storage system (local storage =1, AWS S3=2)
            's3' => [
                'key' => '##############',
                'secret' => '##############',
                'region' => '##############',
                'defaultBucket' => '##############', //bucket name
                'storageUrl'=>'https://[bucket_name].s3.amazonaws.com '  //aws s3 storage url


            ],
Azure Storage Setup
We are using microsoft azure for storage files and images.
Step 1Create access keys (Account Name, Account Key, Container)
You can create azure setup from :
https://learn.microsoft.com/en-us/azure/storage/common/storage-account-keys-manage?tabs=azure-portal
.
Update Azure Access keys
After generate the keys update it on
common/config/params.php
<?php
          'adminEmail' => 'admin@SocialiFied.co',
          'supportEmail' => 'support@SocialiFied.com',
          'senderEmail' => 'admin@SocialiFied.co',
          'senderName' => 'SocialiFied',

          'siteMode' => 1, // 1 for live, 2 for testing , 3 demo
          'siteUrl' => 'http://example.com',// domain here
          'enventoPurchaseCode' => '##########', // envato purchase code
          'storageSystem'=> 3,//  storage system ( local storage =1, AWS S3=2, AZURE=3)
          's3' => [
              'key' => '##############',
              'secret' => '##############',
              'region' => '##############',
              'defaultBucket' => '#########', //name
              'storageUrl'=>'https://[bucket_name].s3.amazonaws.com'  //aws s3 storage url

          ],
          'azureFs' => [
              'accountName' => '##############',
              'accountKey' => '##############',
              'container' => '##############',

          ],
Setup Agora api key for audio video calling

Project access URL
Admin Panel
Admin Url :youdomin.com/backend/web/index.php Login information :
Username : admin
Password : 123456
Rest API Endpoint Url (restApiBaseUrl)
youdomin.com/api/web/v1Socket Url (socketApiBaseUrl)
http://yourdomain:4000iPhone app setup
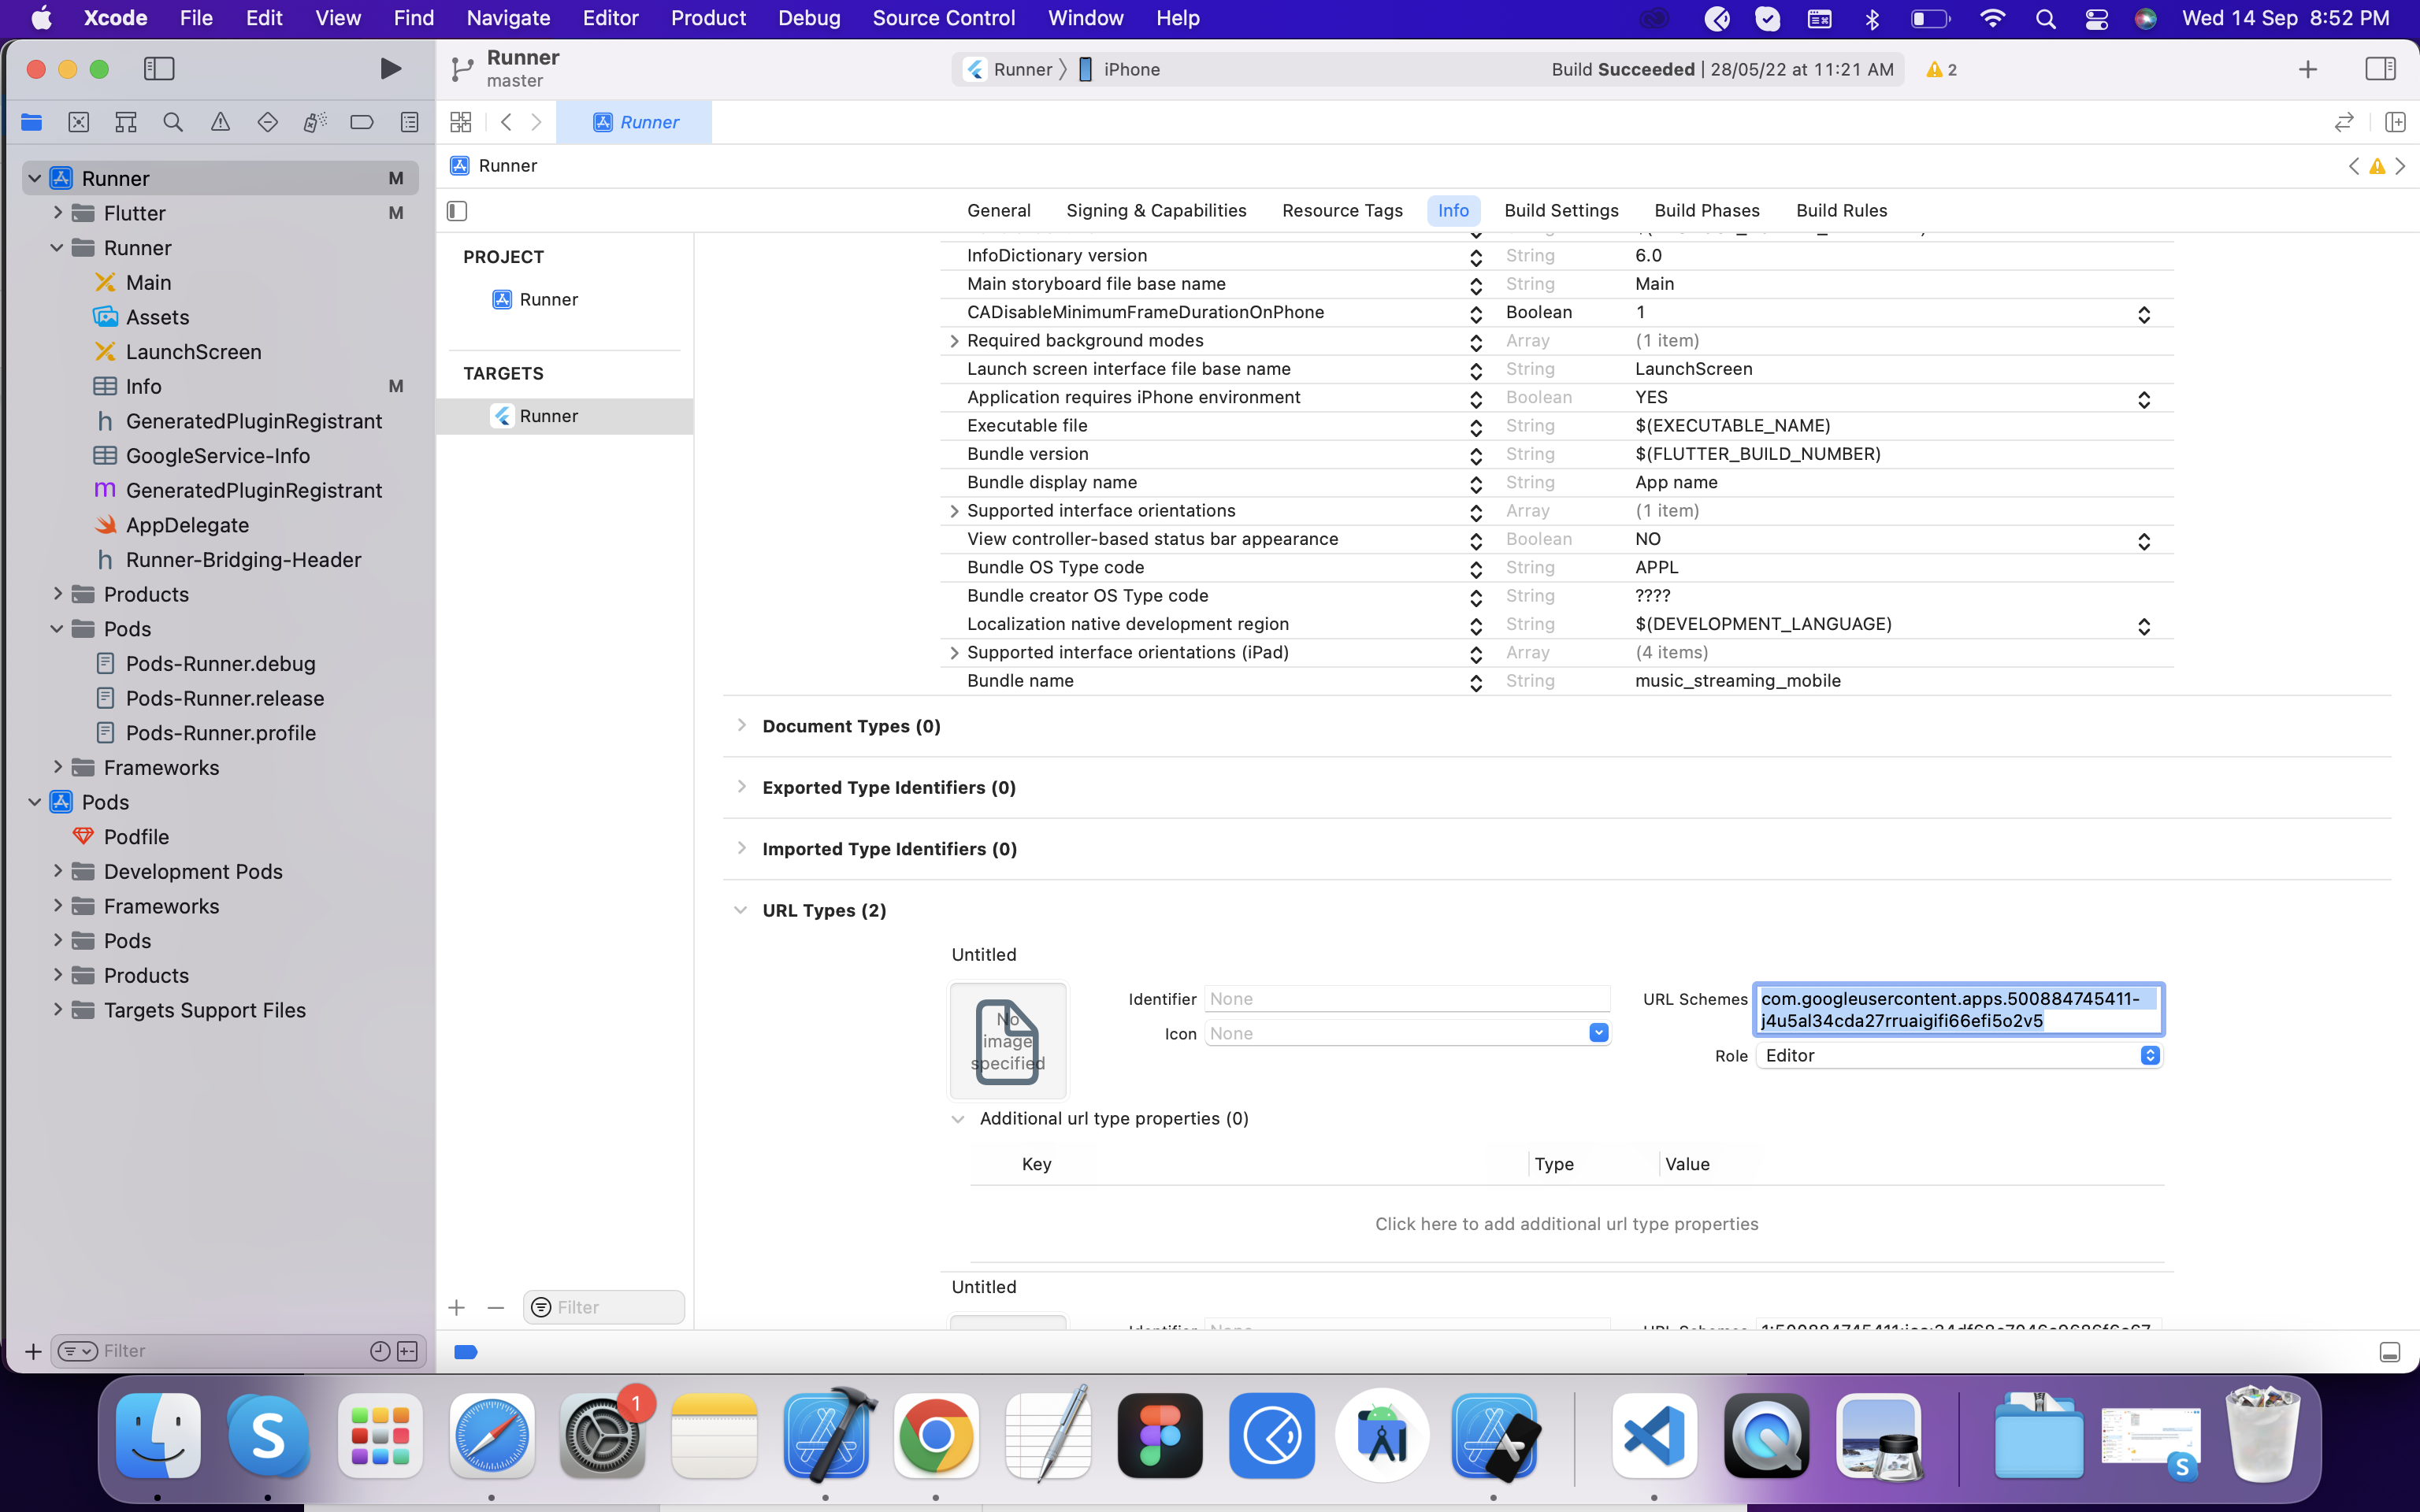
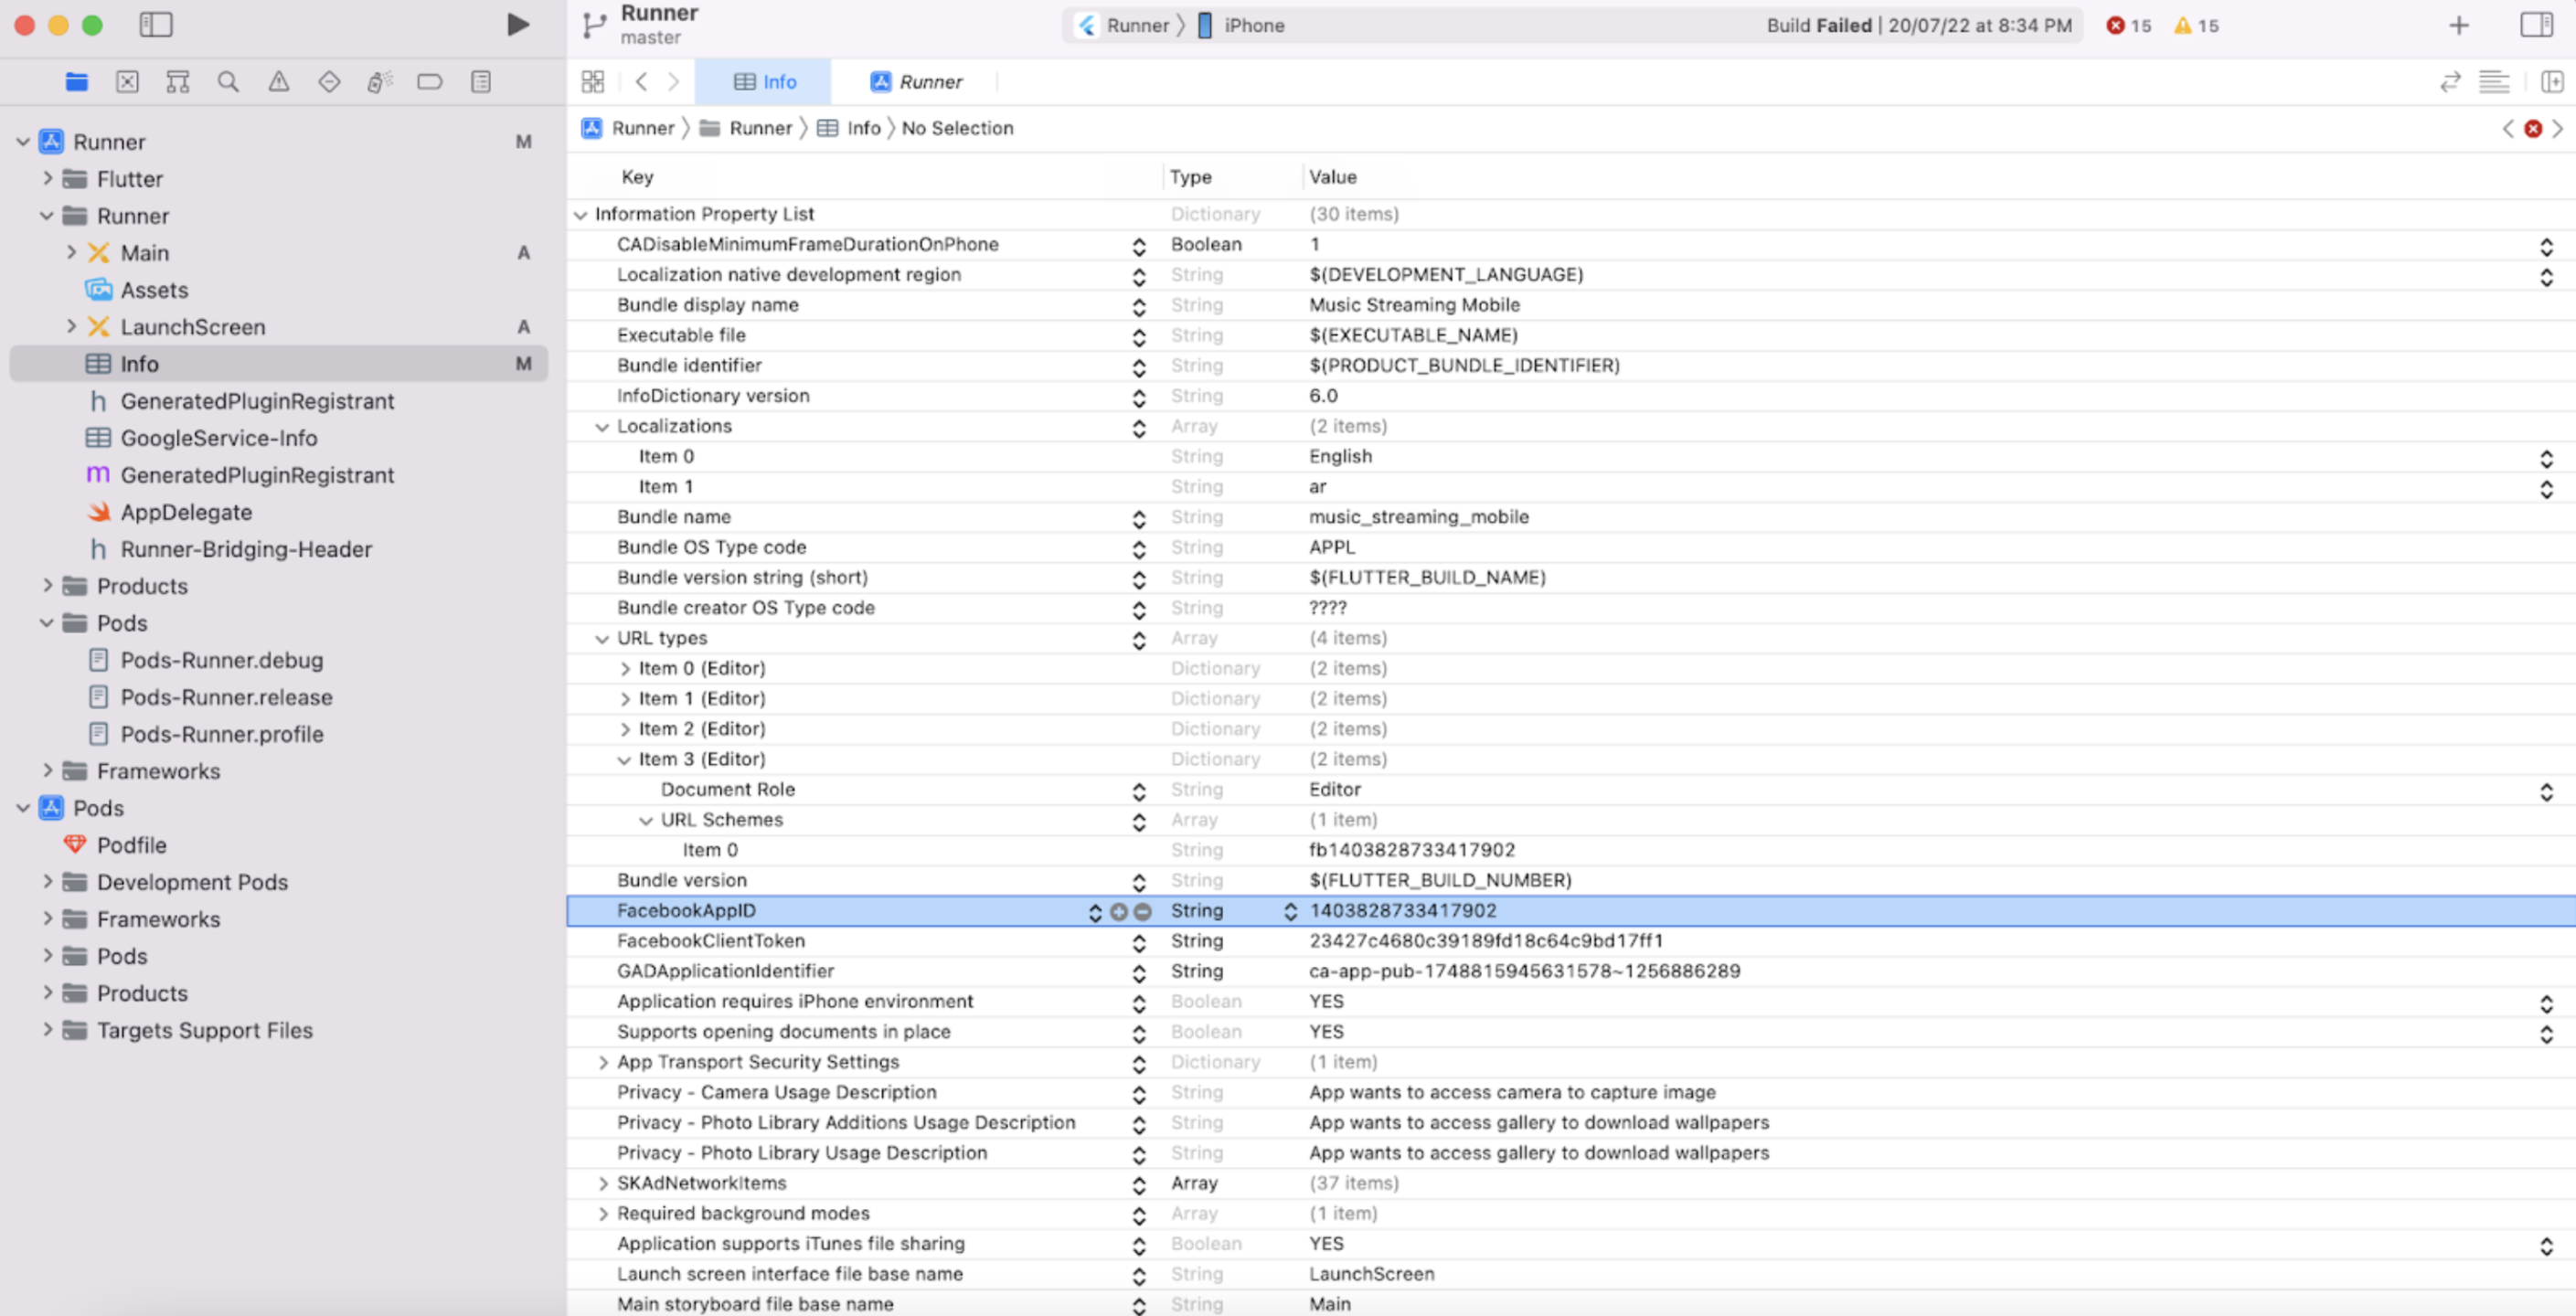
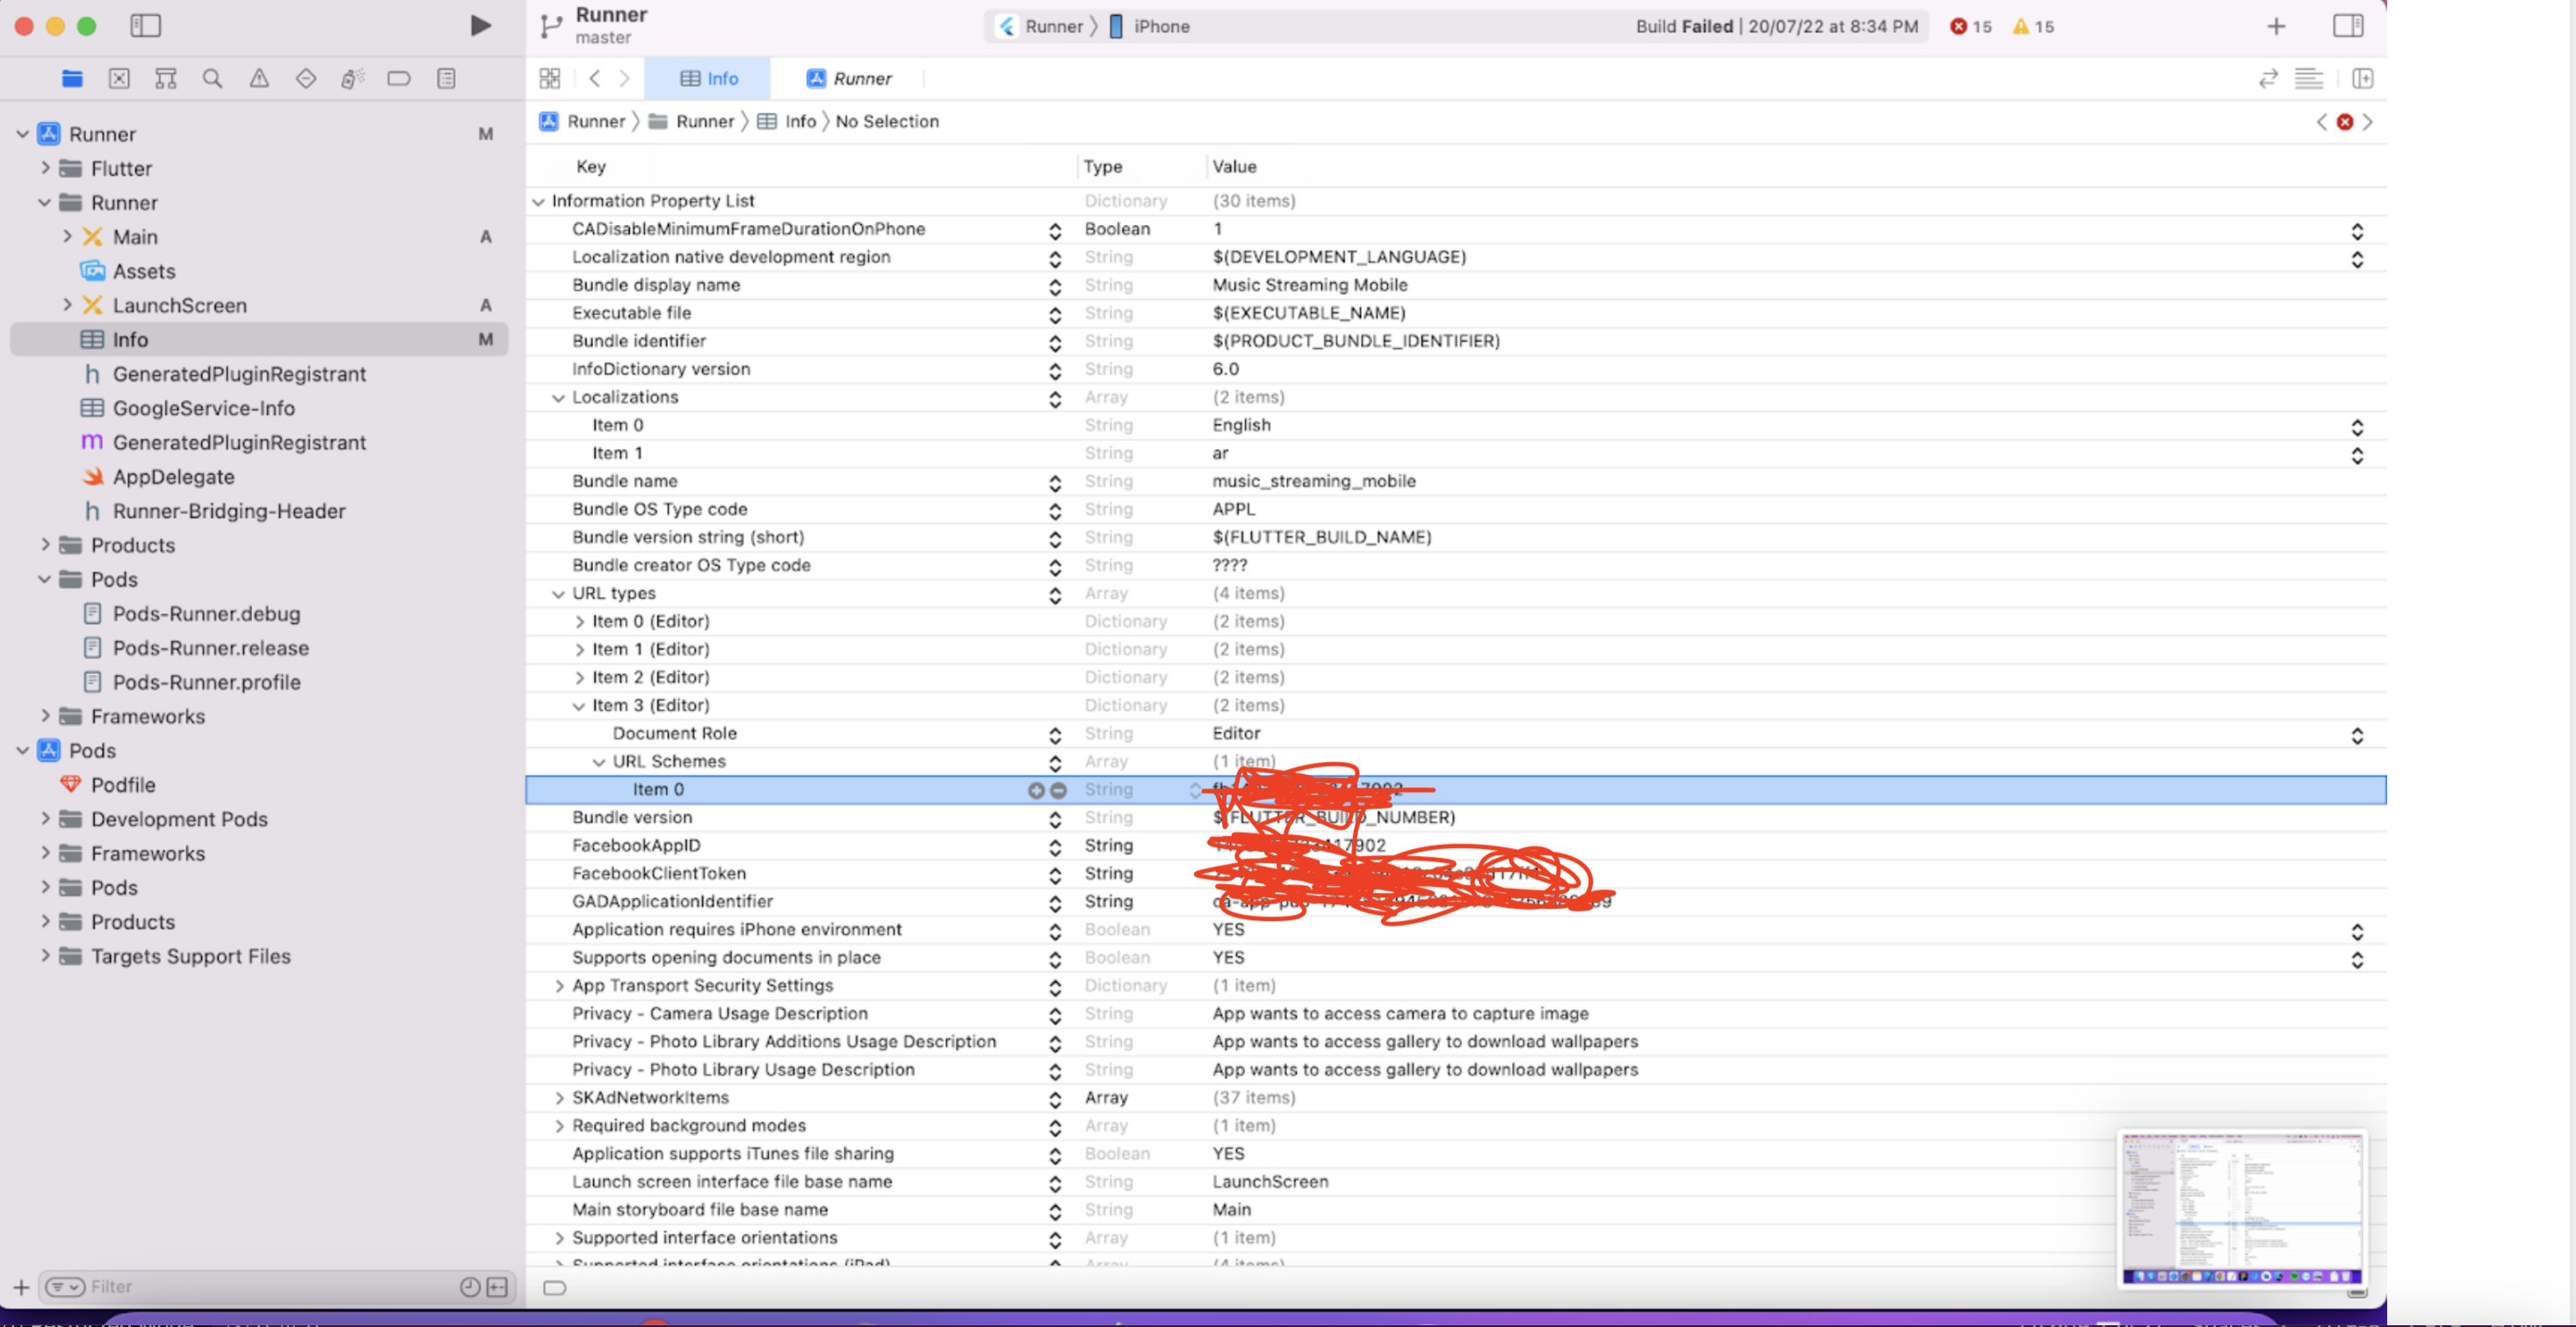
Step 1Go to developer.apple.com and login using credentials Follow the instructions given in the link below to create bundle identifier.
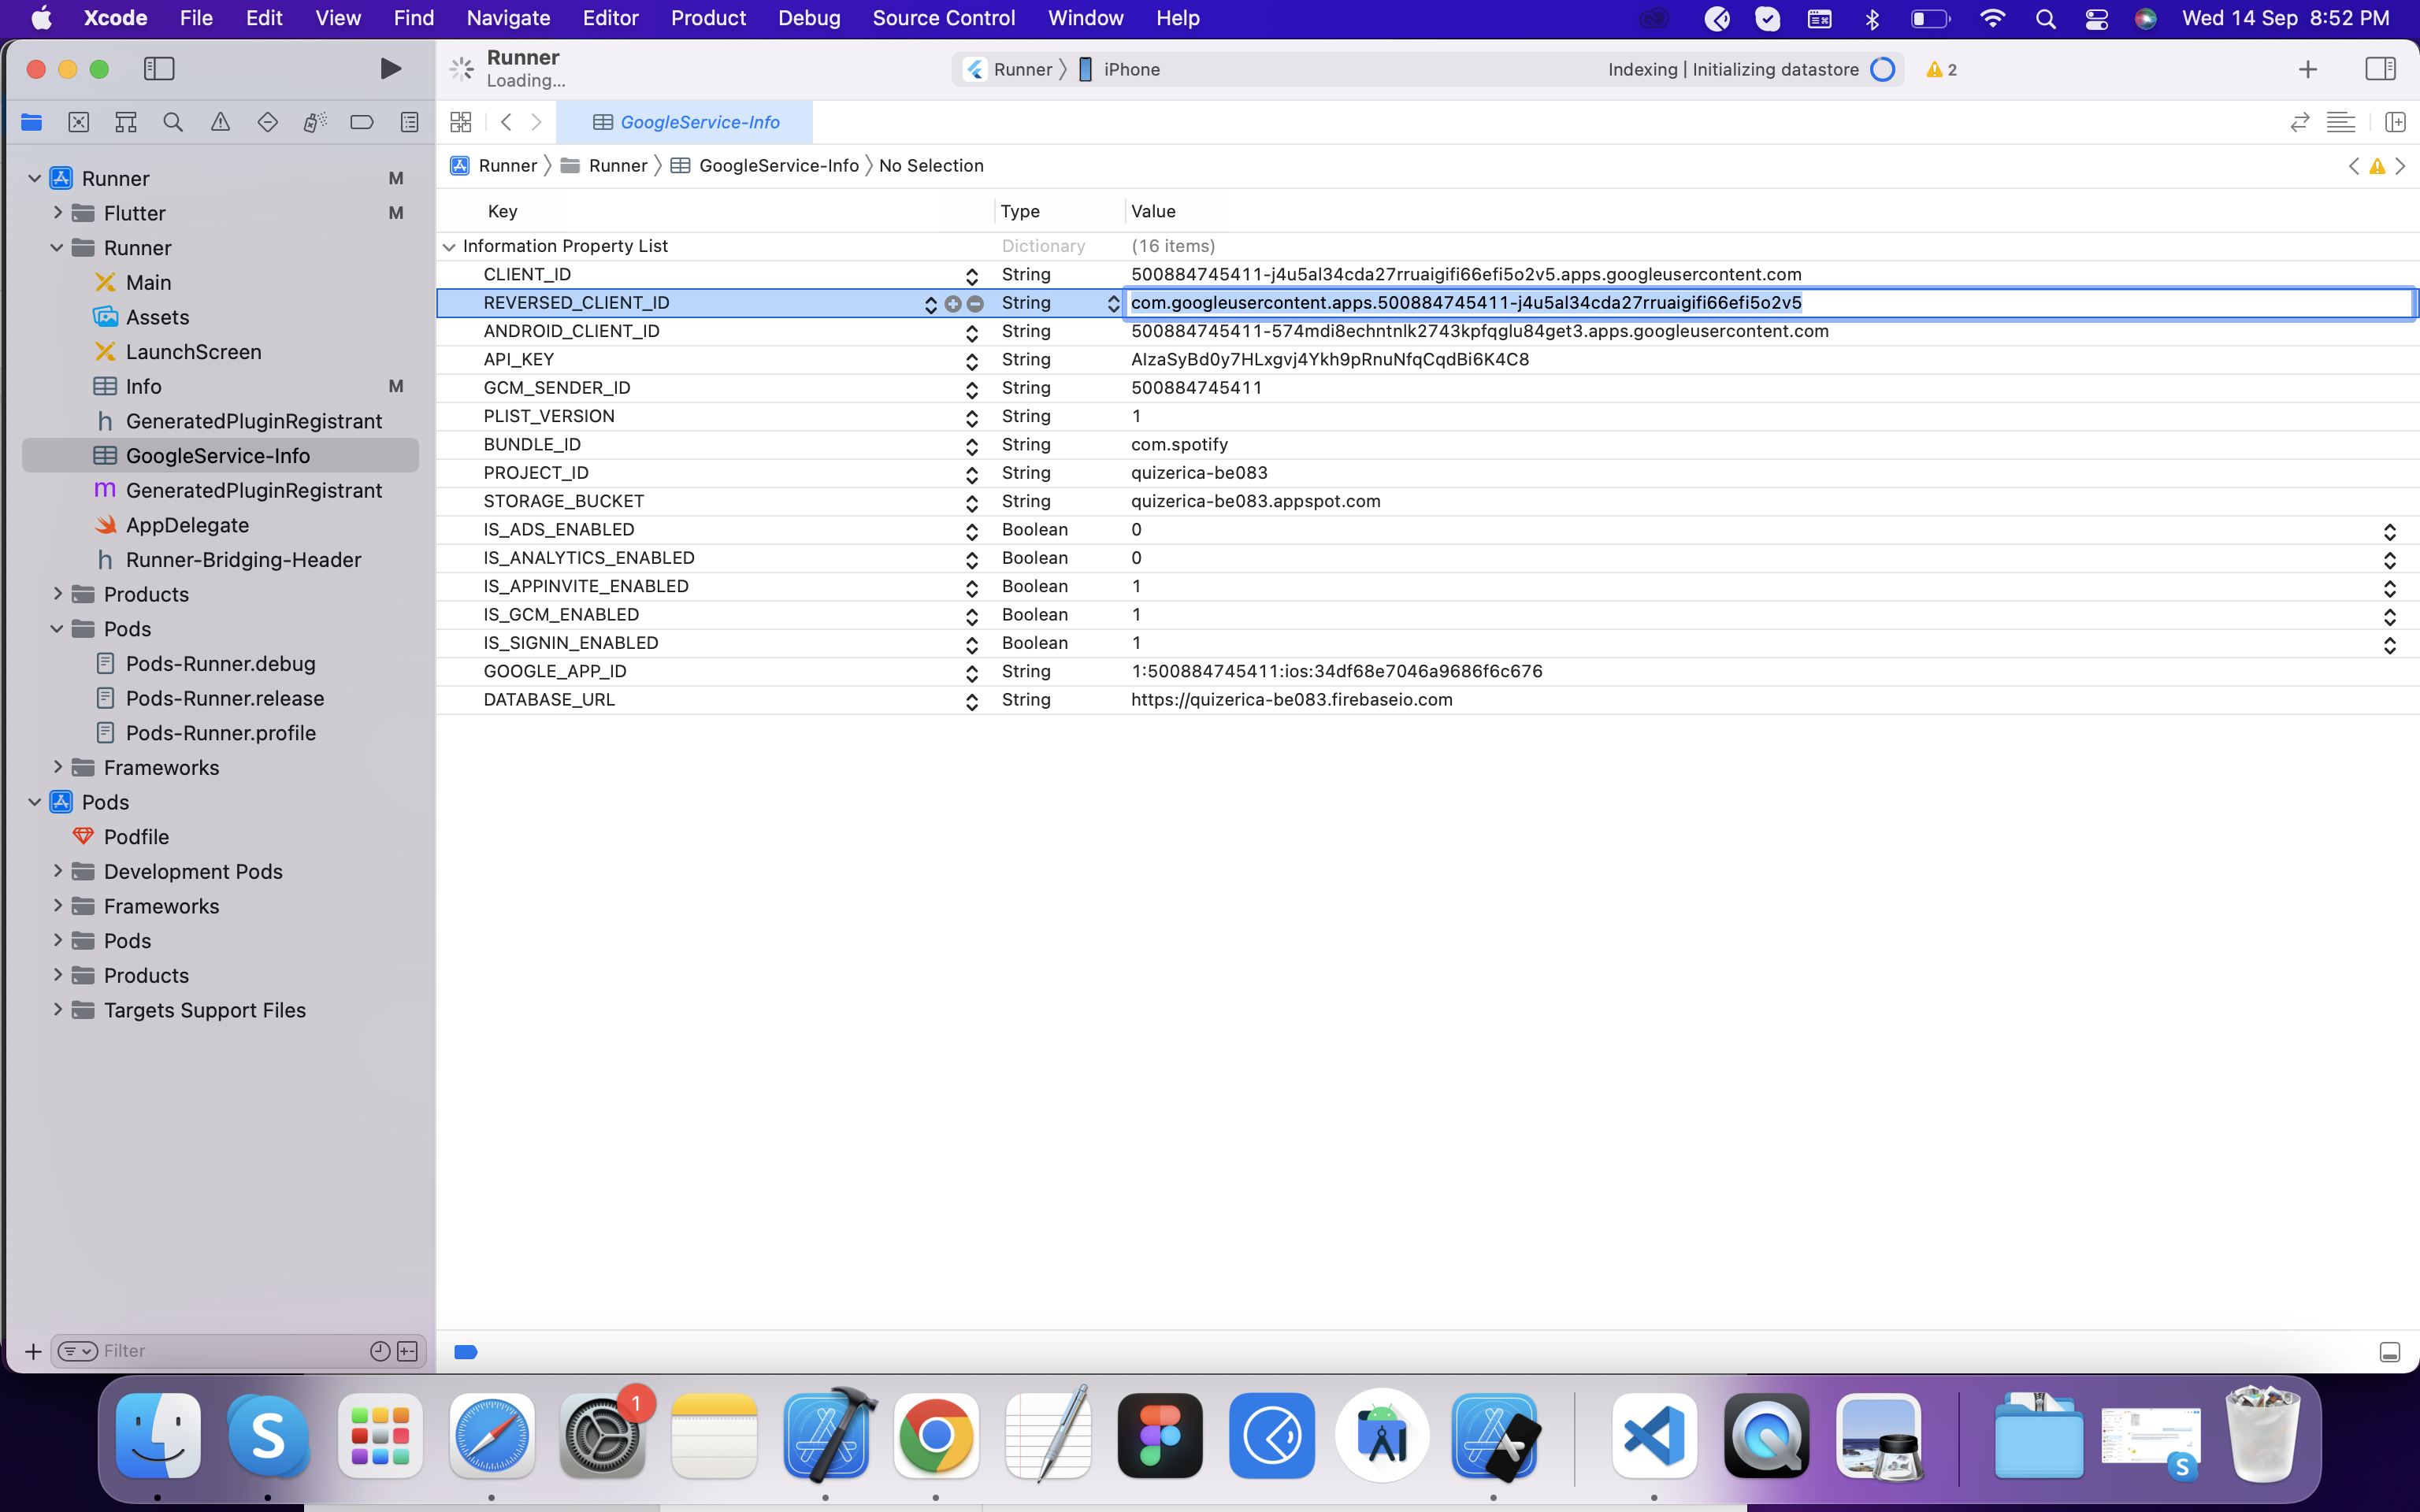
https://www.appcodezip.com/2020/05/app-id.htmlKeep note of bundle identifier as we need it in firebase ios app setup and flutter ios app setup.
Step 2
Enbale apple pay and push notification
Your need to enable push notification and apple login option in create identifer that you created in step 1. See below screenshot for refrence
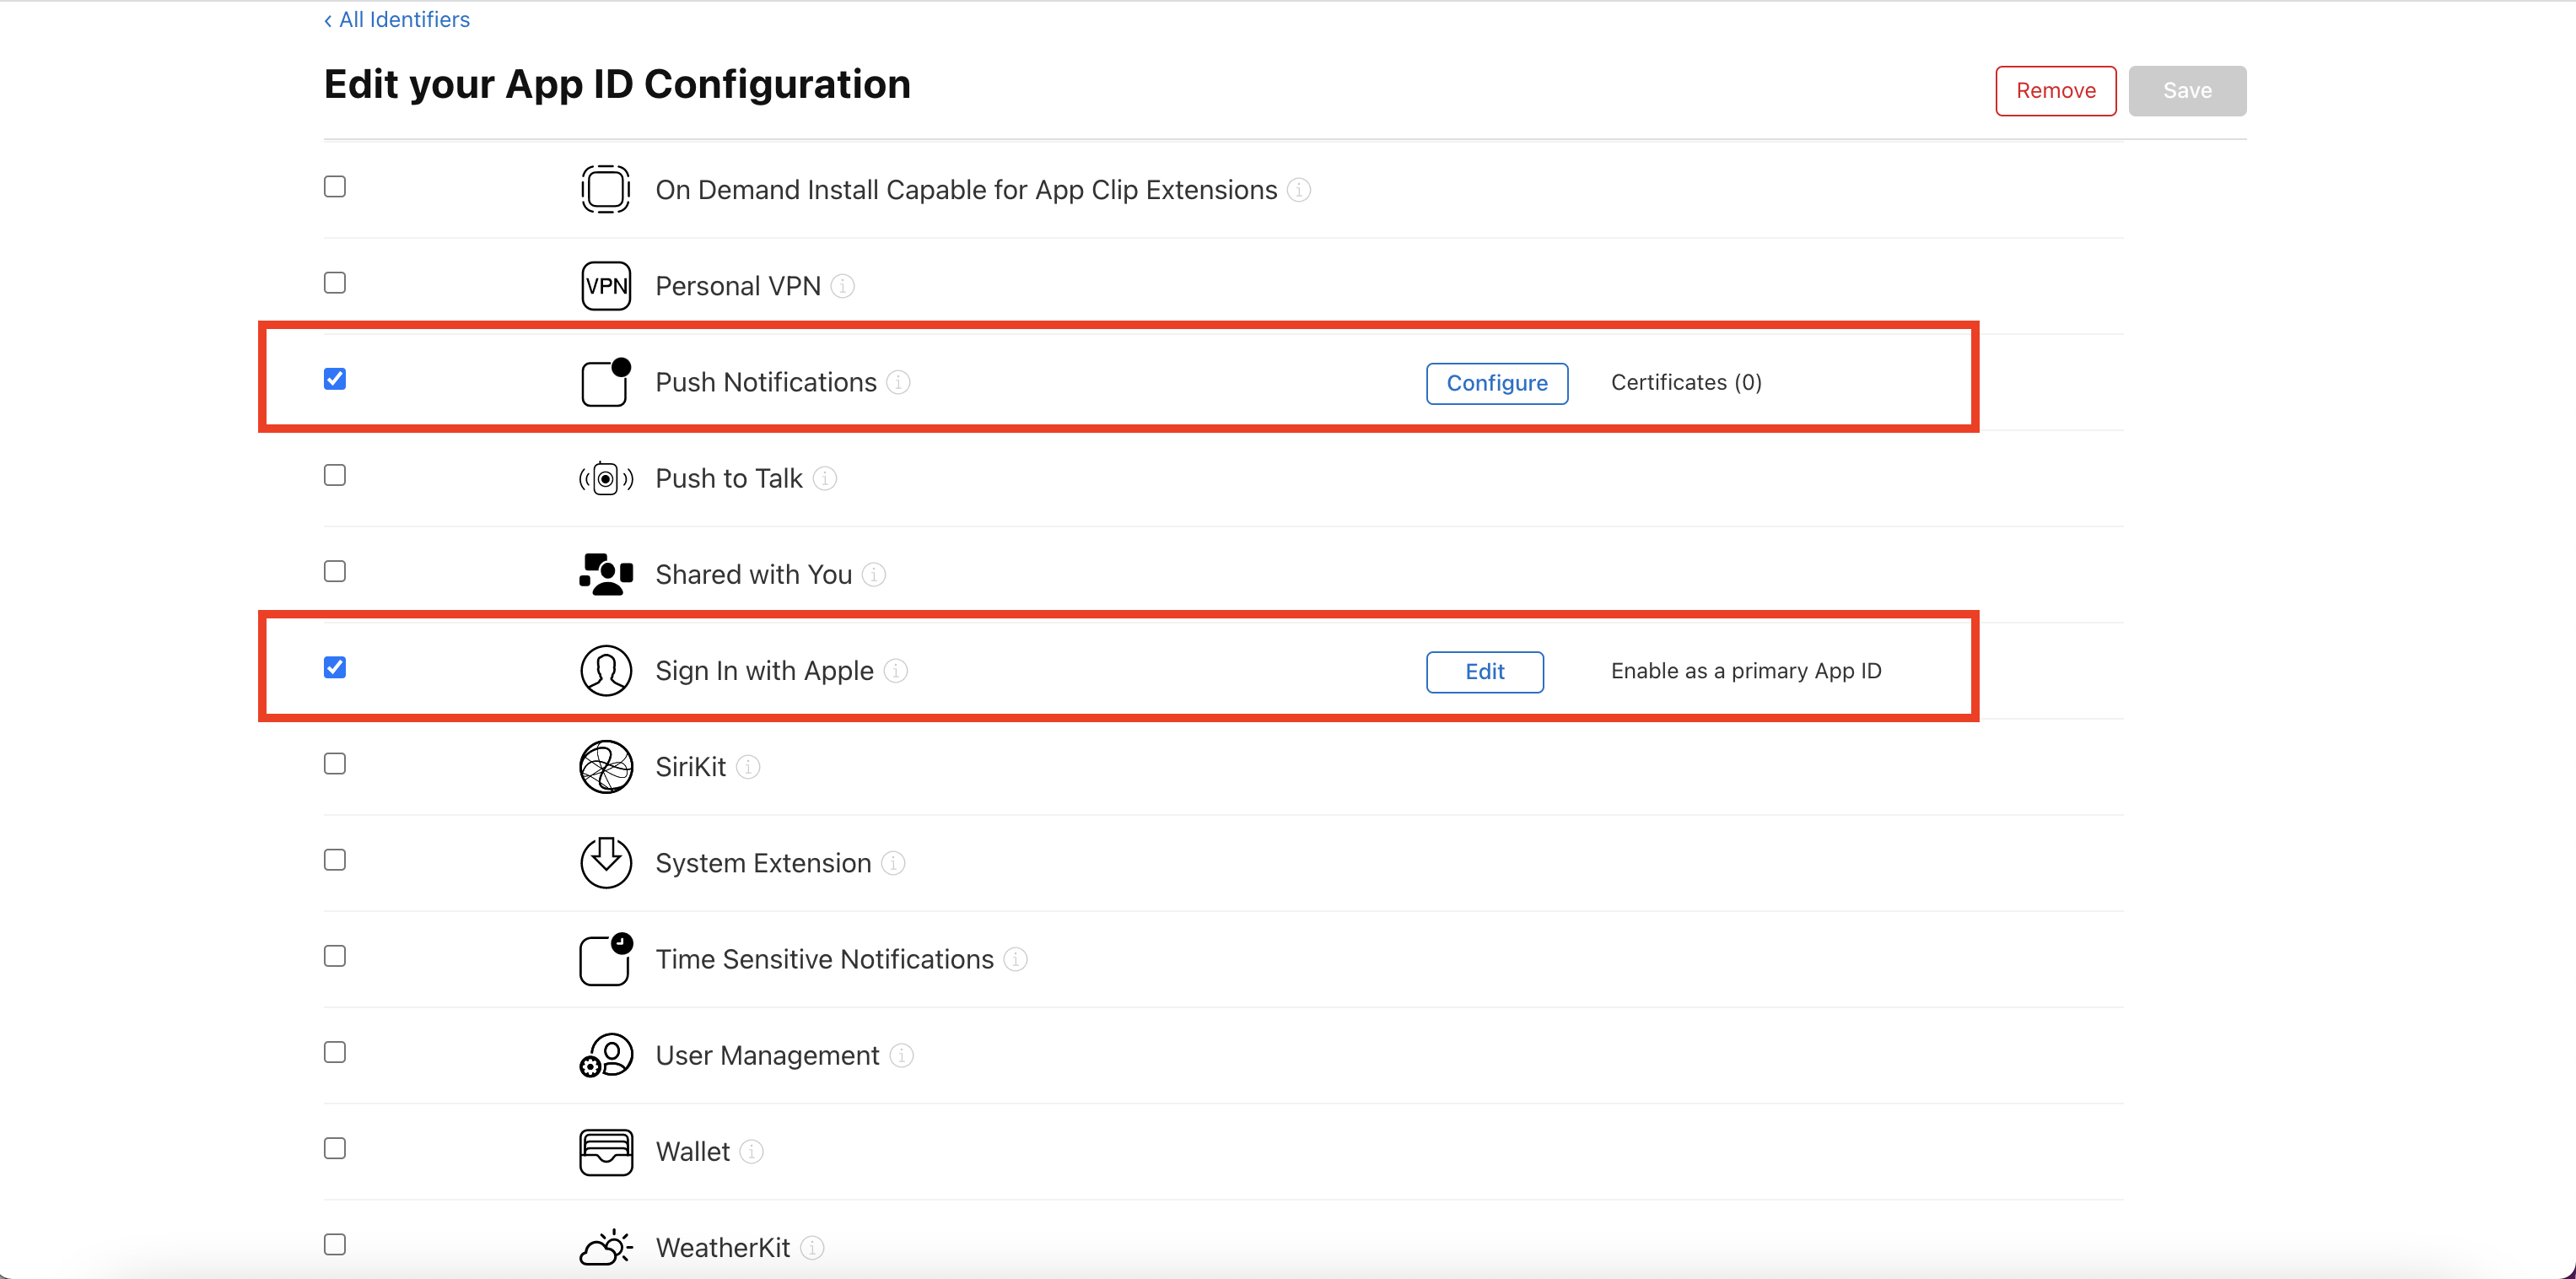
Step 3
Setup iOS app source code
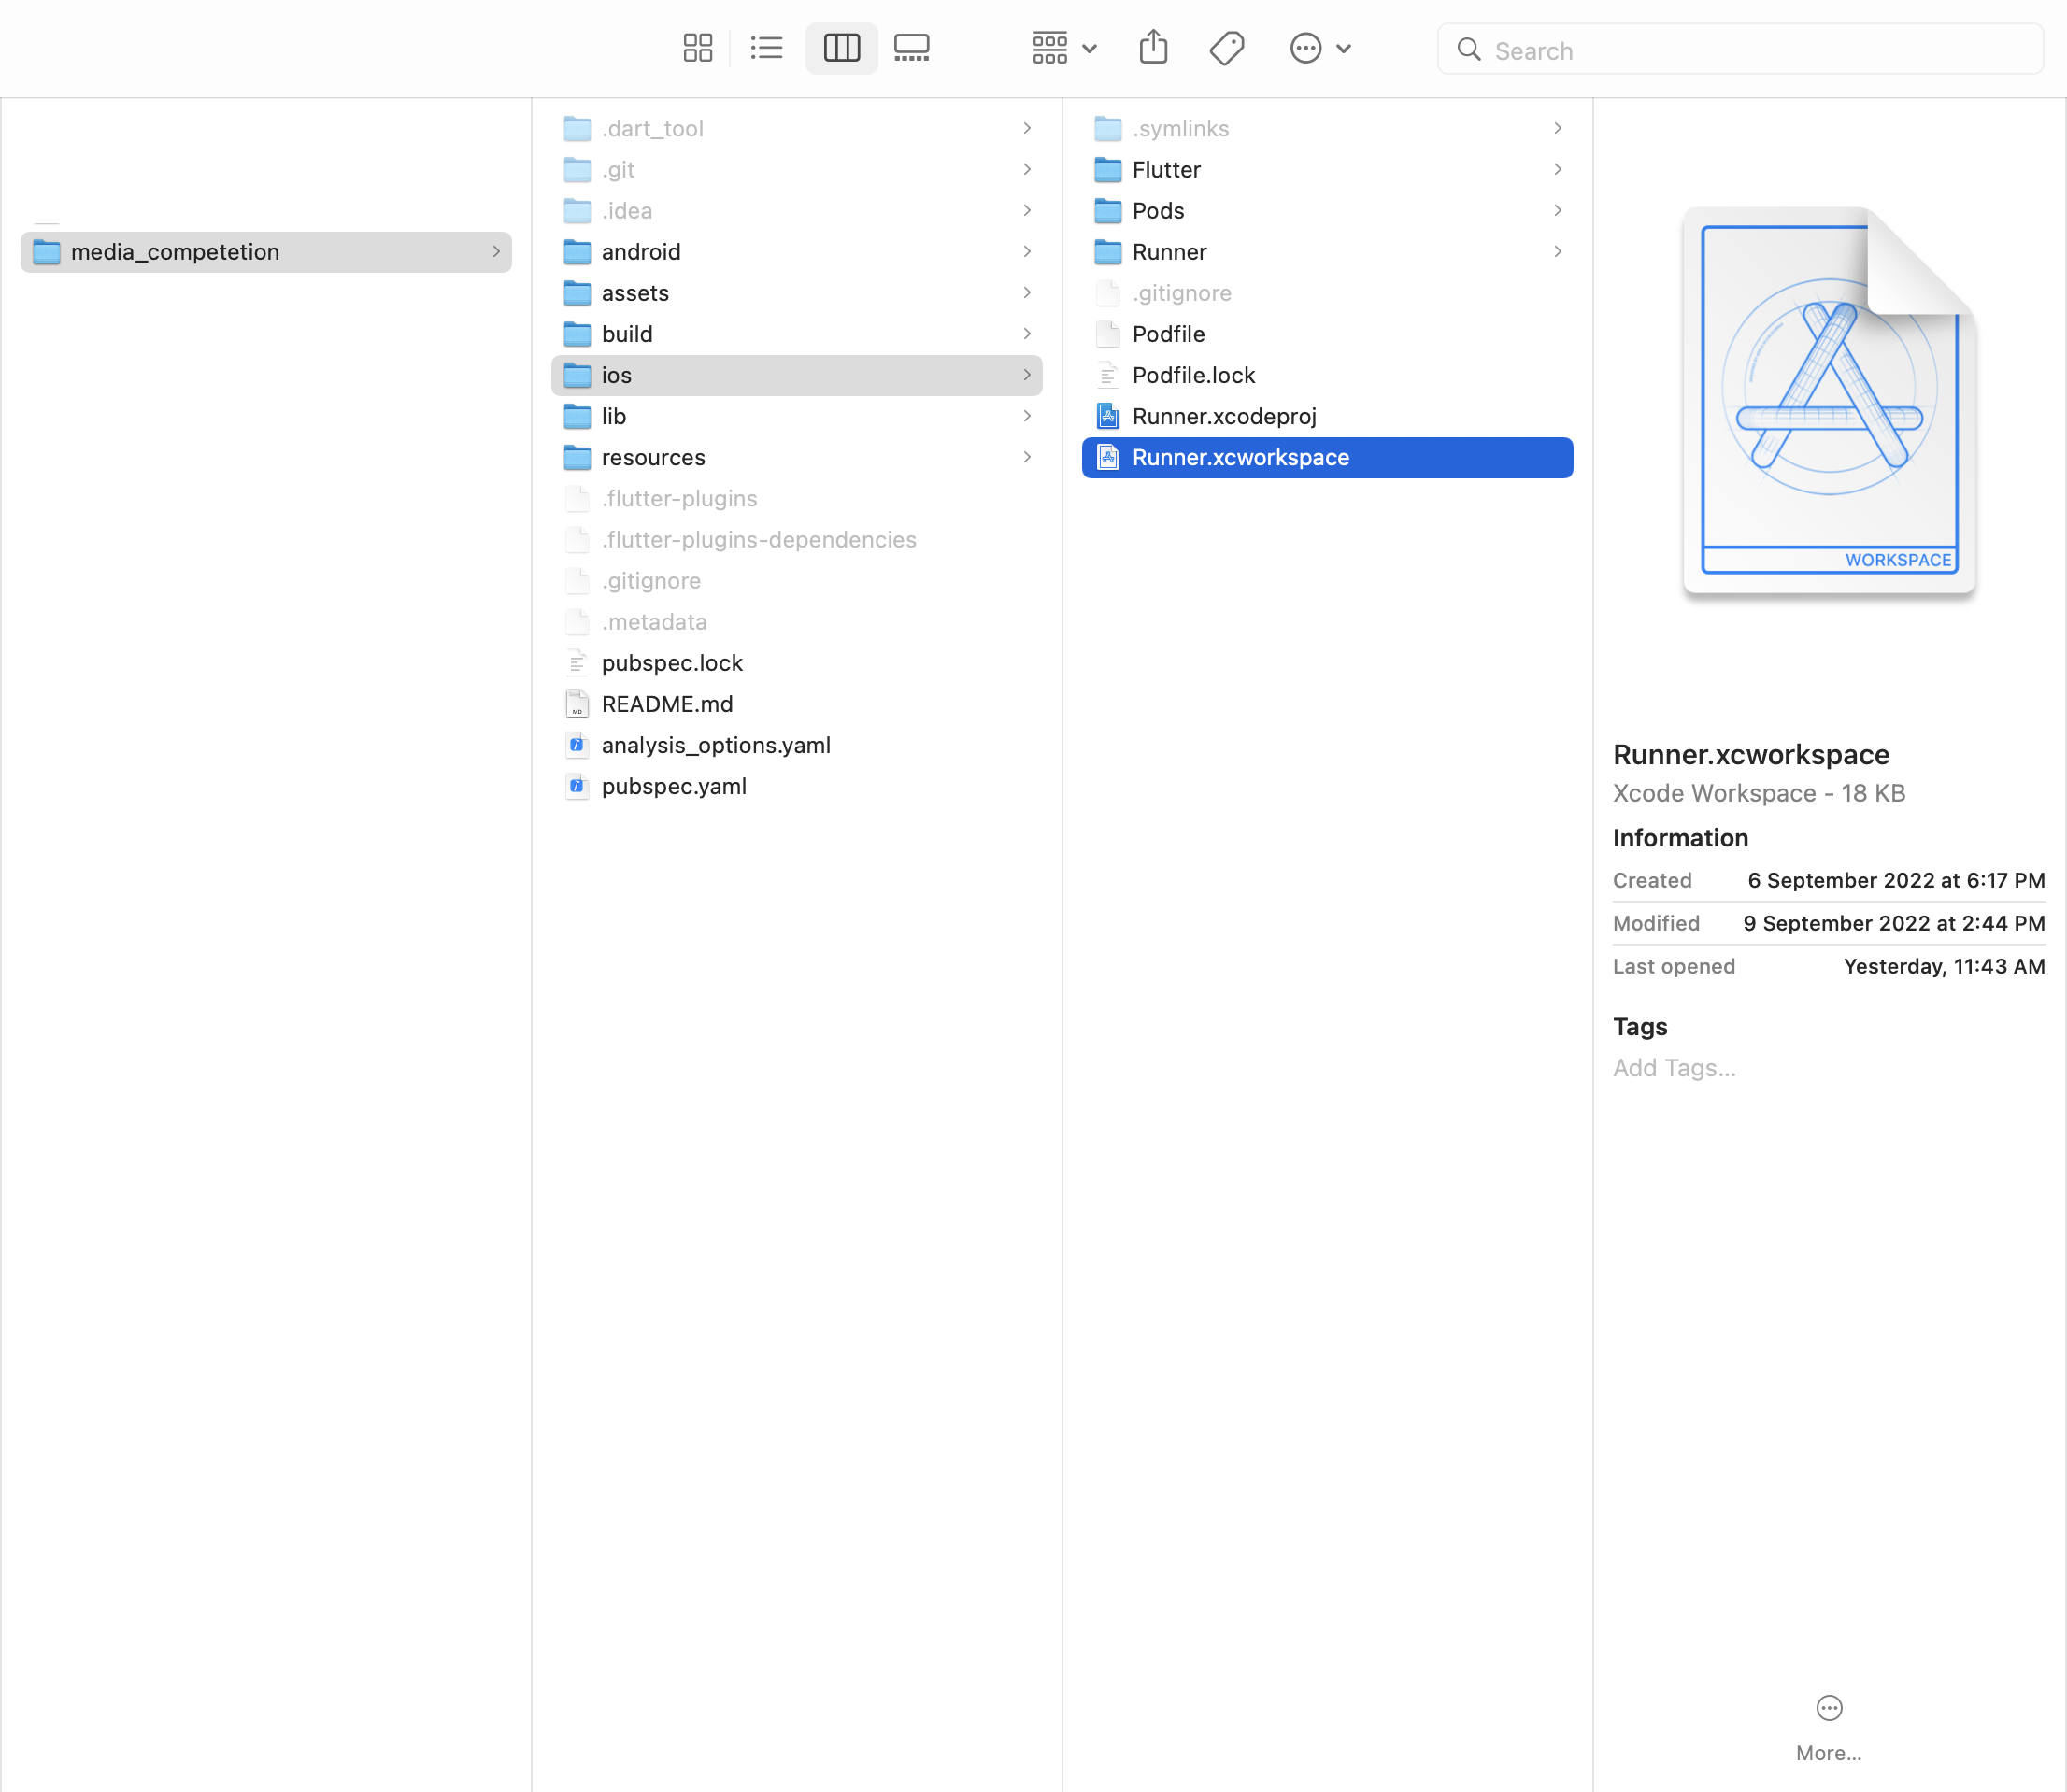
Change bundle identifier
Replace the bundle identifier with your created bundle identifier above in ios app setup in apple developer account
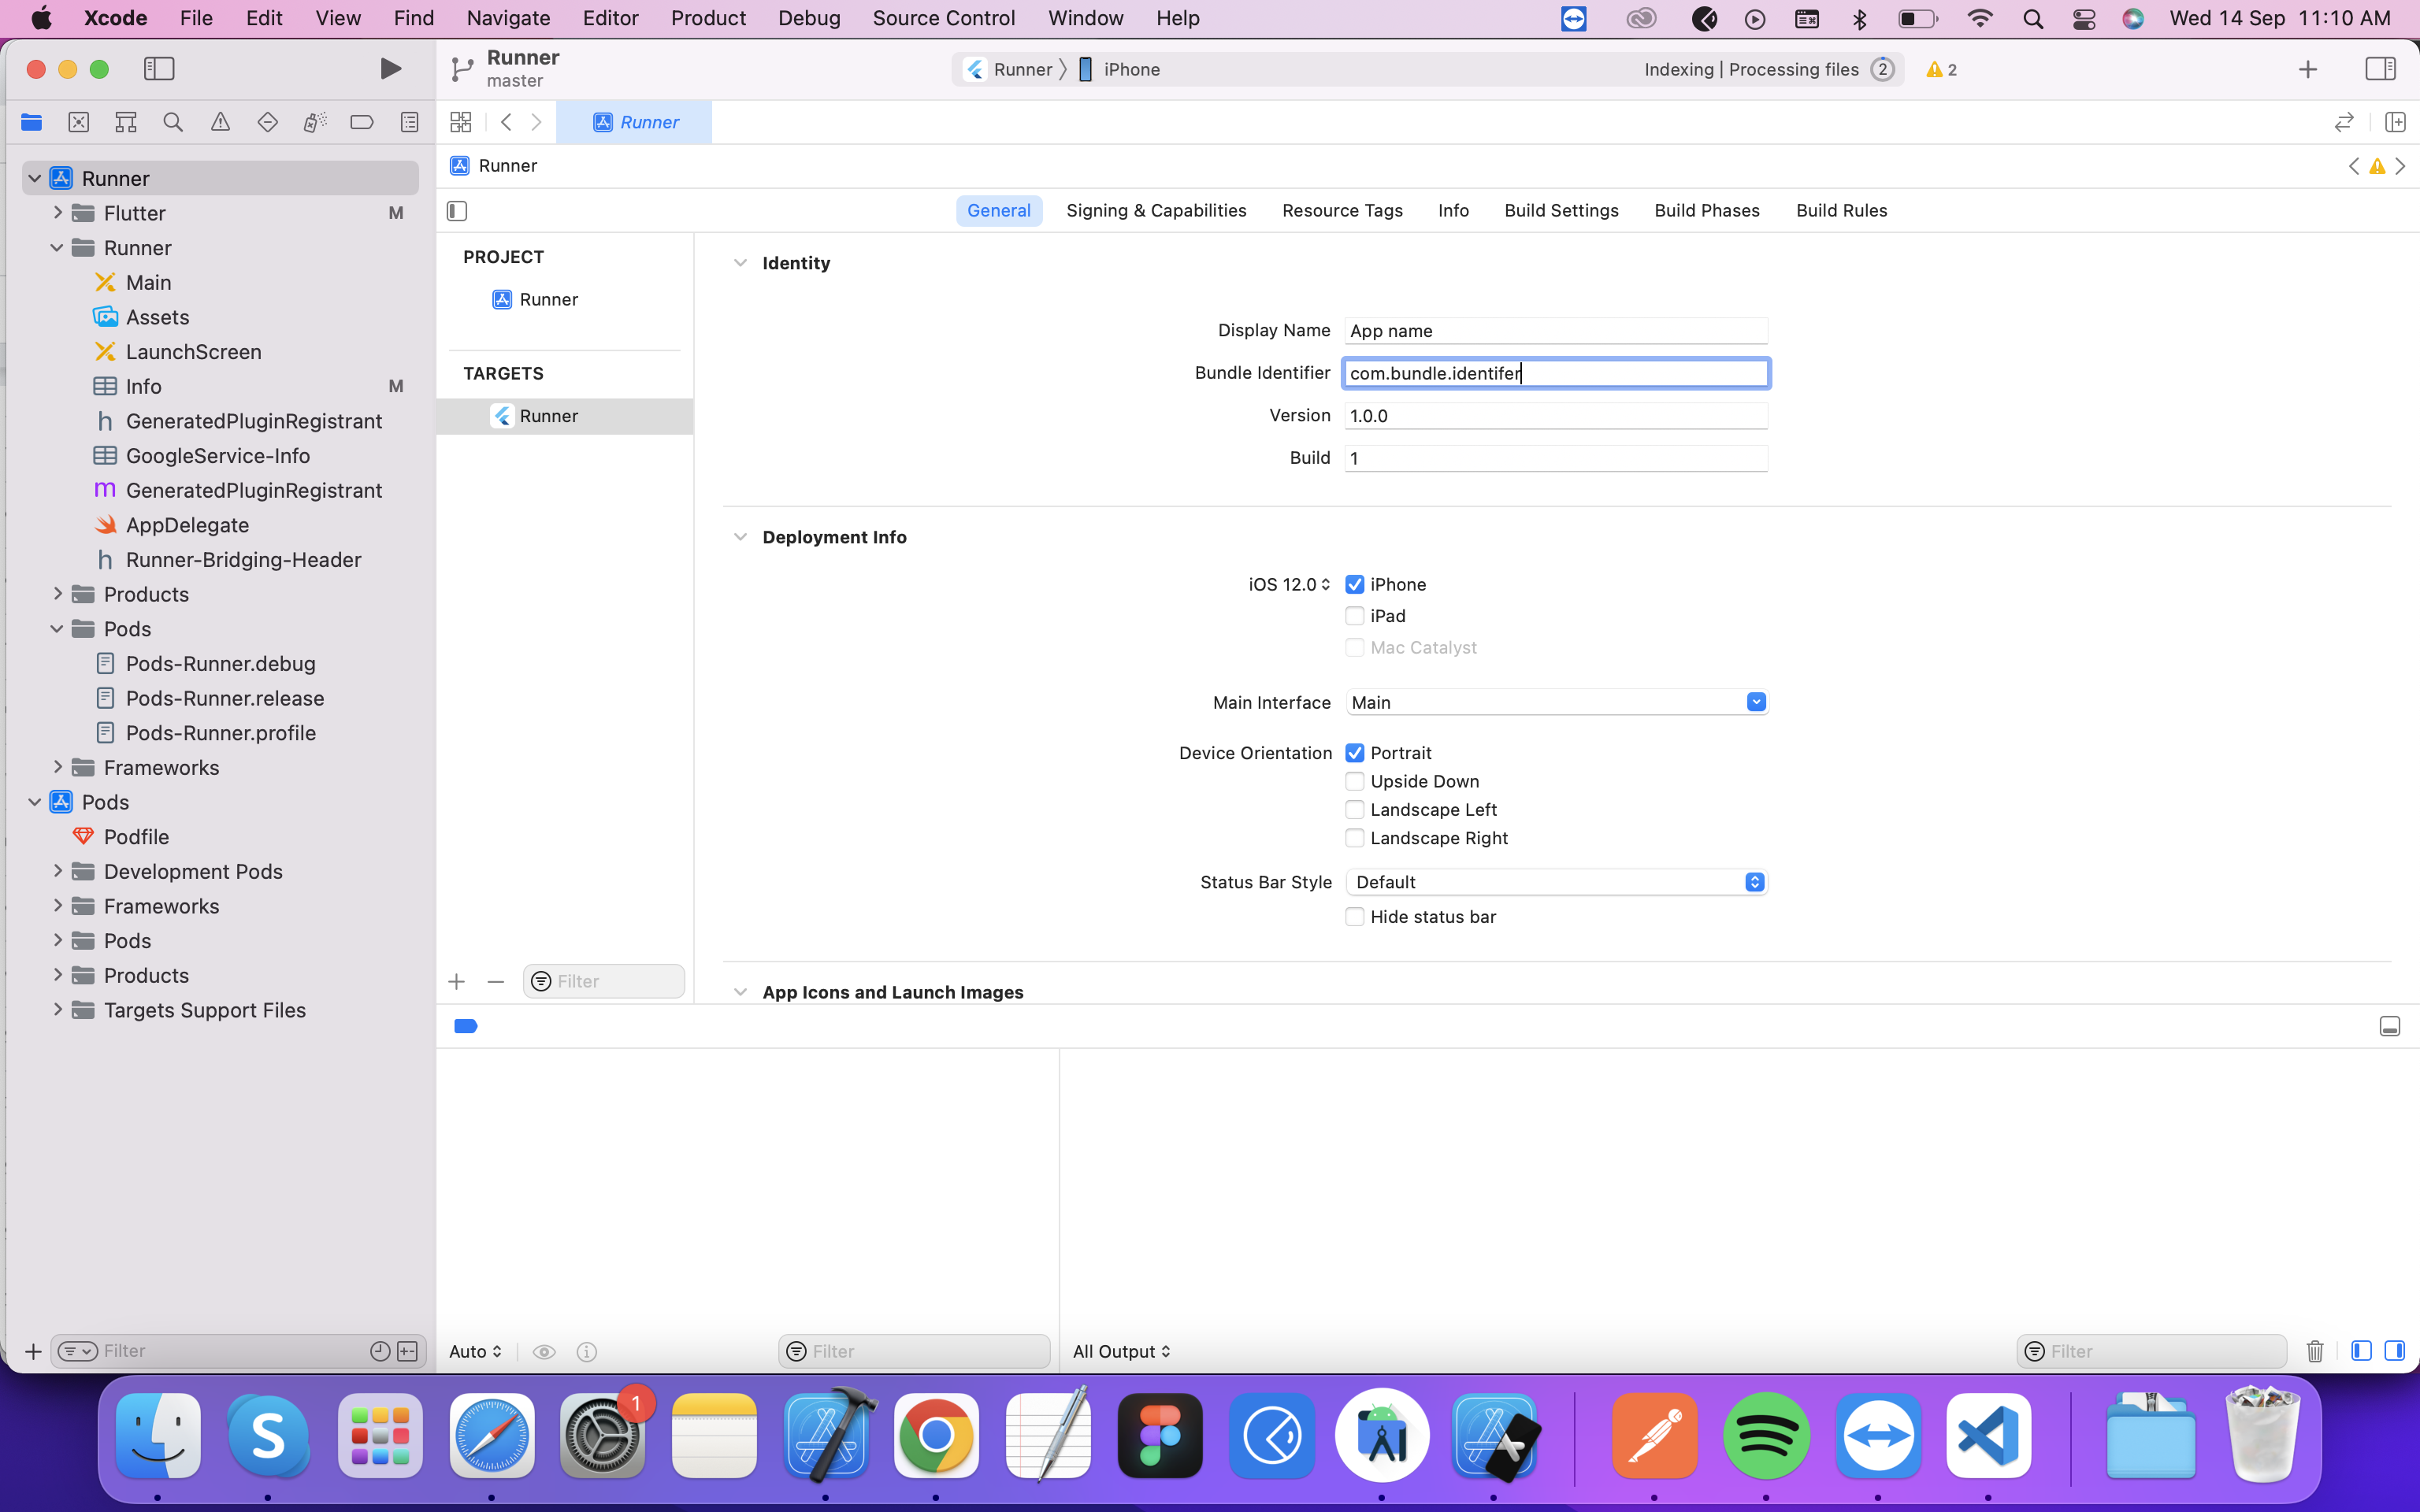
Change app name
Add new app name in display name field
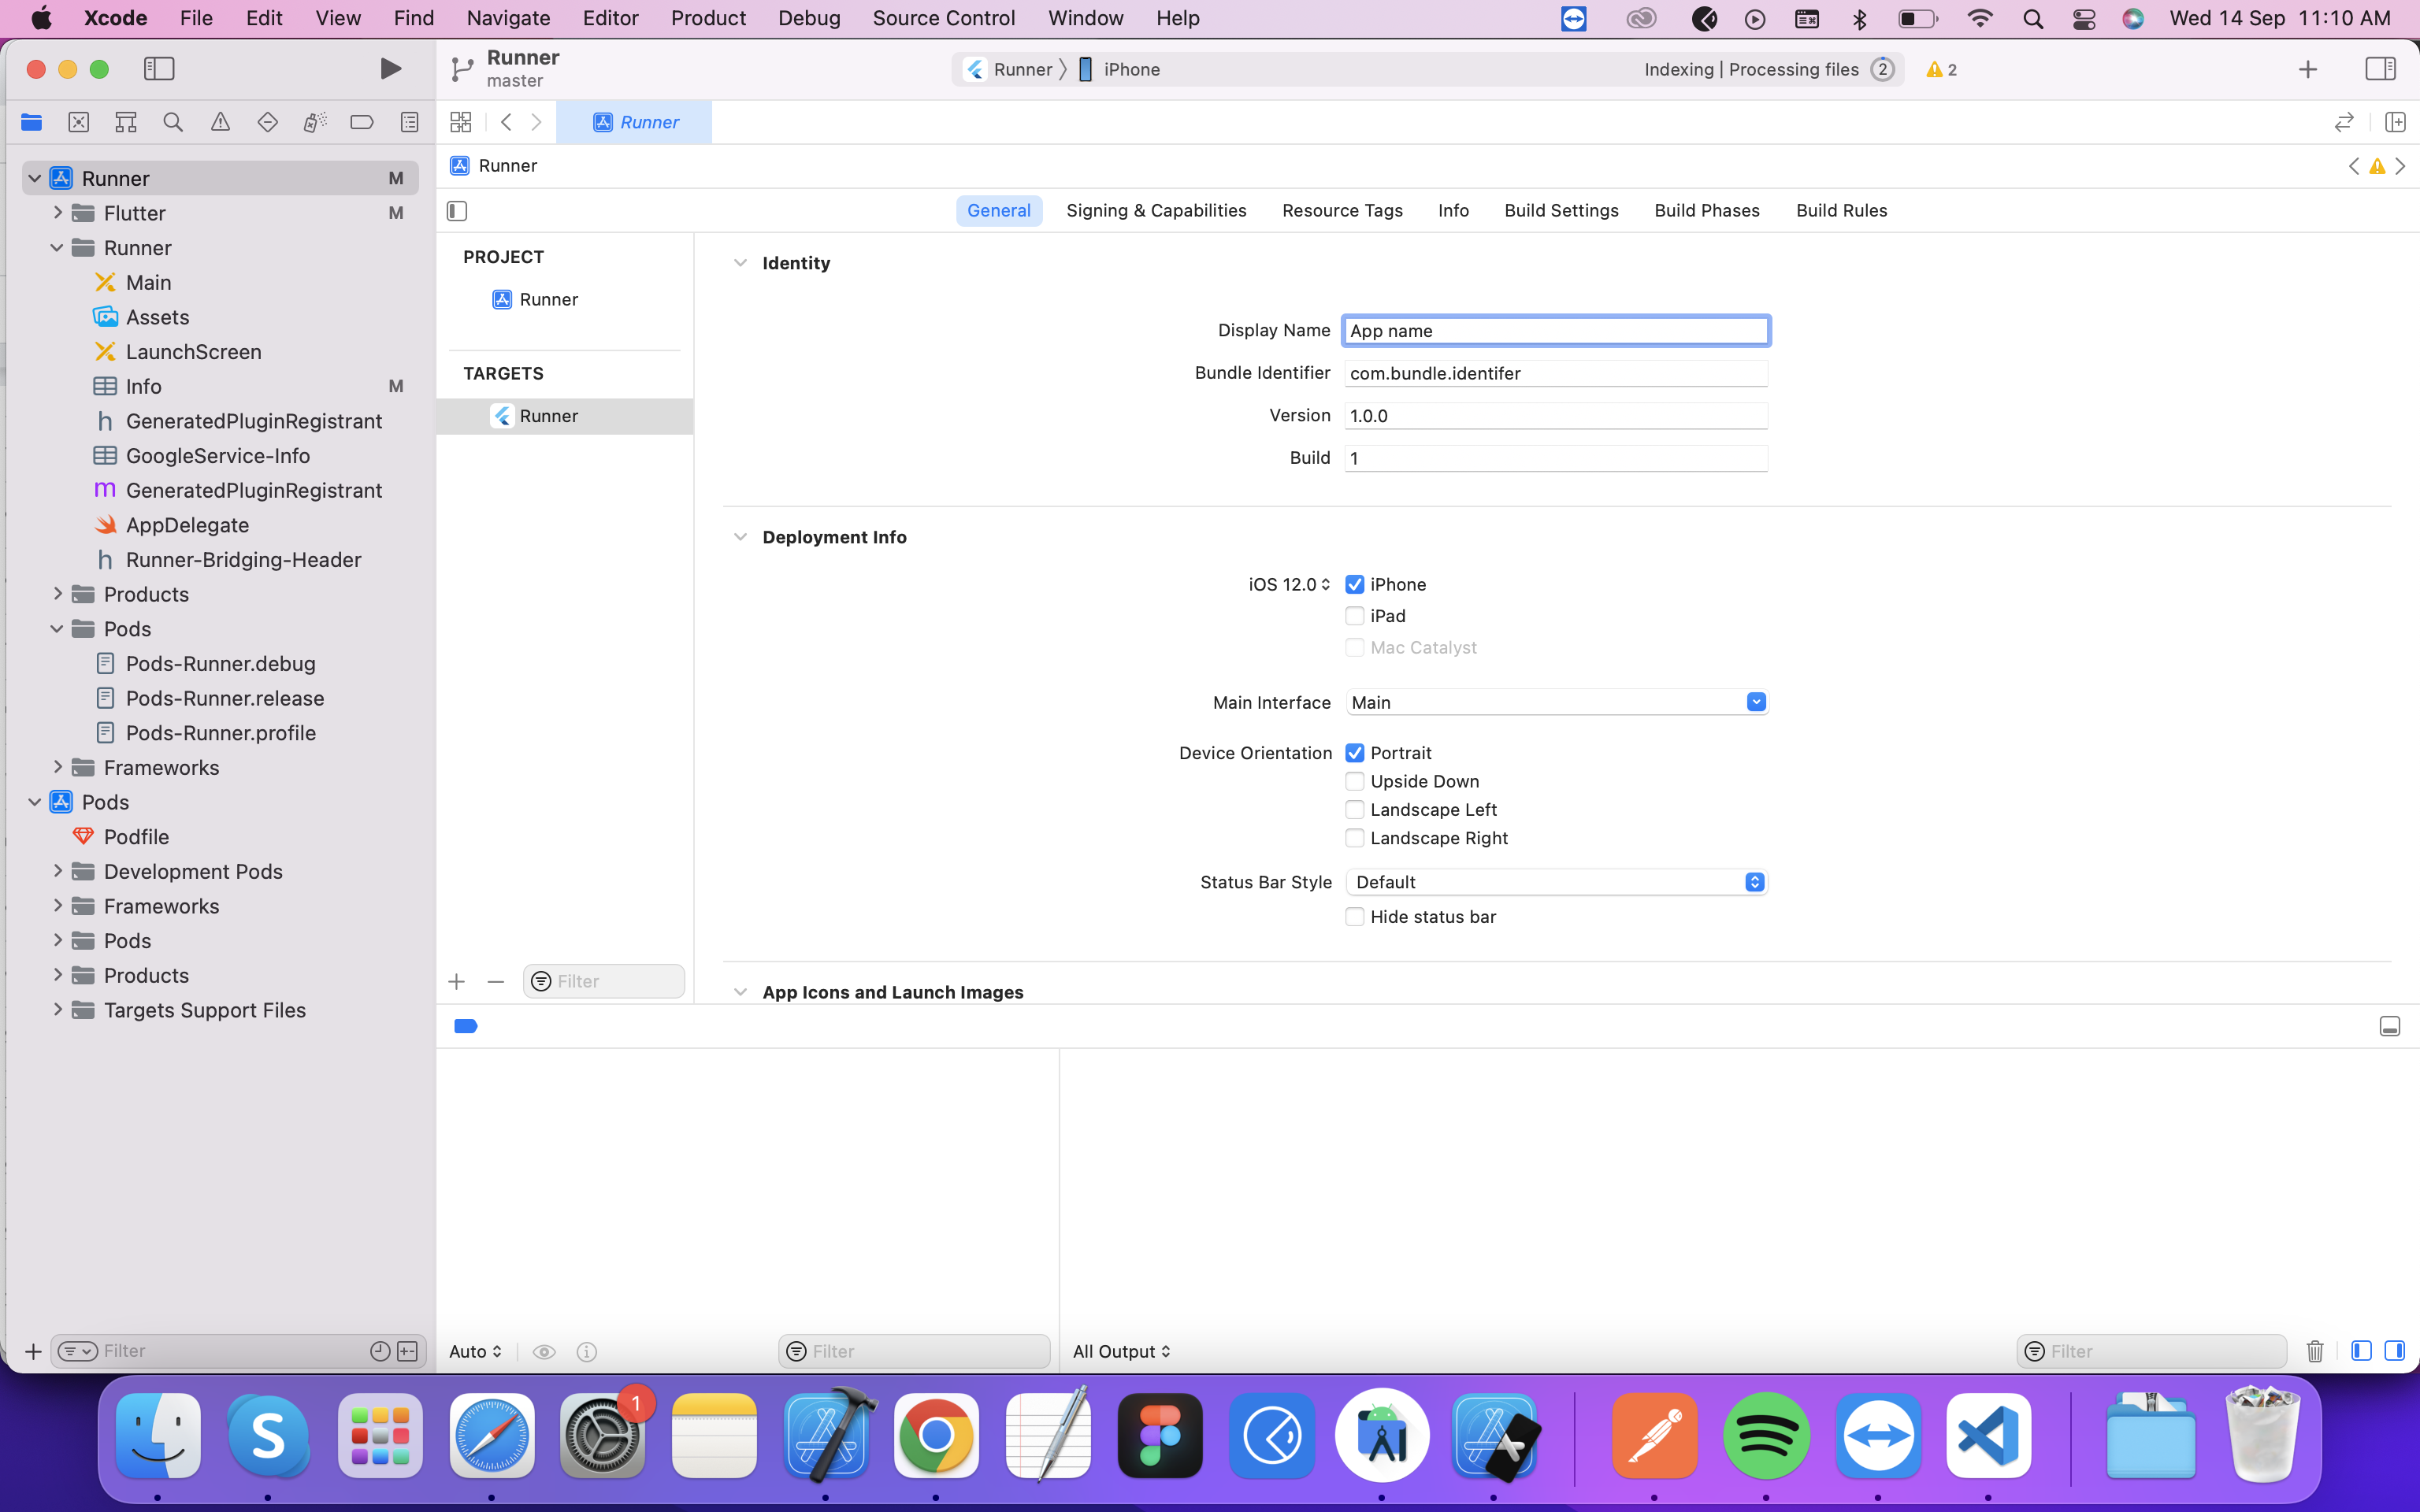
Change app icons
Go to "Assets.xcassets" folder and replace app icon as shown in below screenshot
![]()
Android app setup
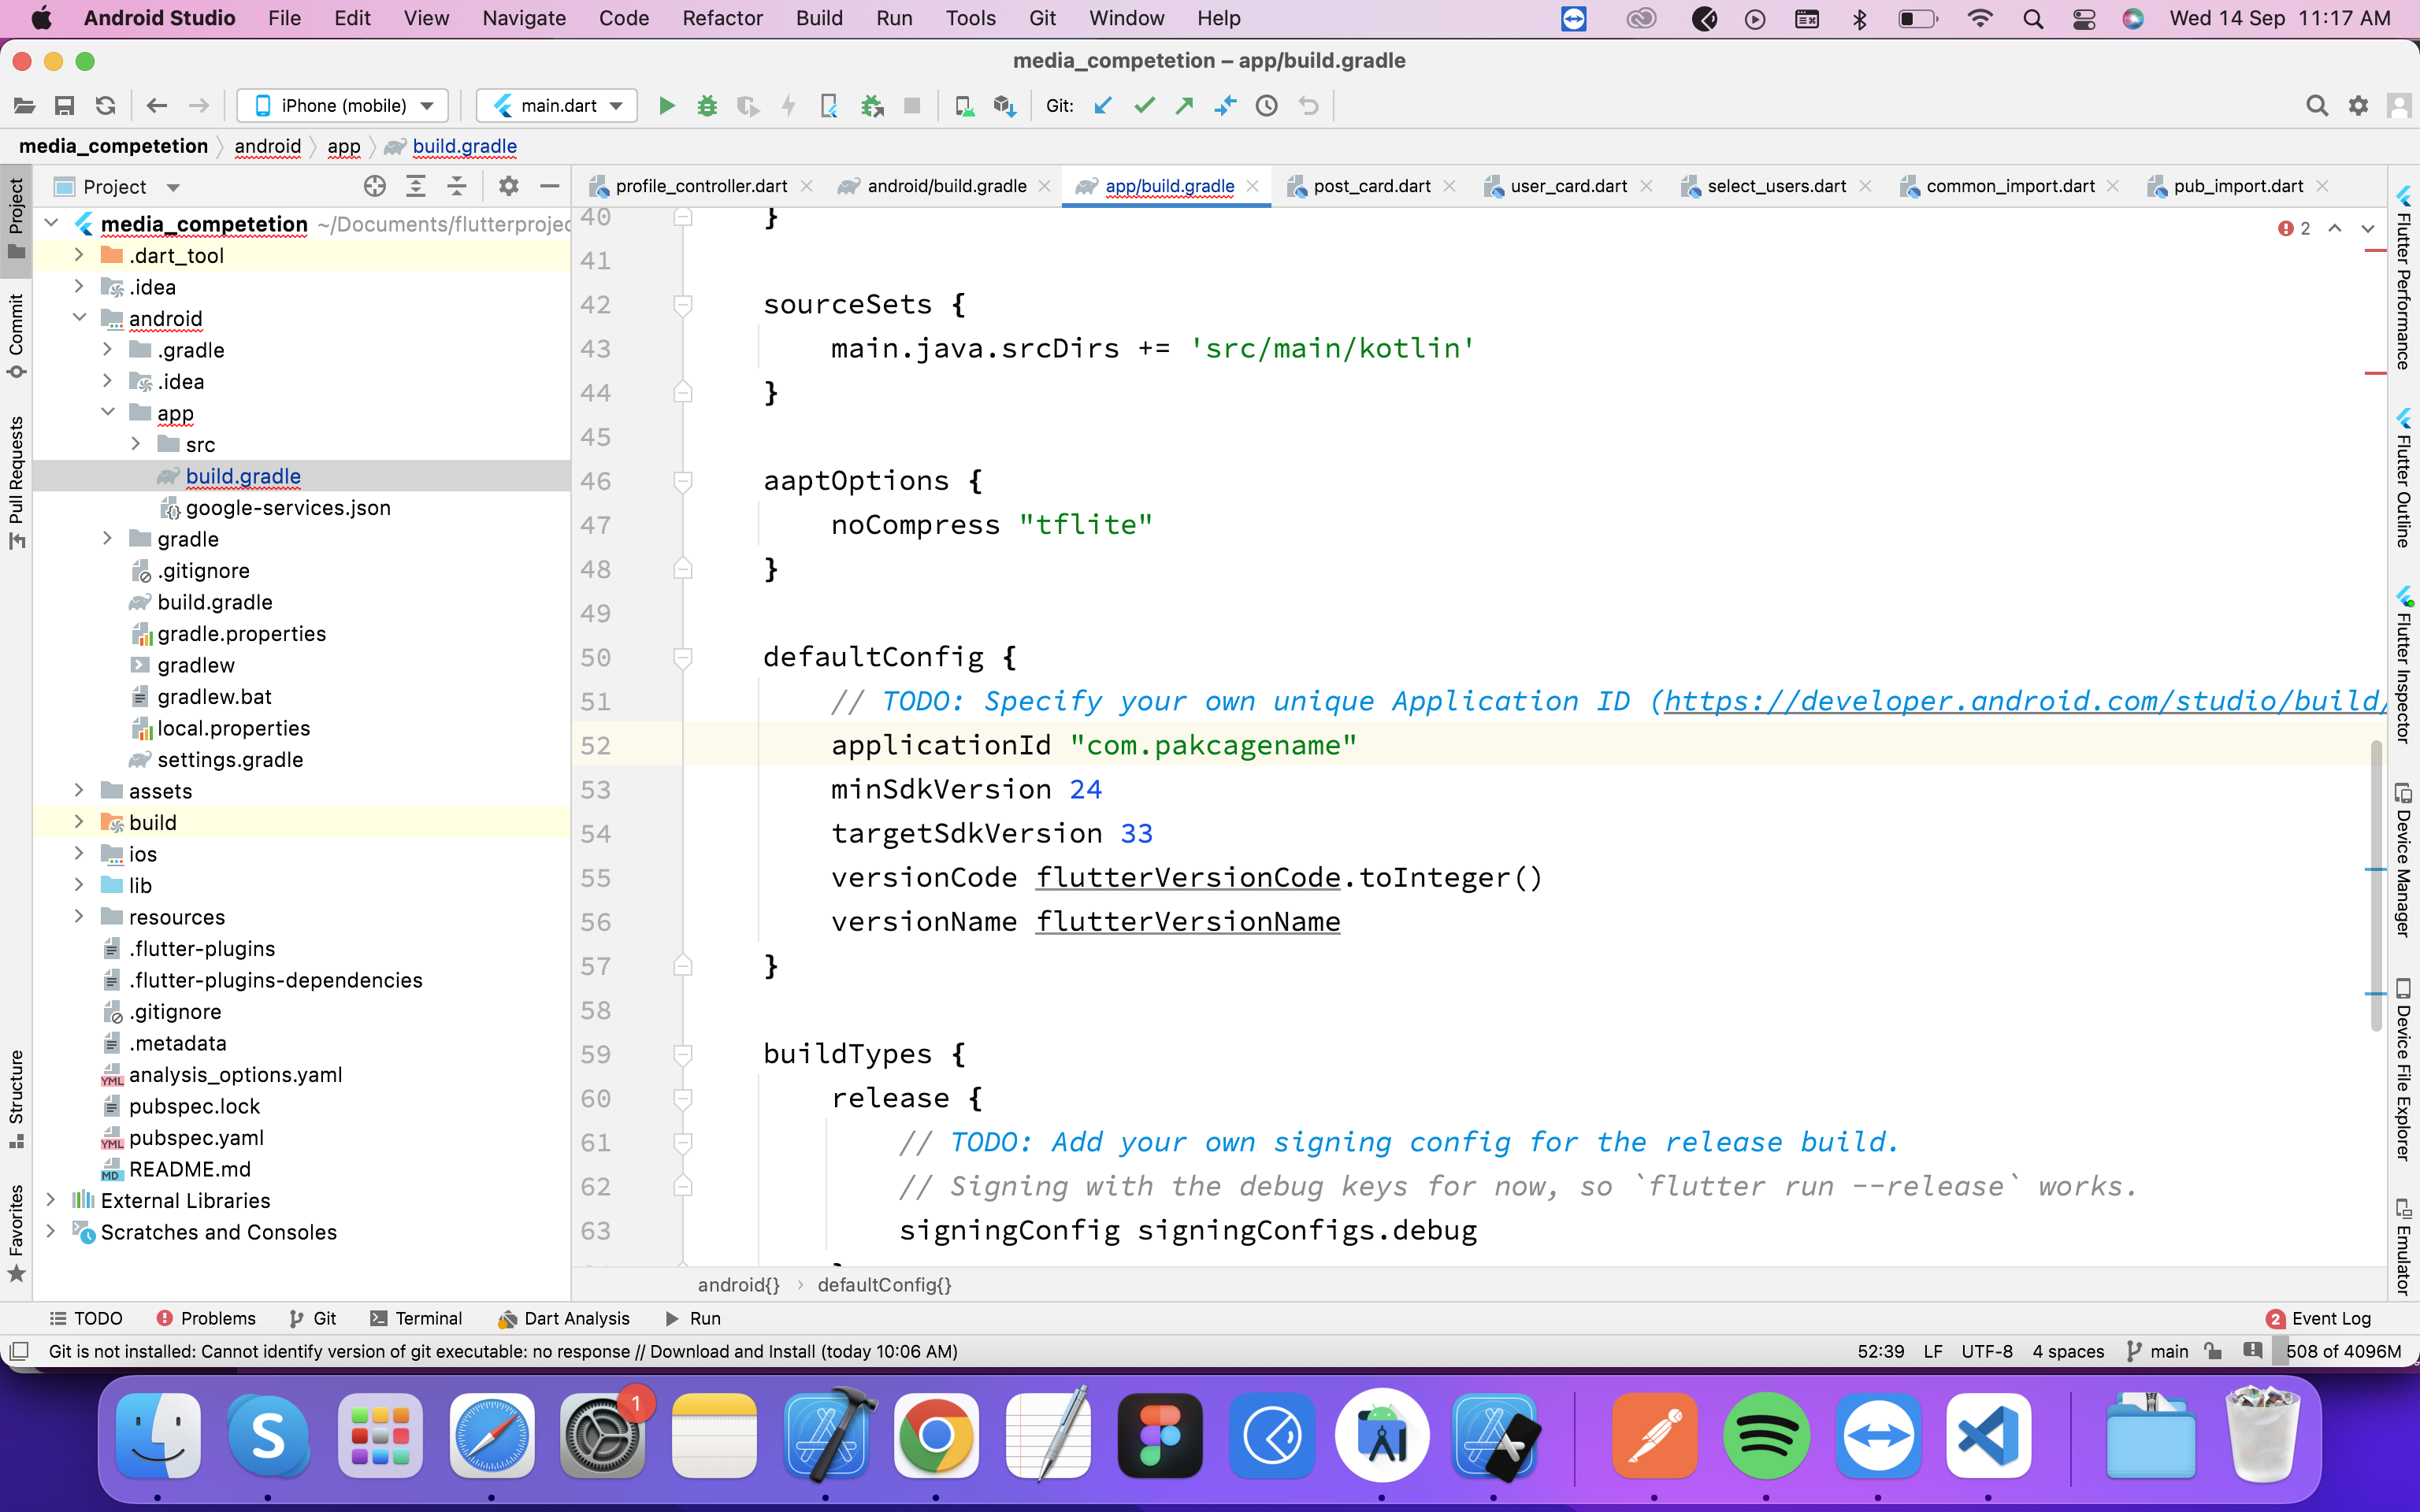
Step 1Replace package name
Open the "build.gradle" file in android code, Replace the package with your own created package name as shown in below screenshot.
Change app name
Step 2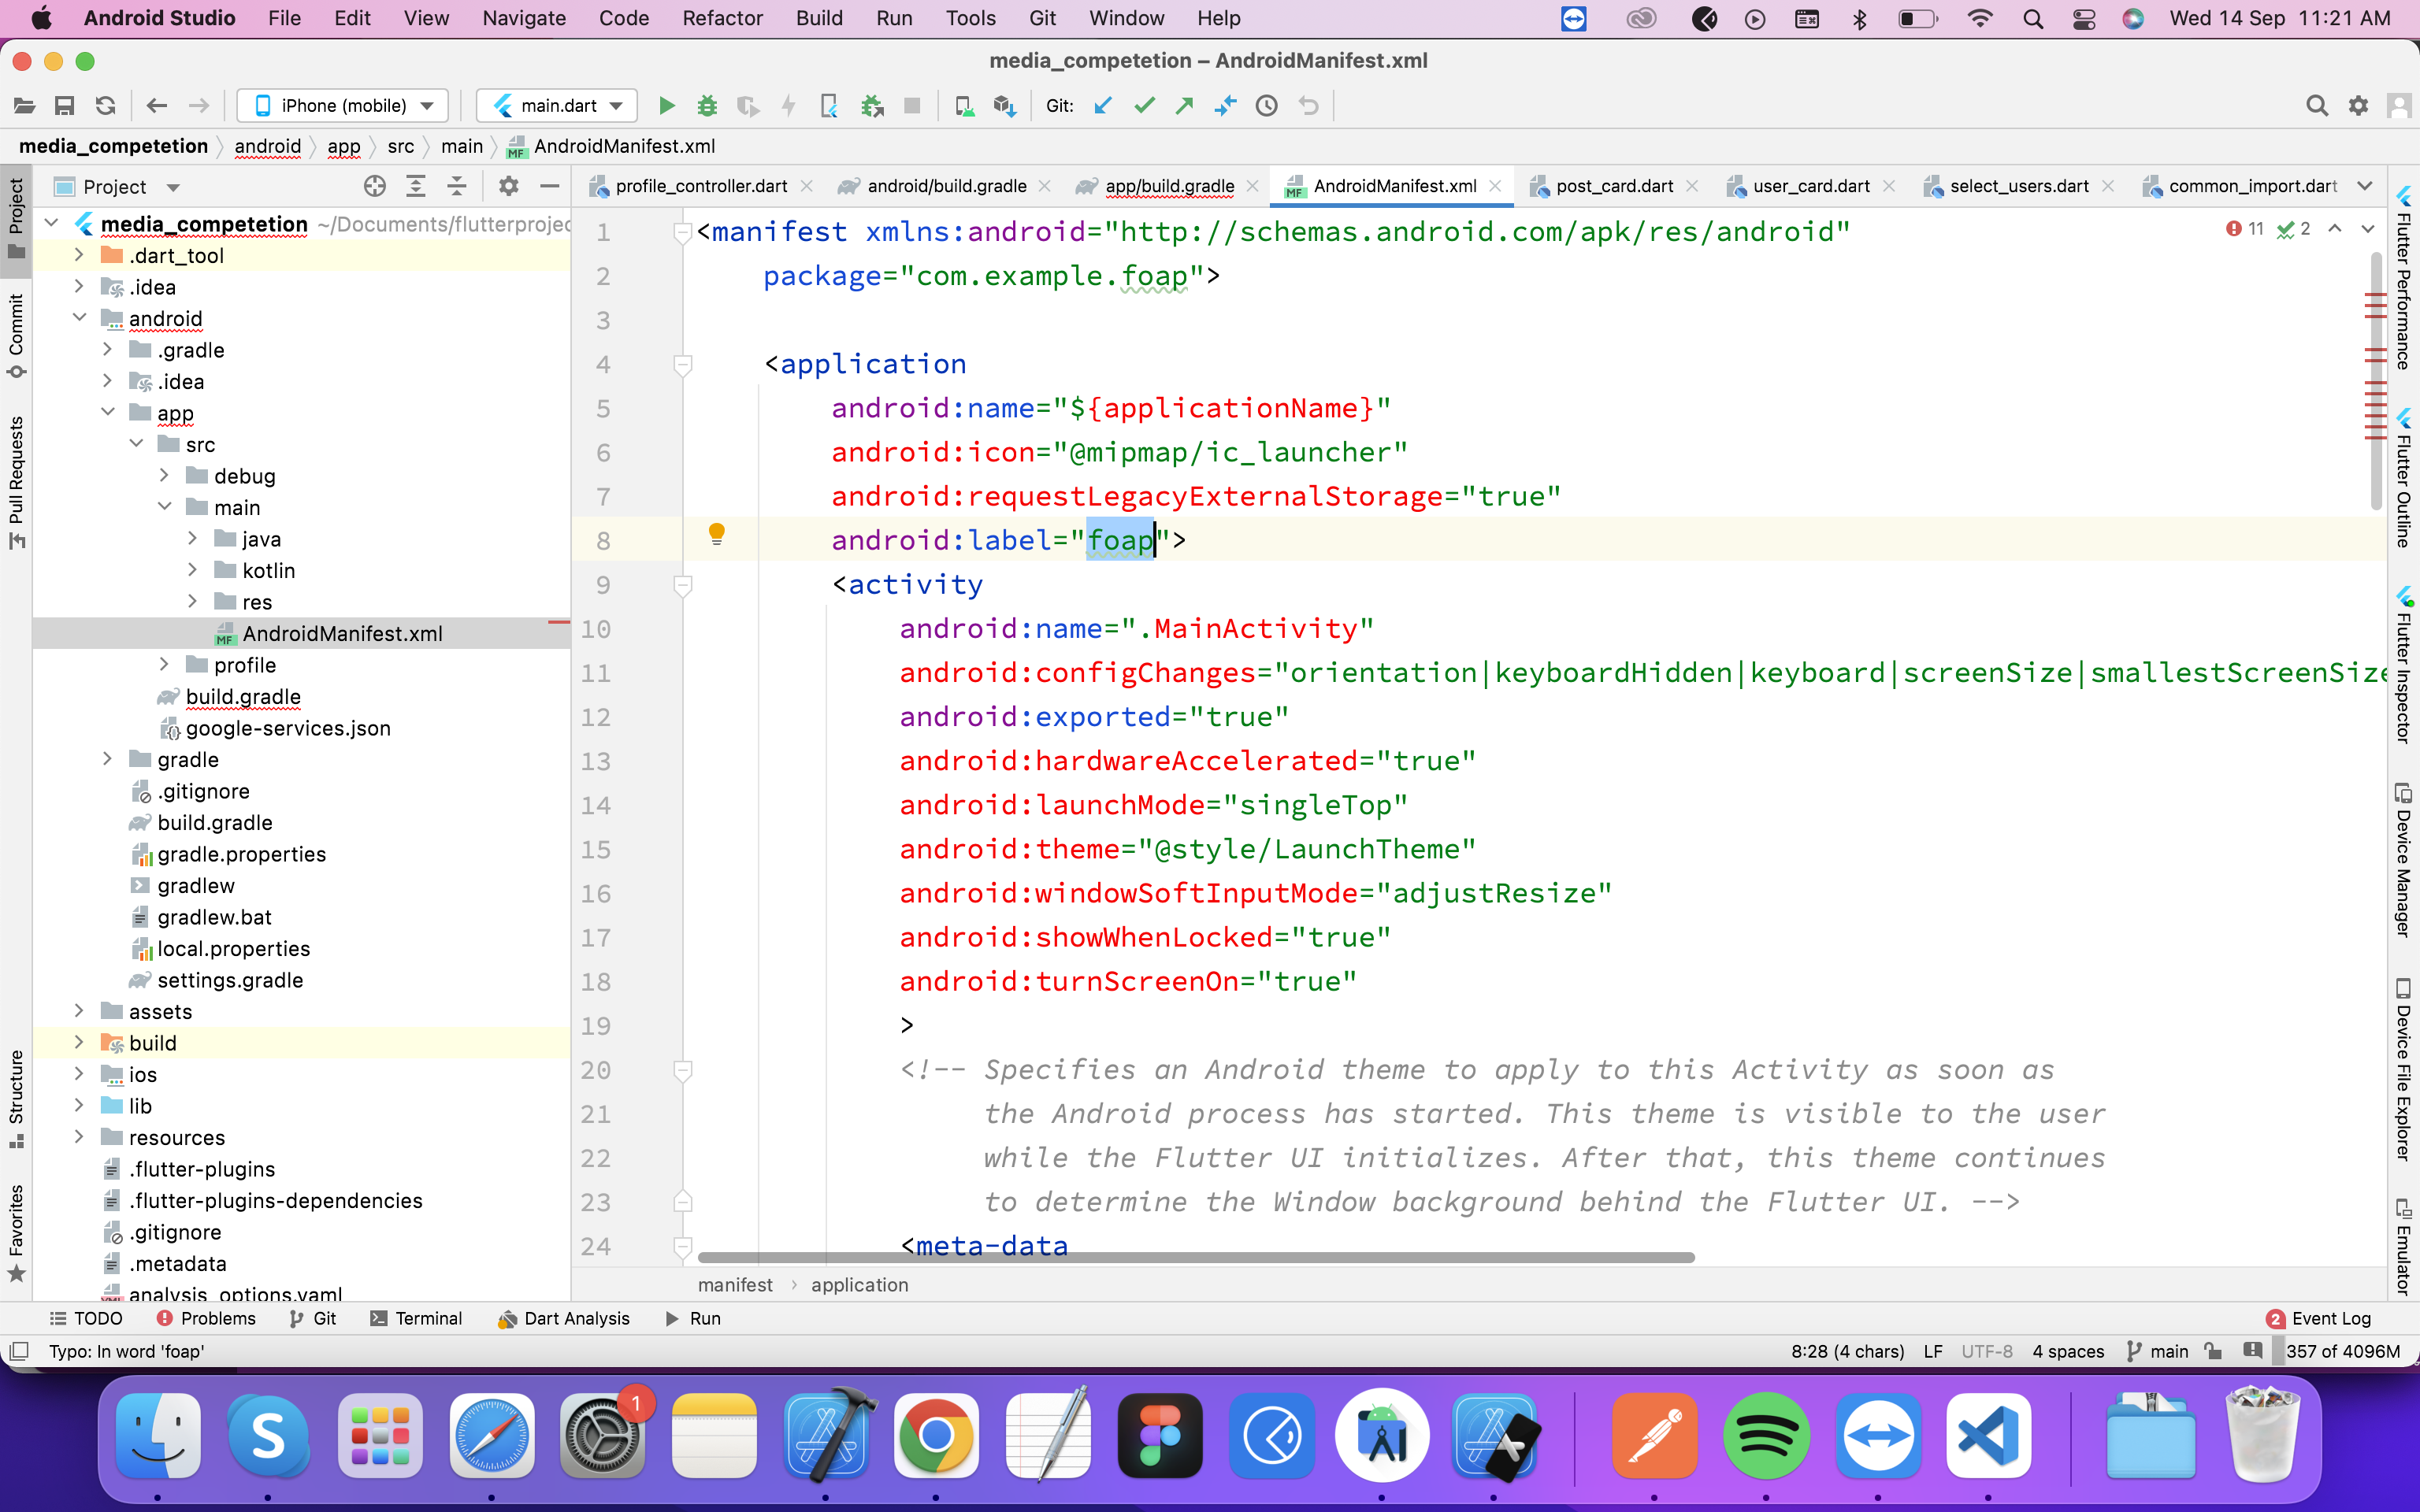
Change app icons
Step 3![]()
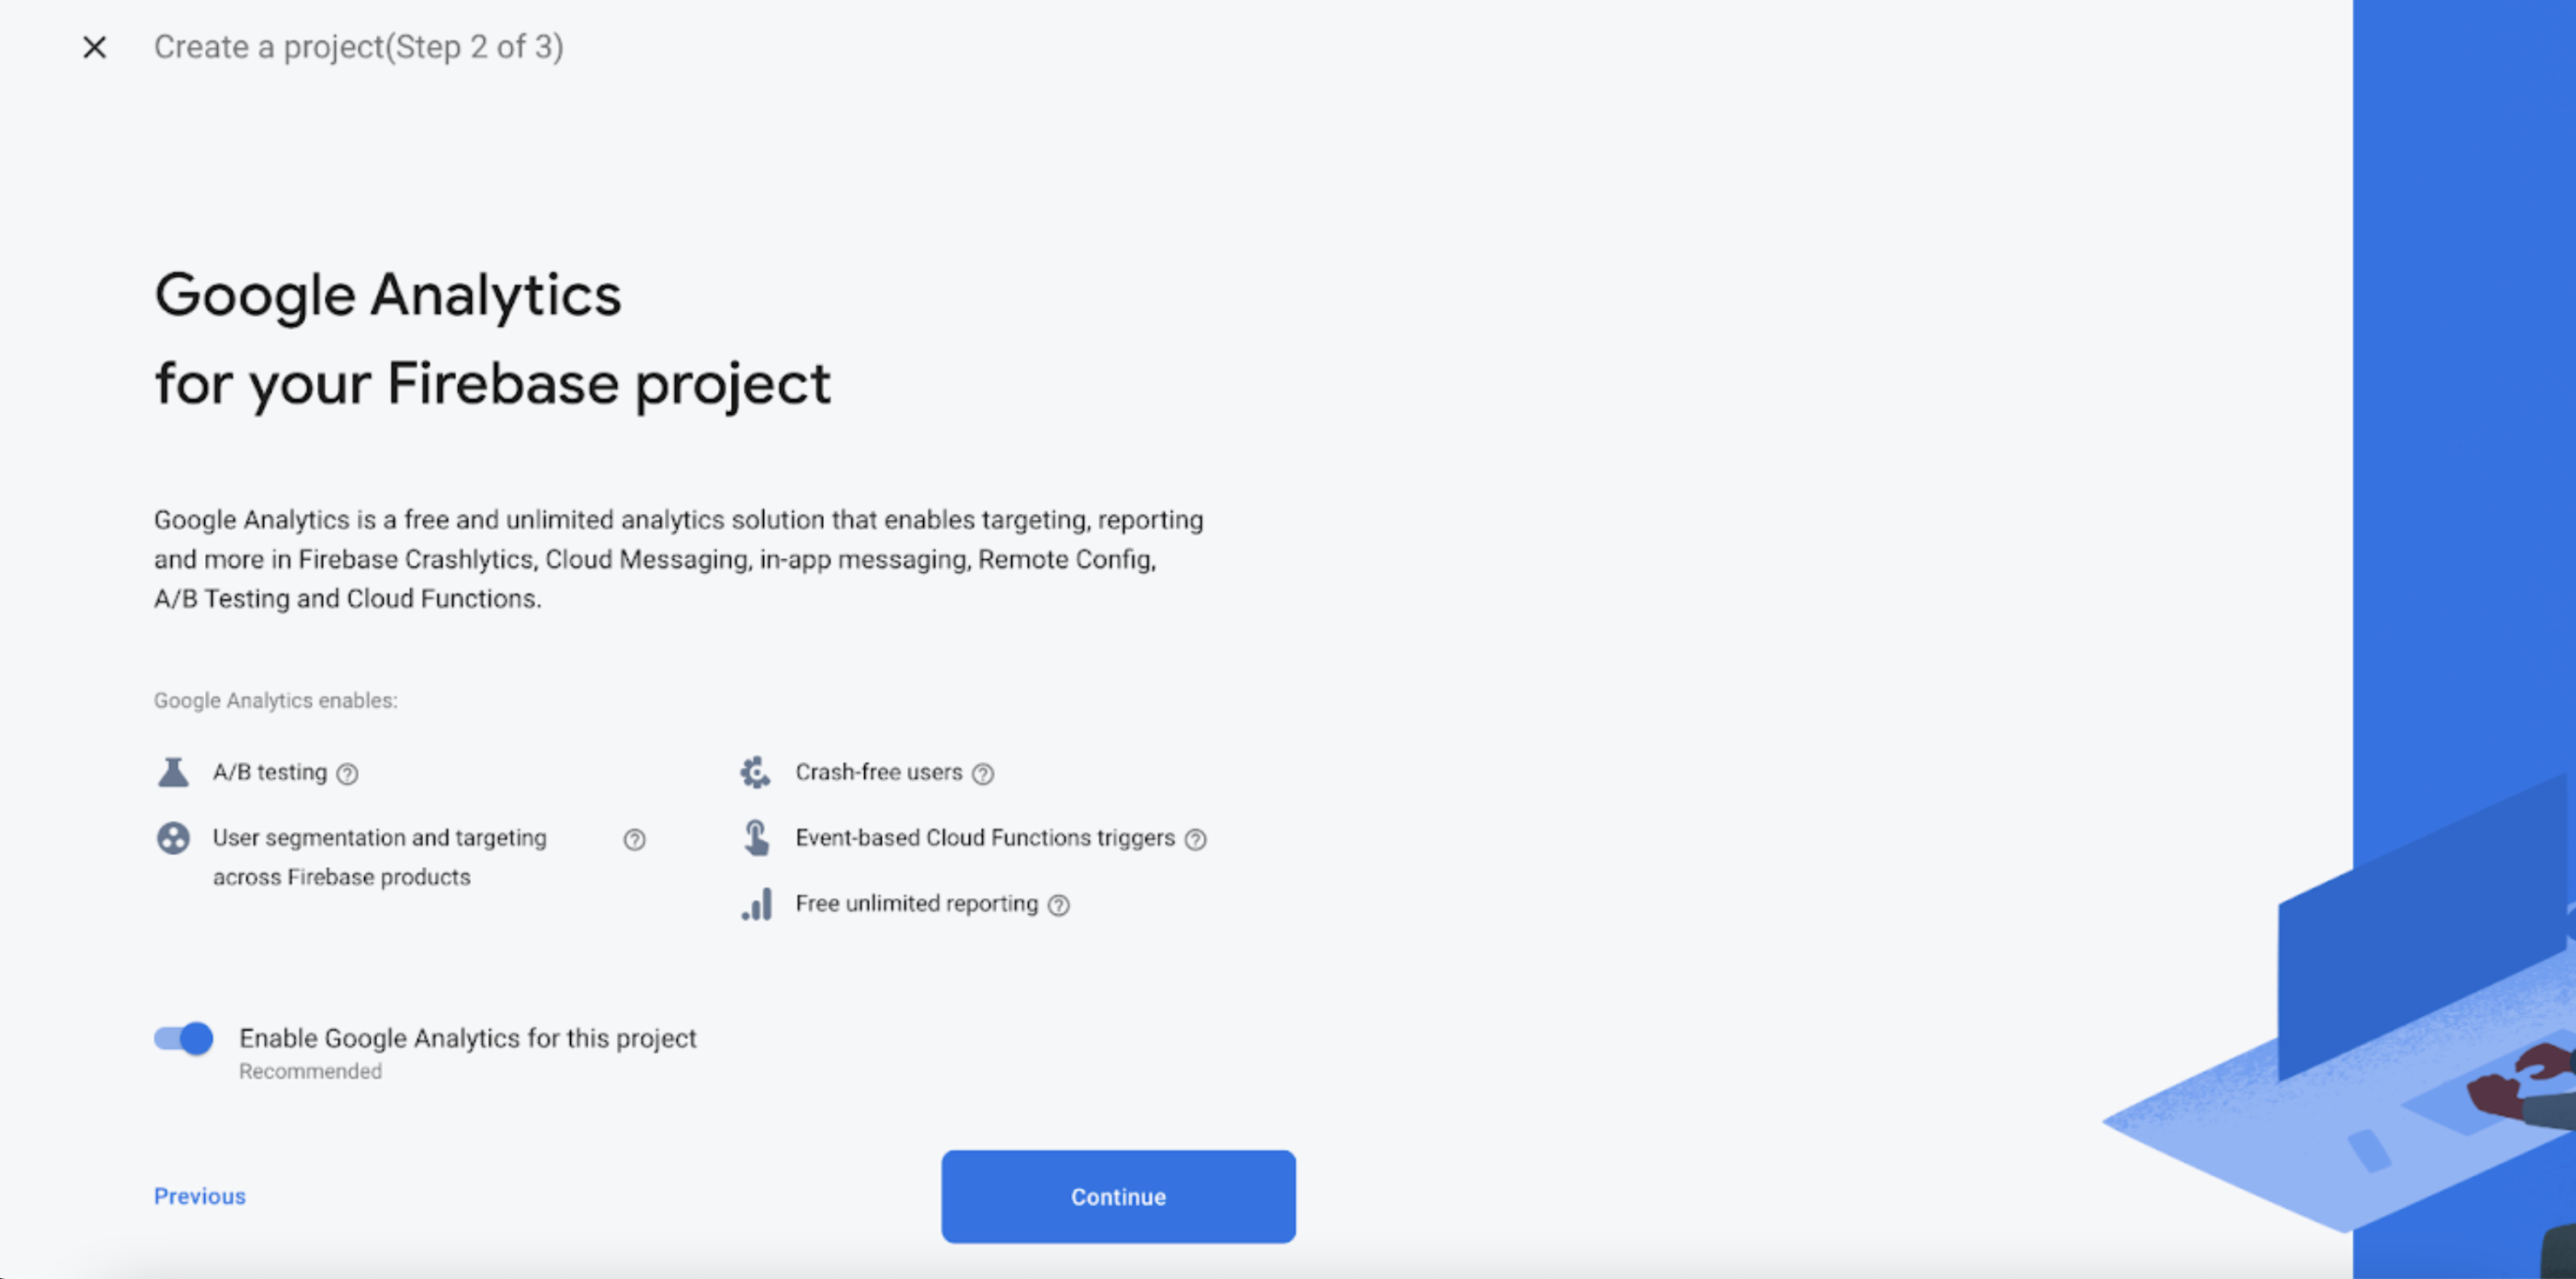
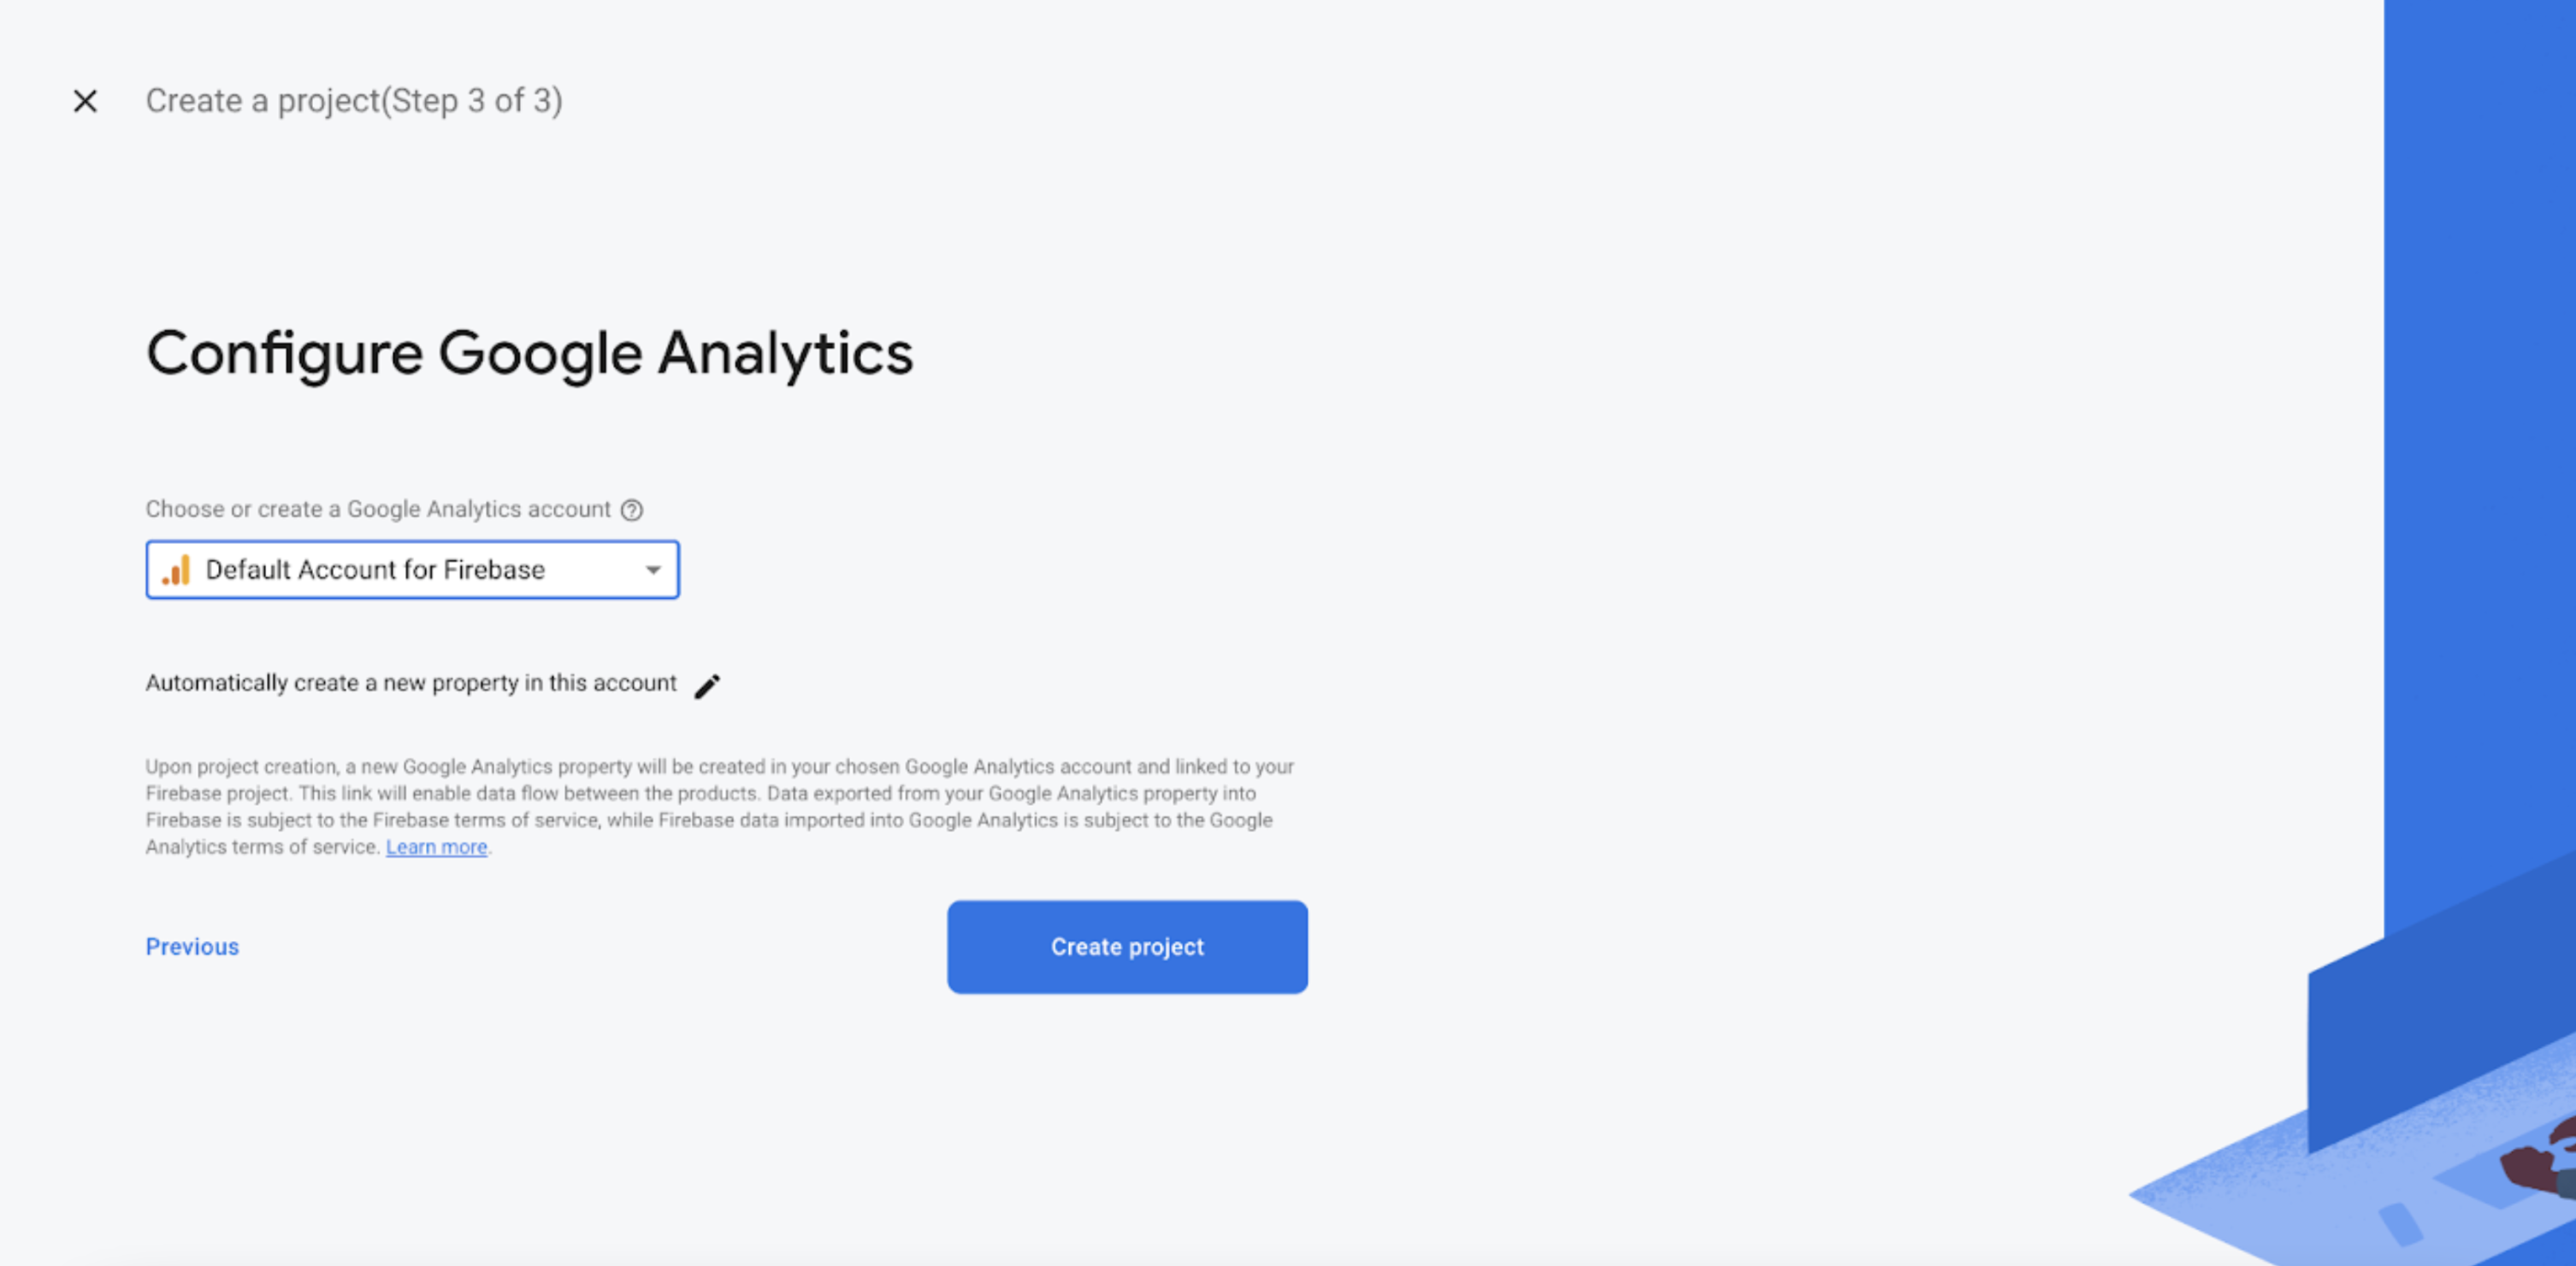
Firebase app setup for social login and push notificatoions
Create new firebase project
Step 1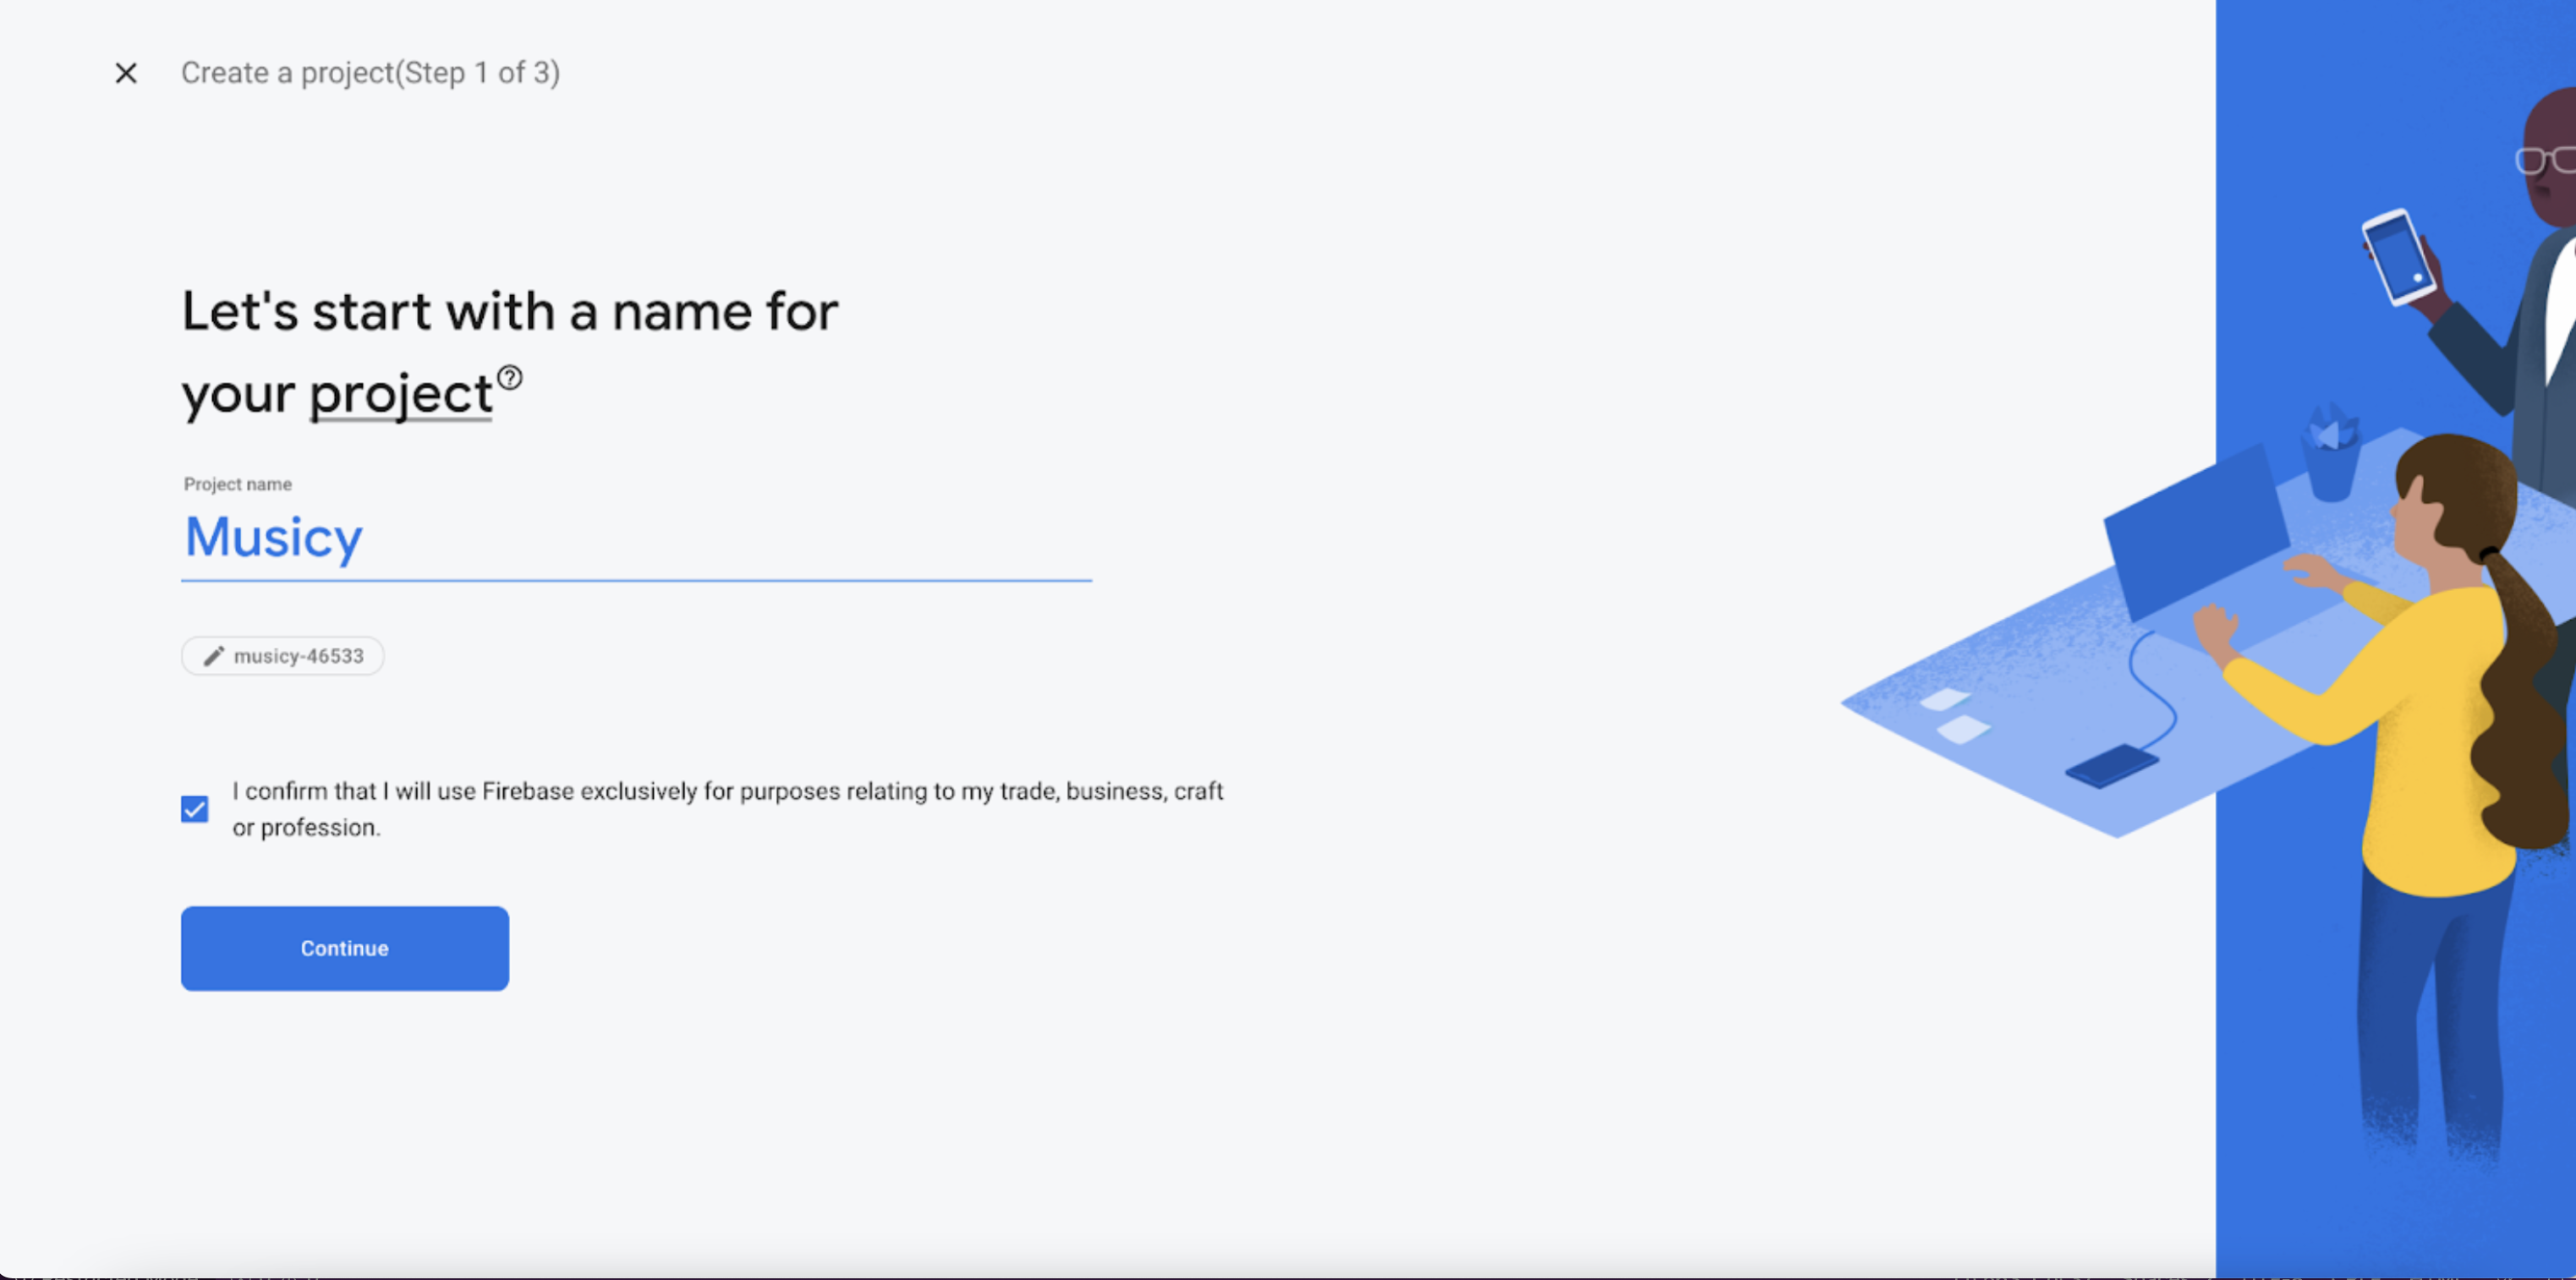
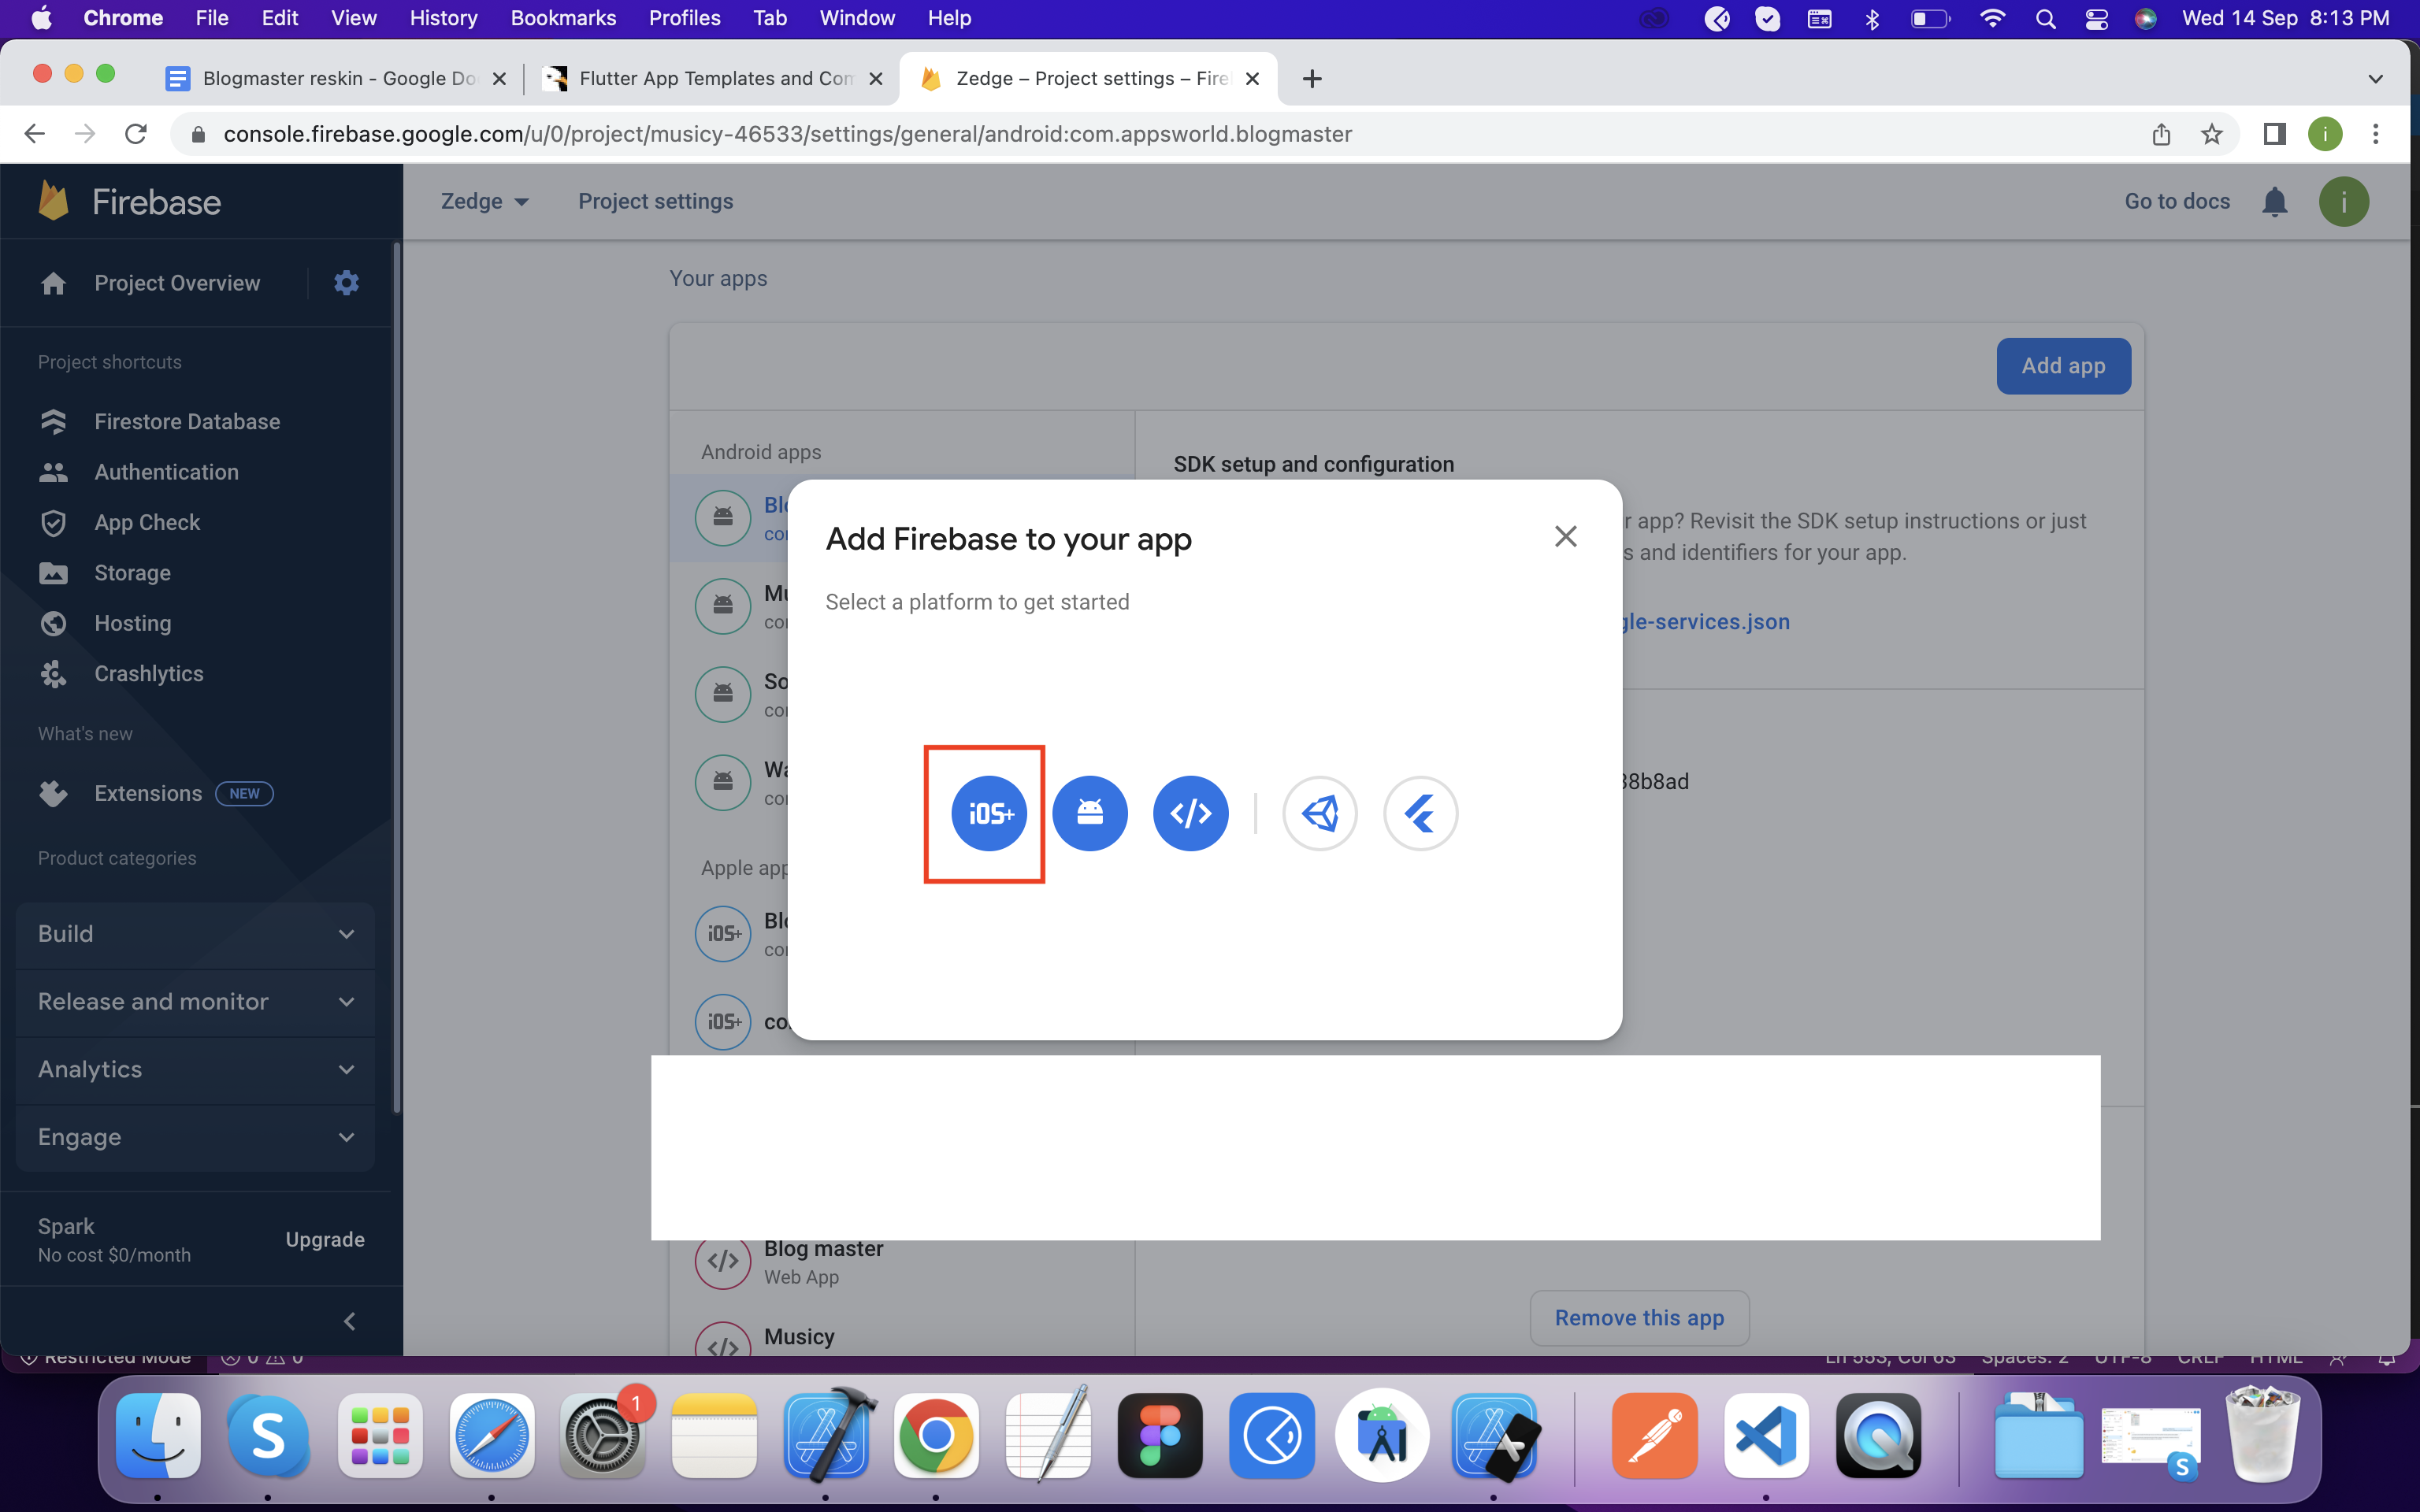
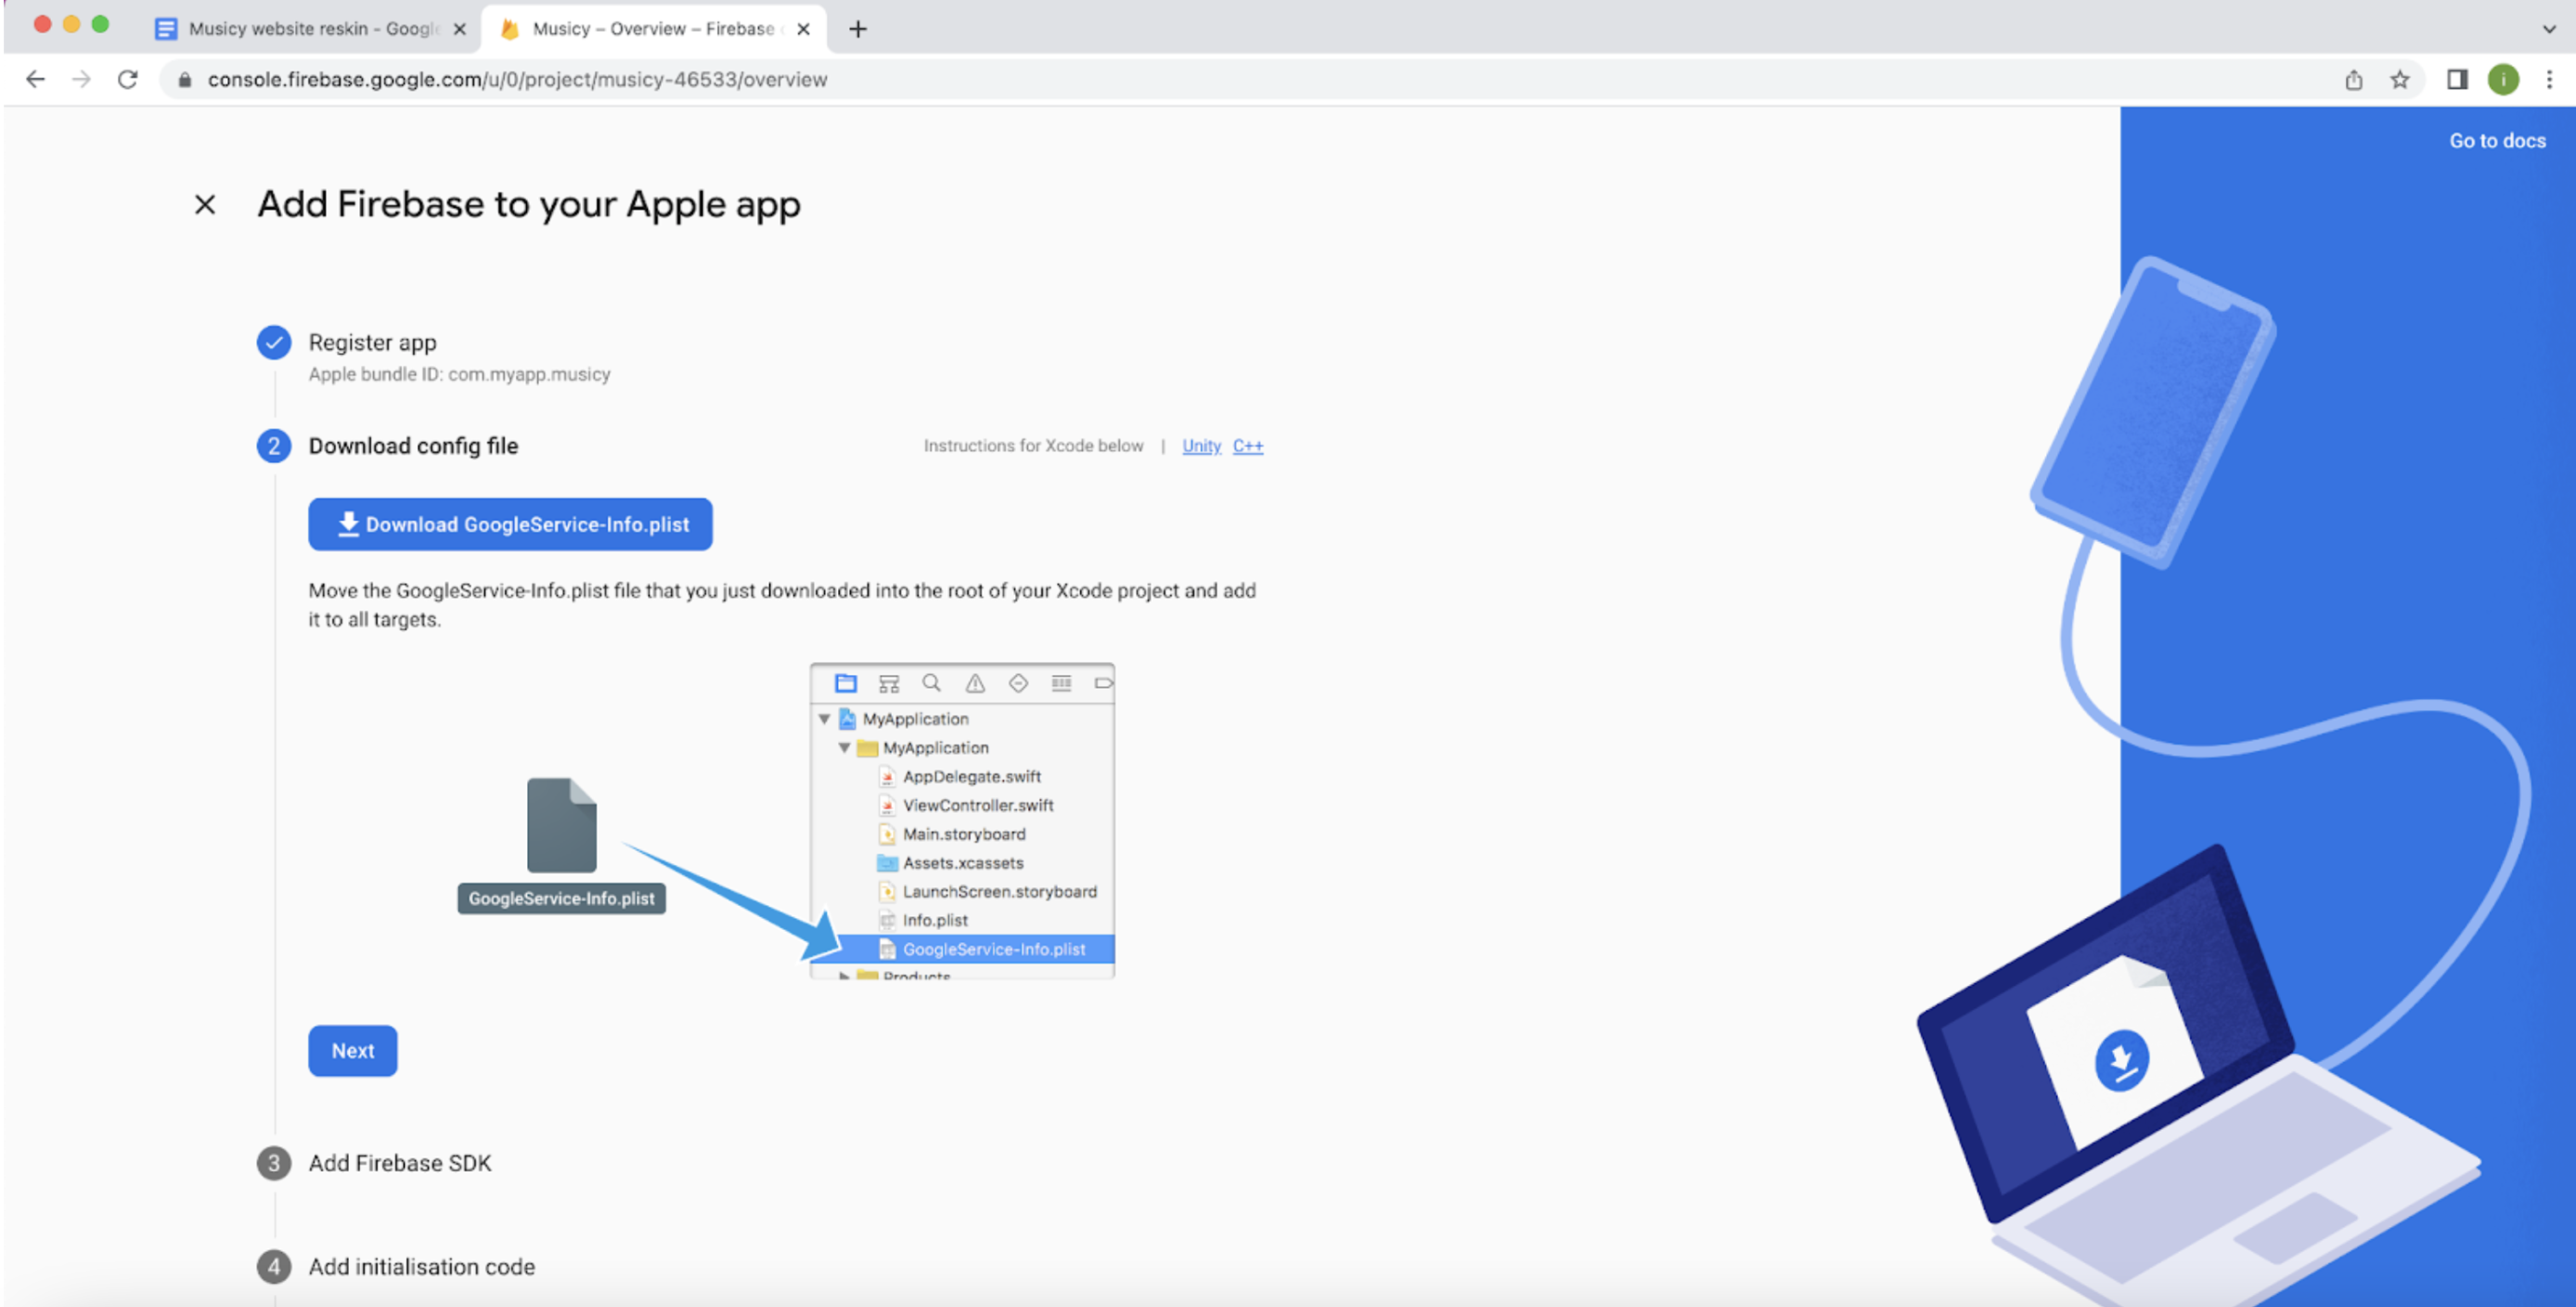
Create iOS app in firebase project
Step 2Follow the below screenshots to Create ios app.
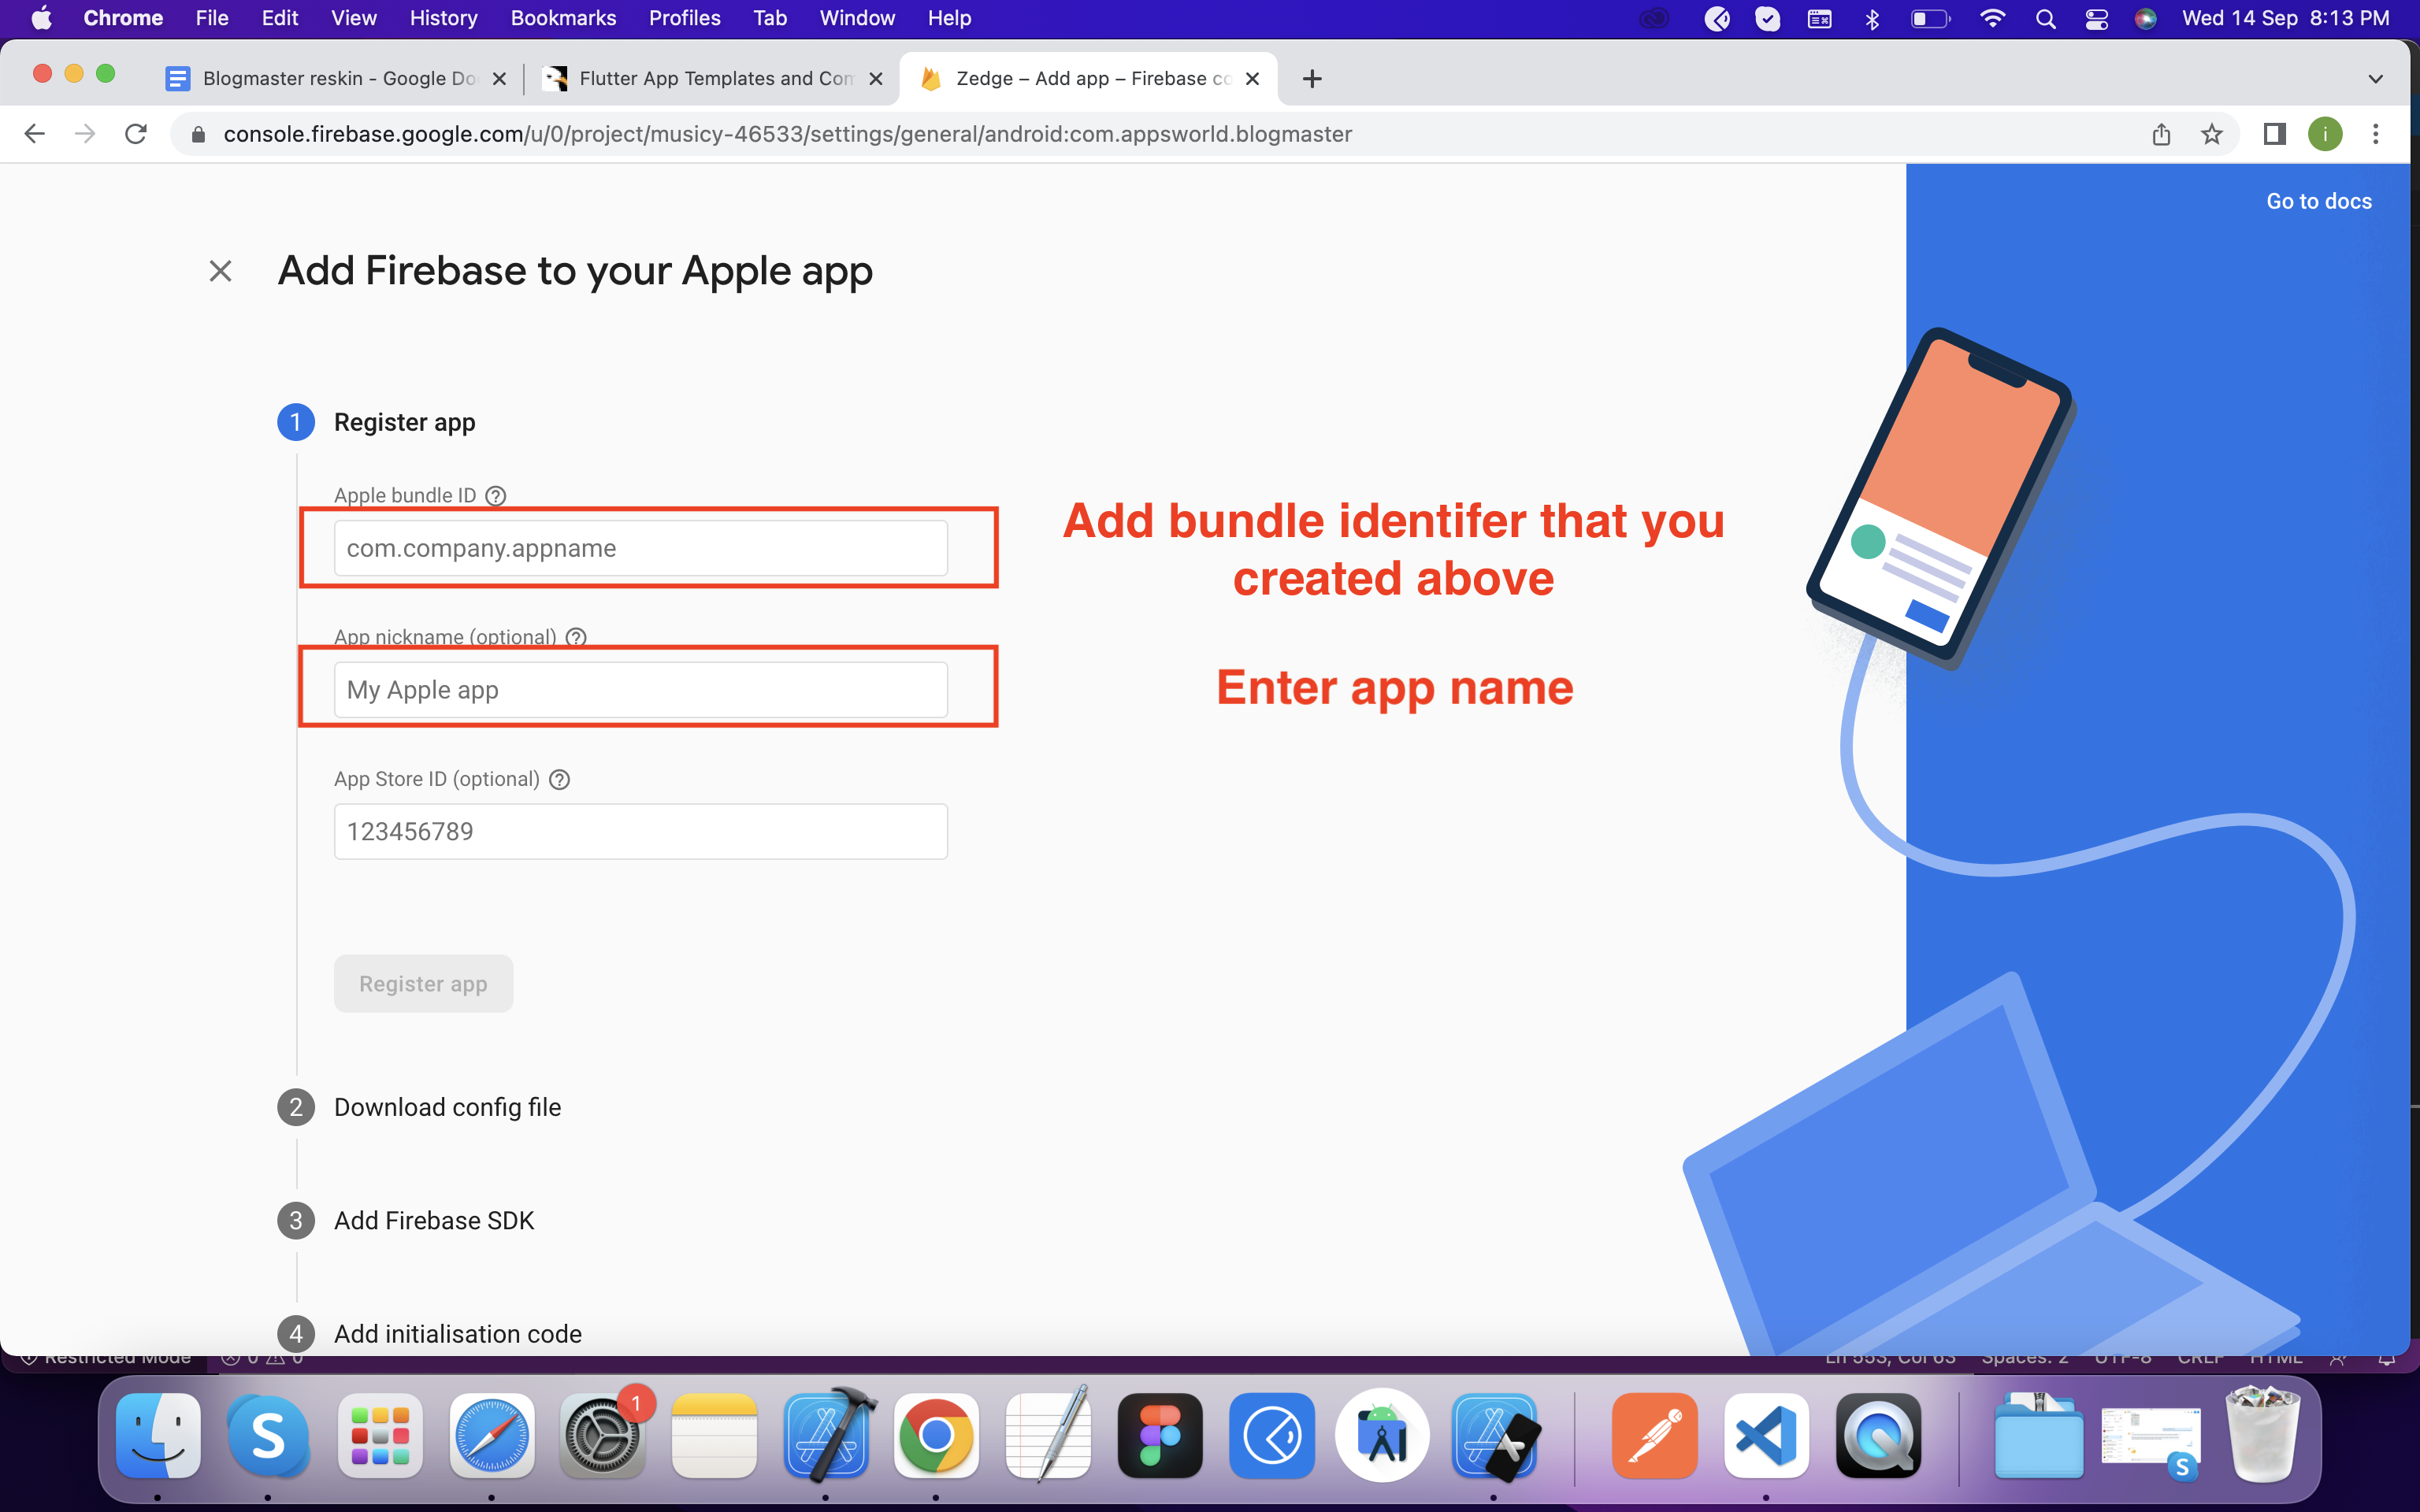
Download the plist file , We will use it later in flutter app.
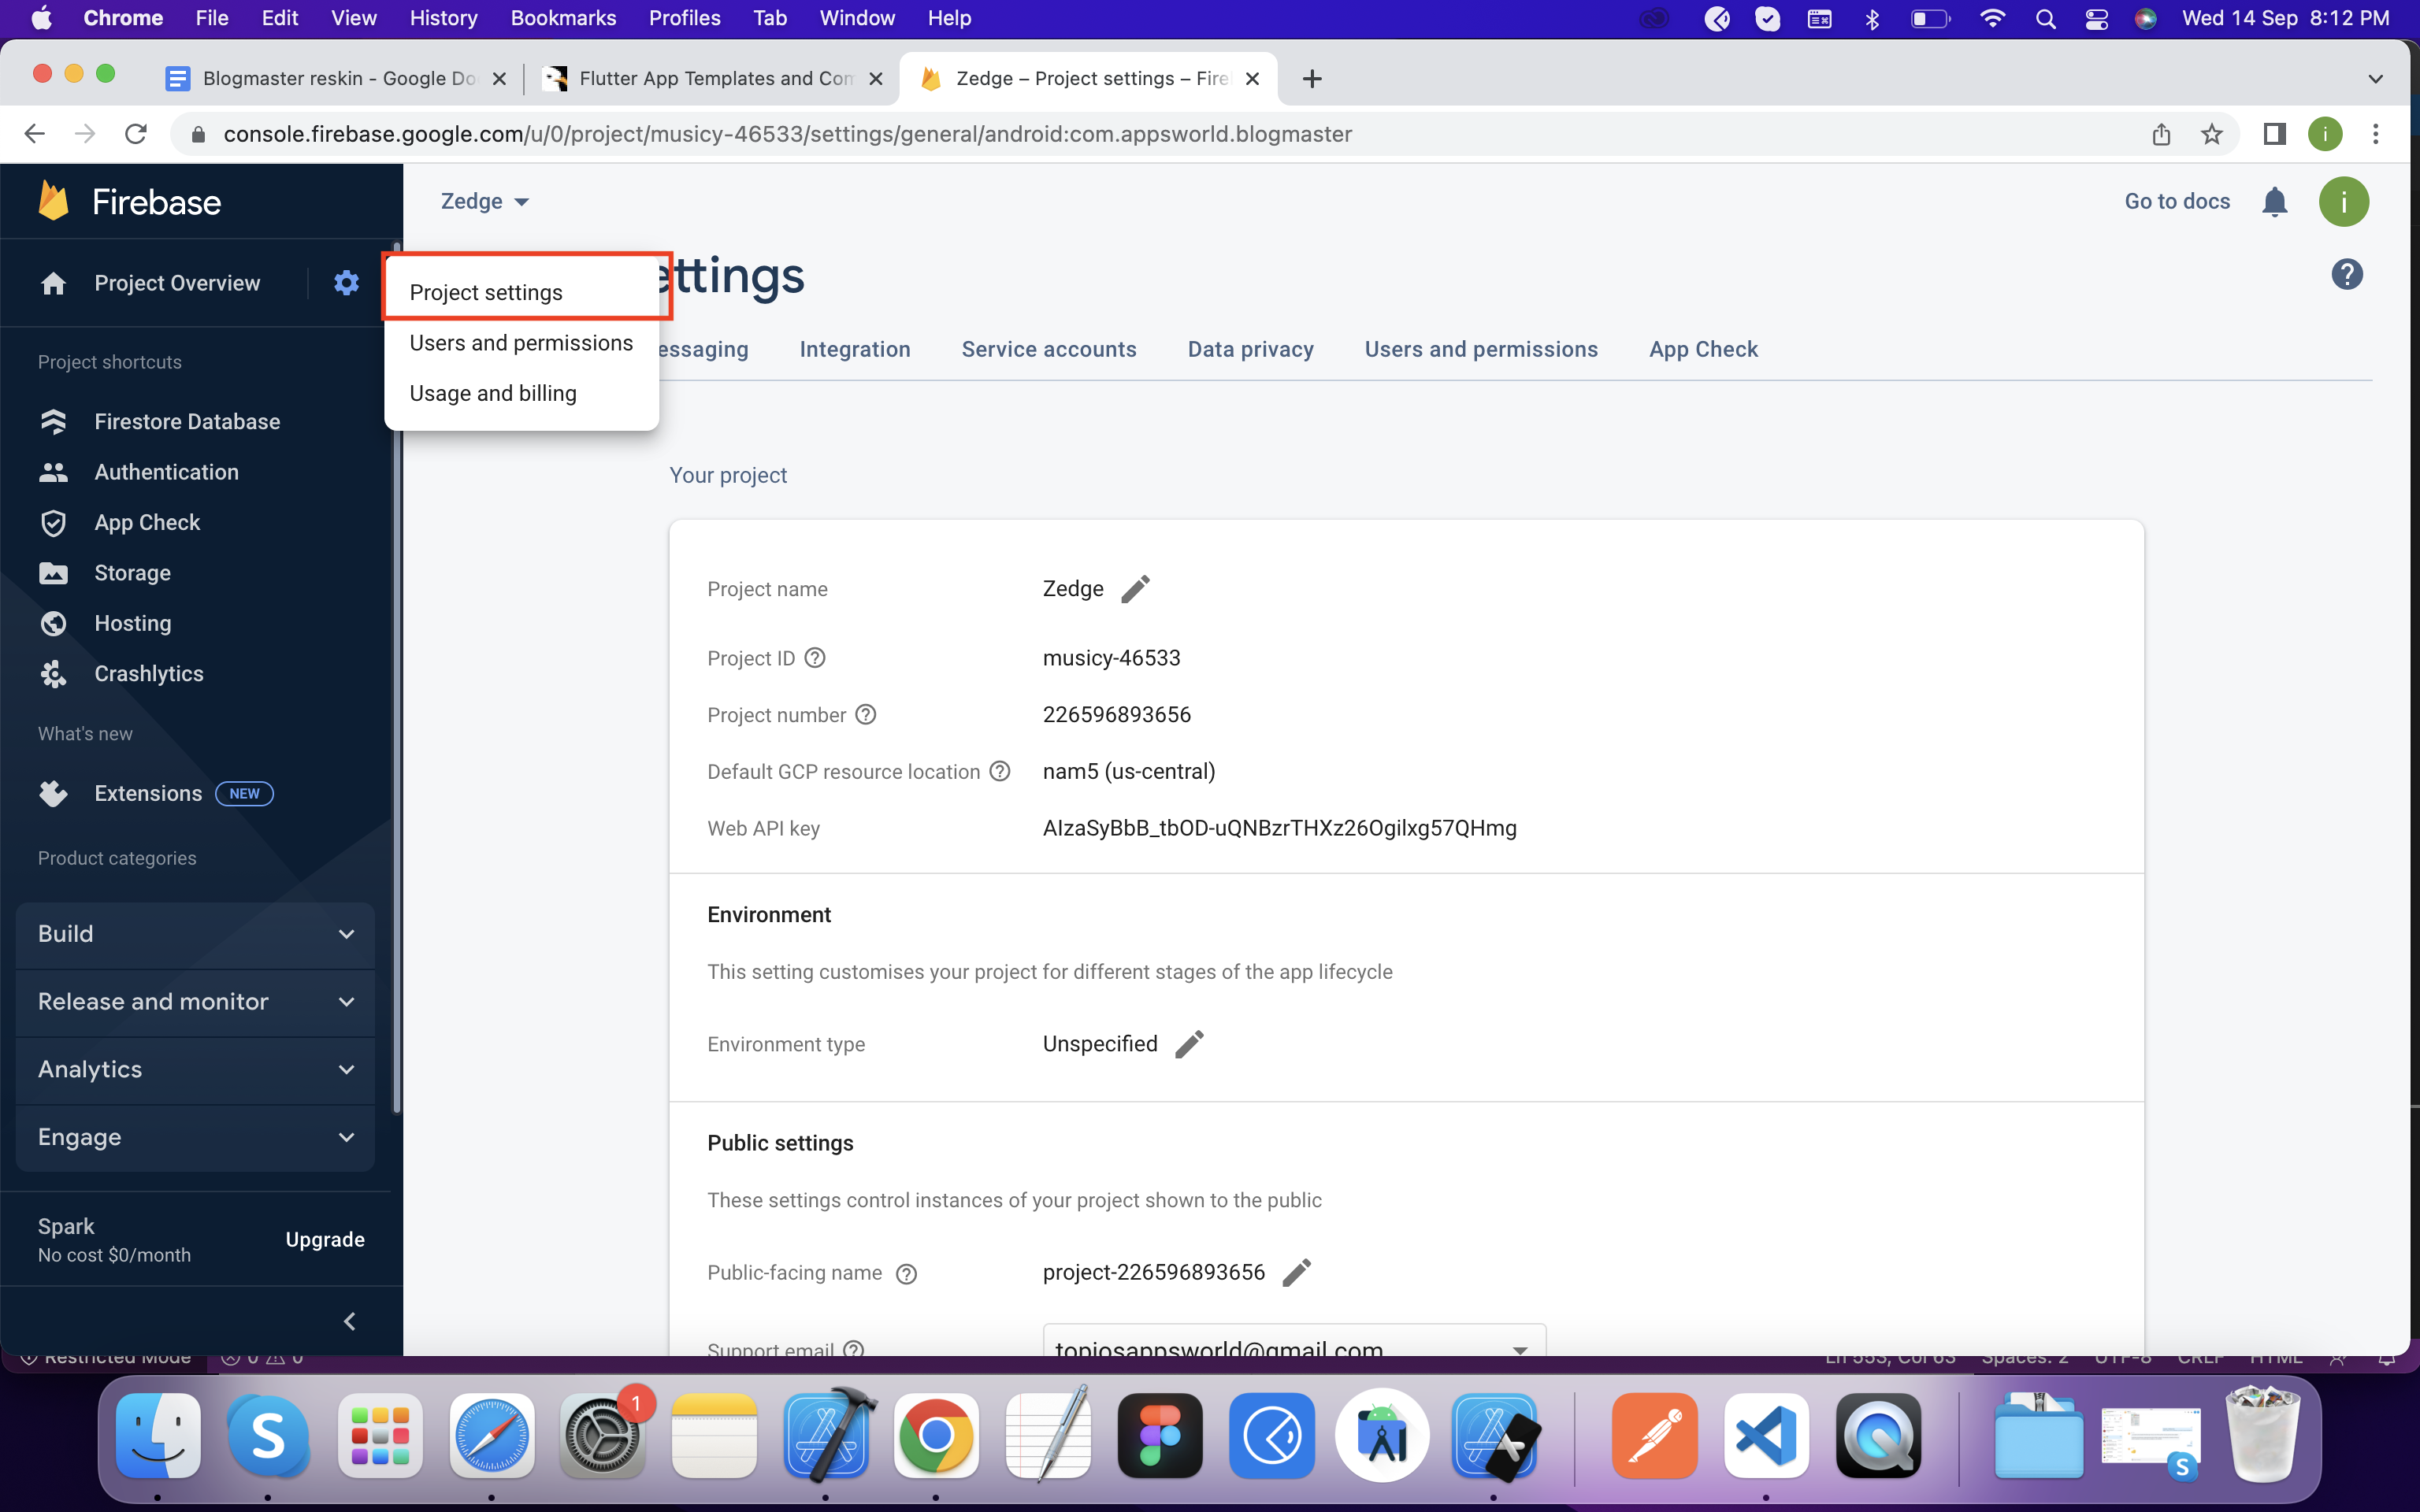
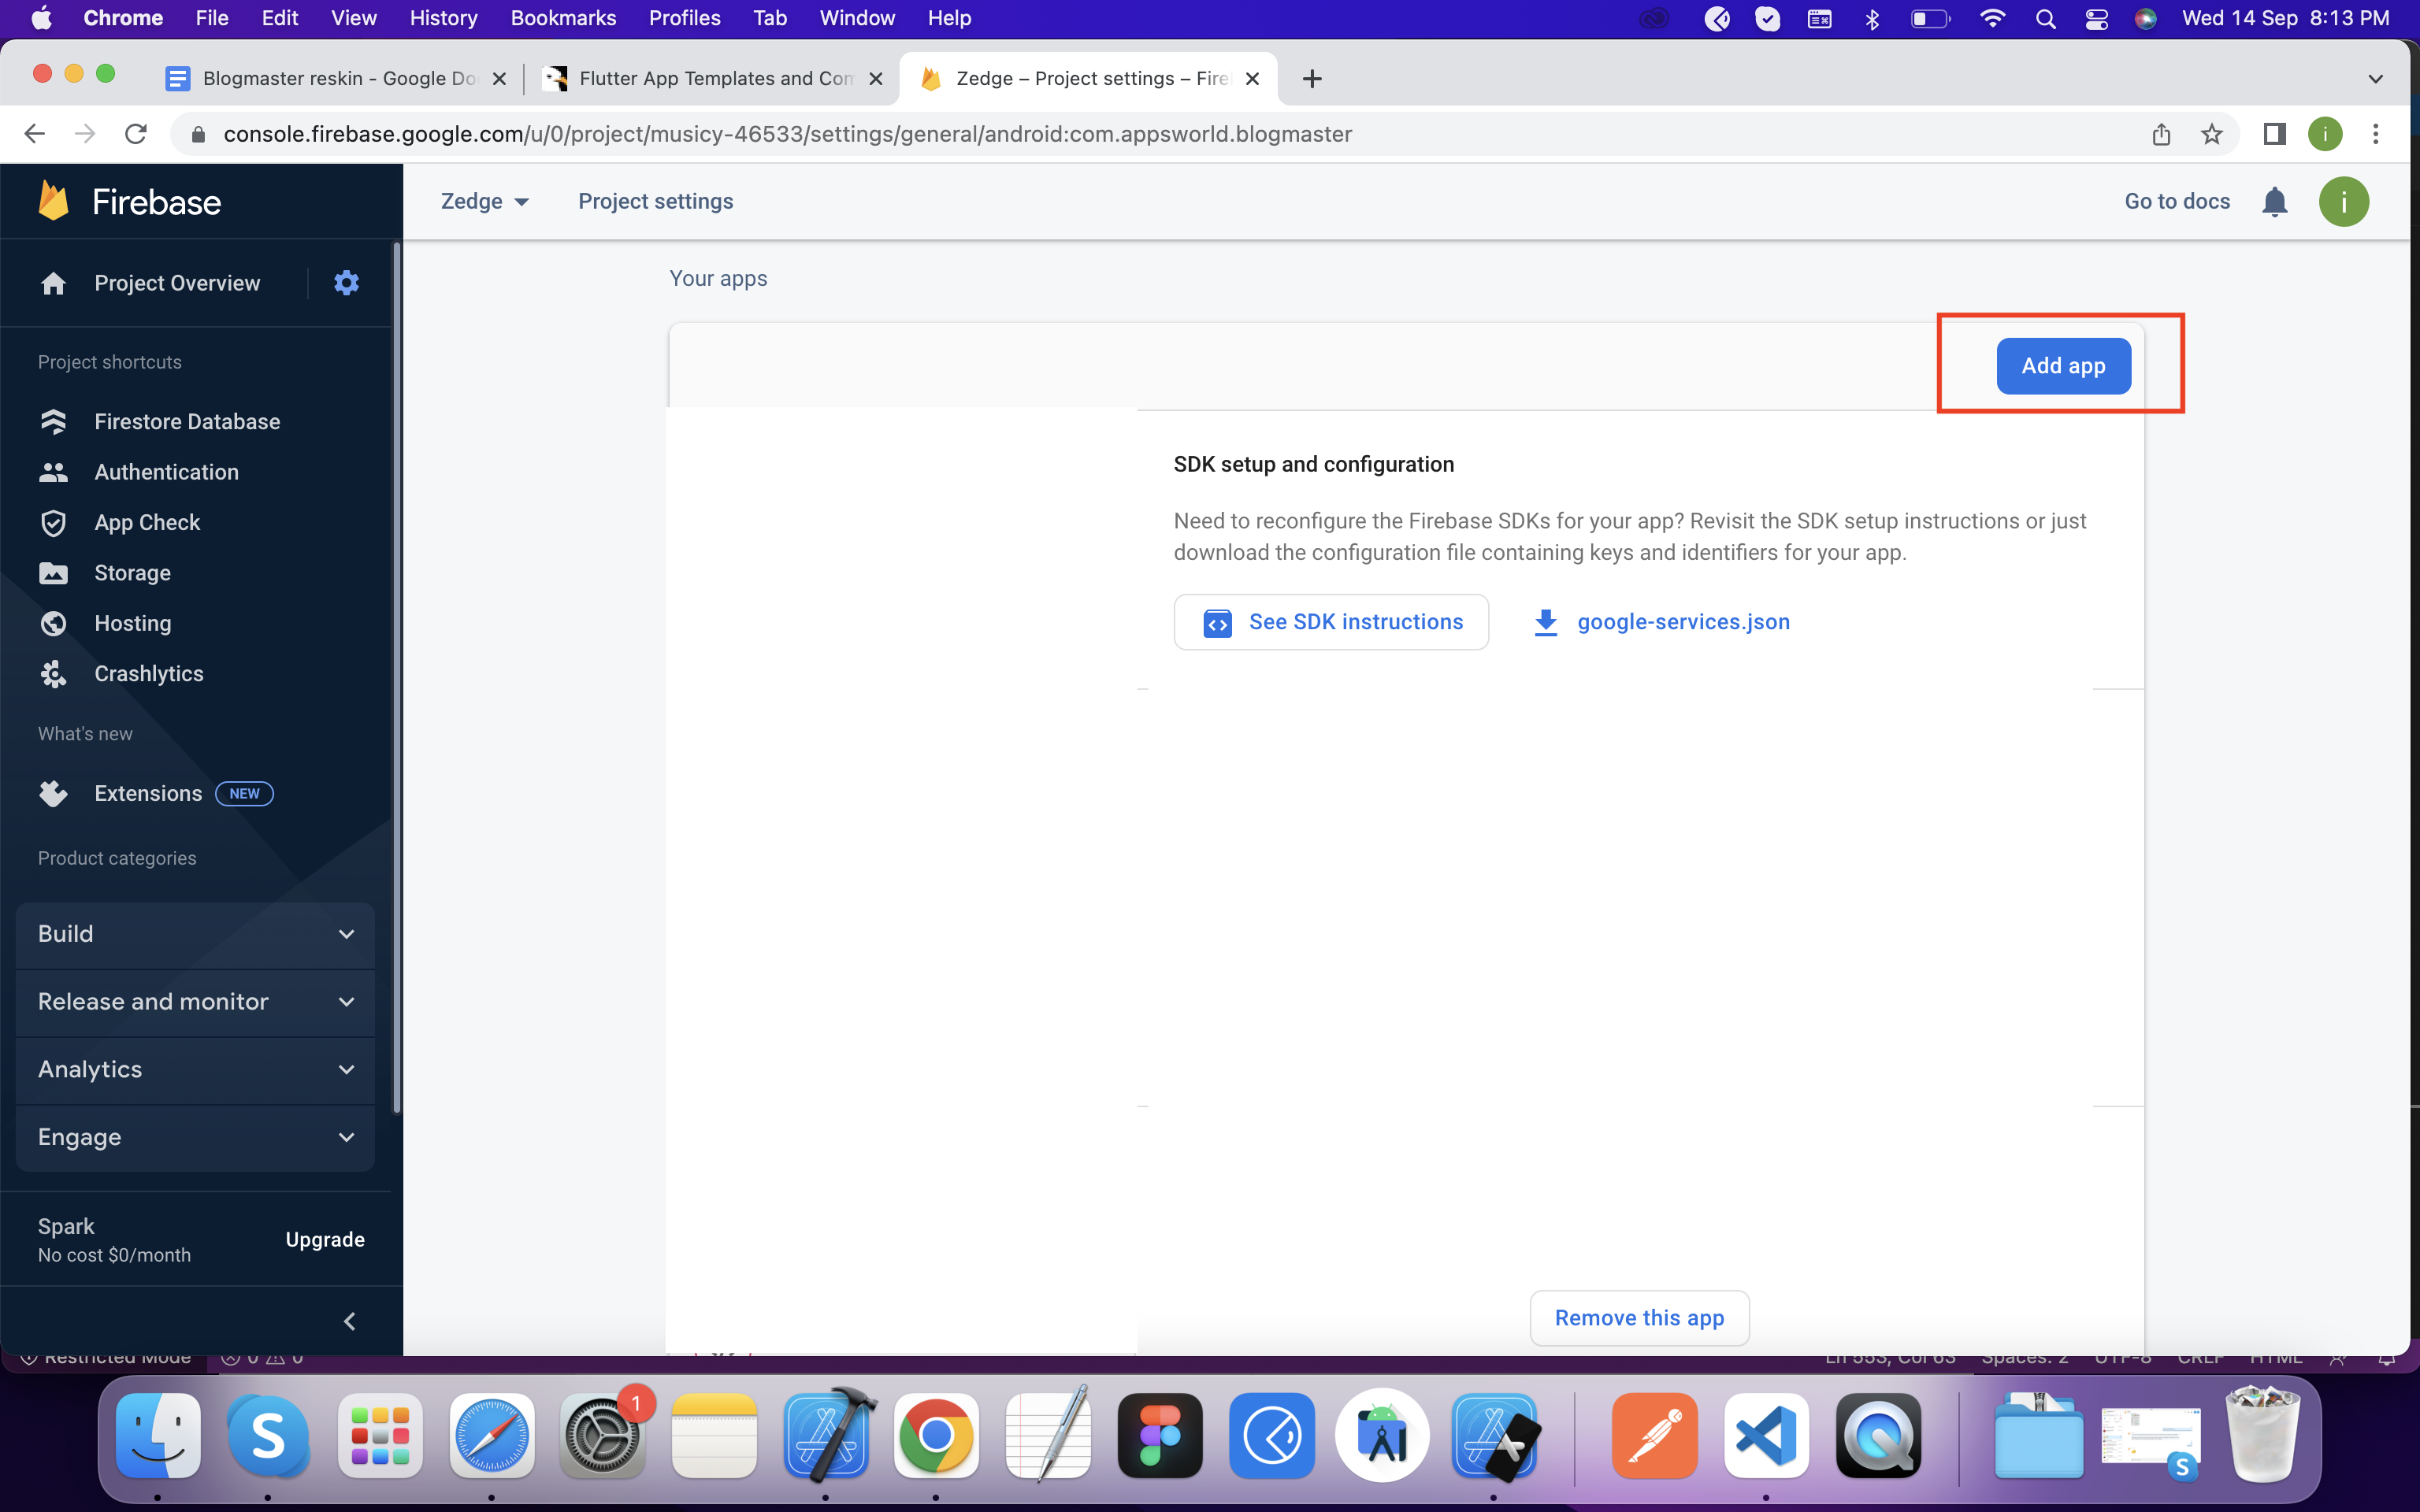
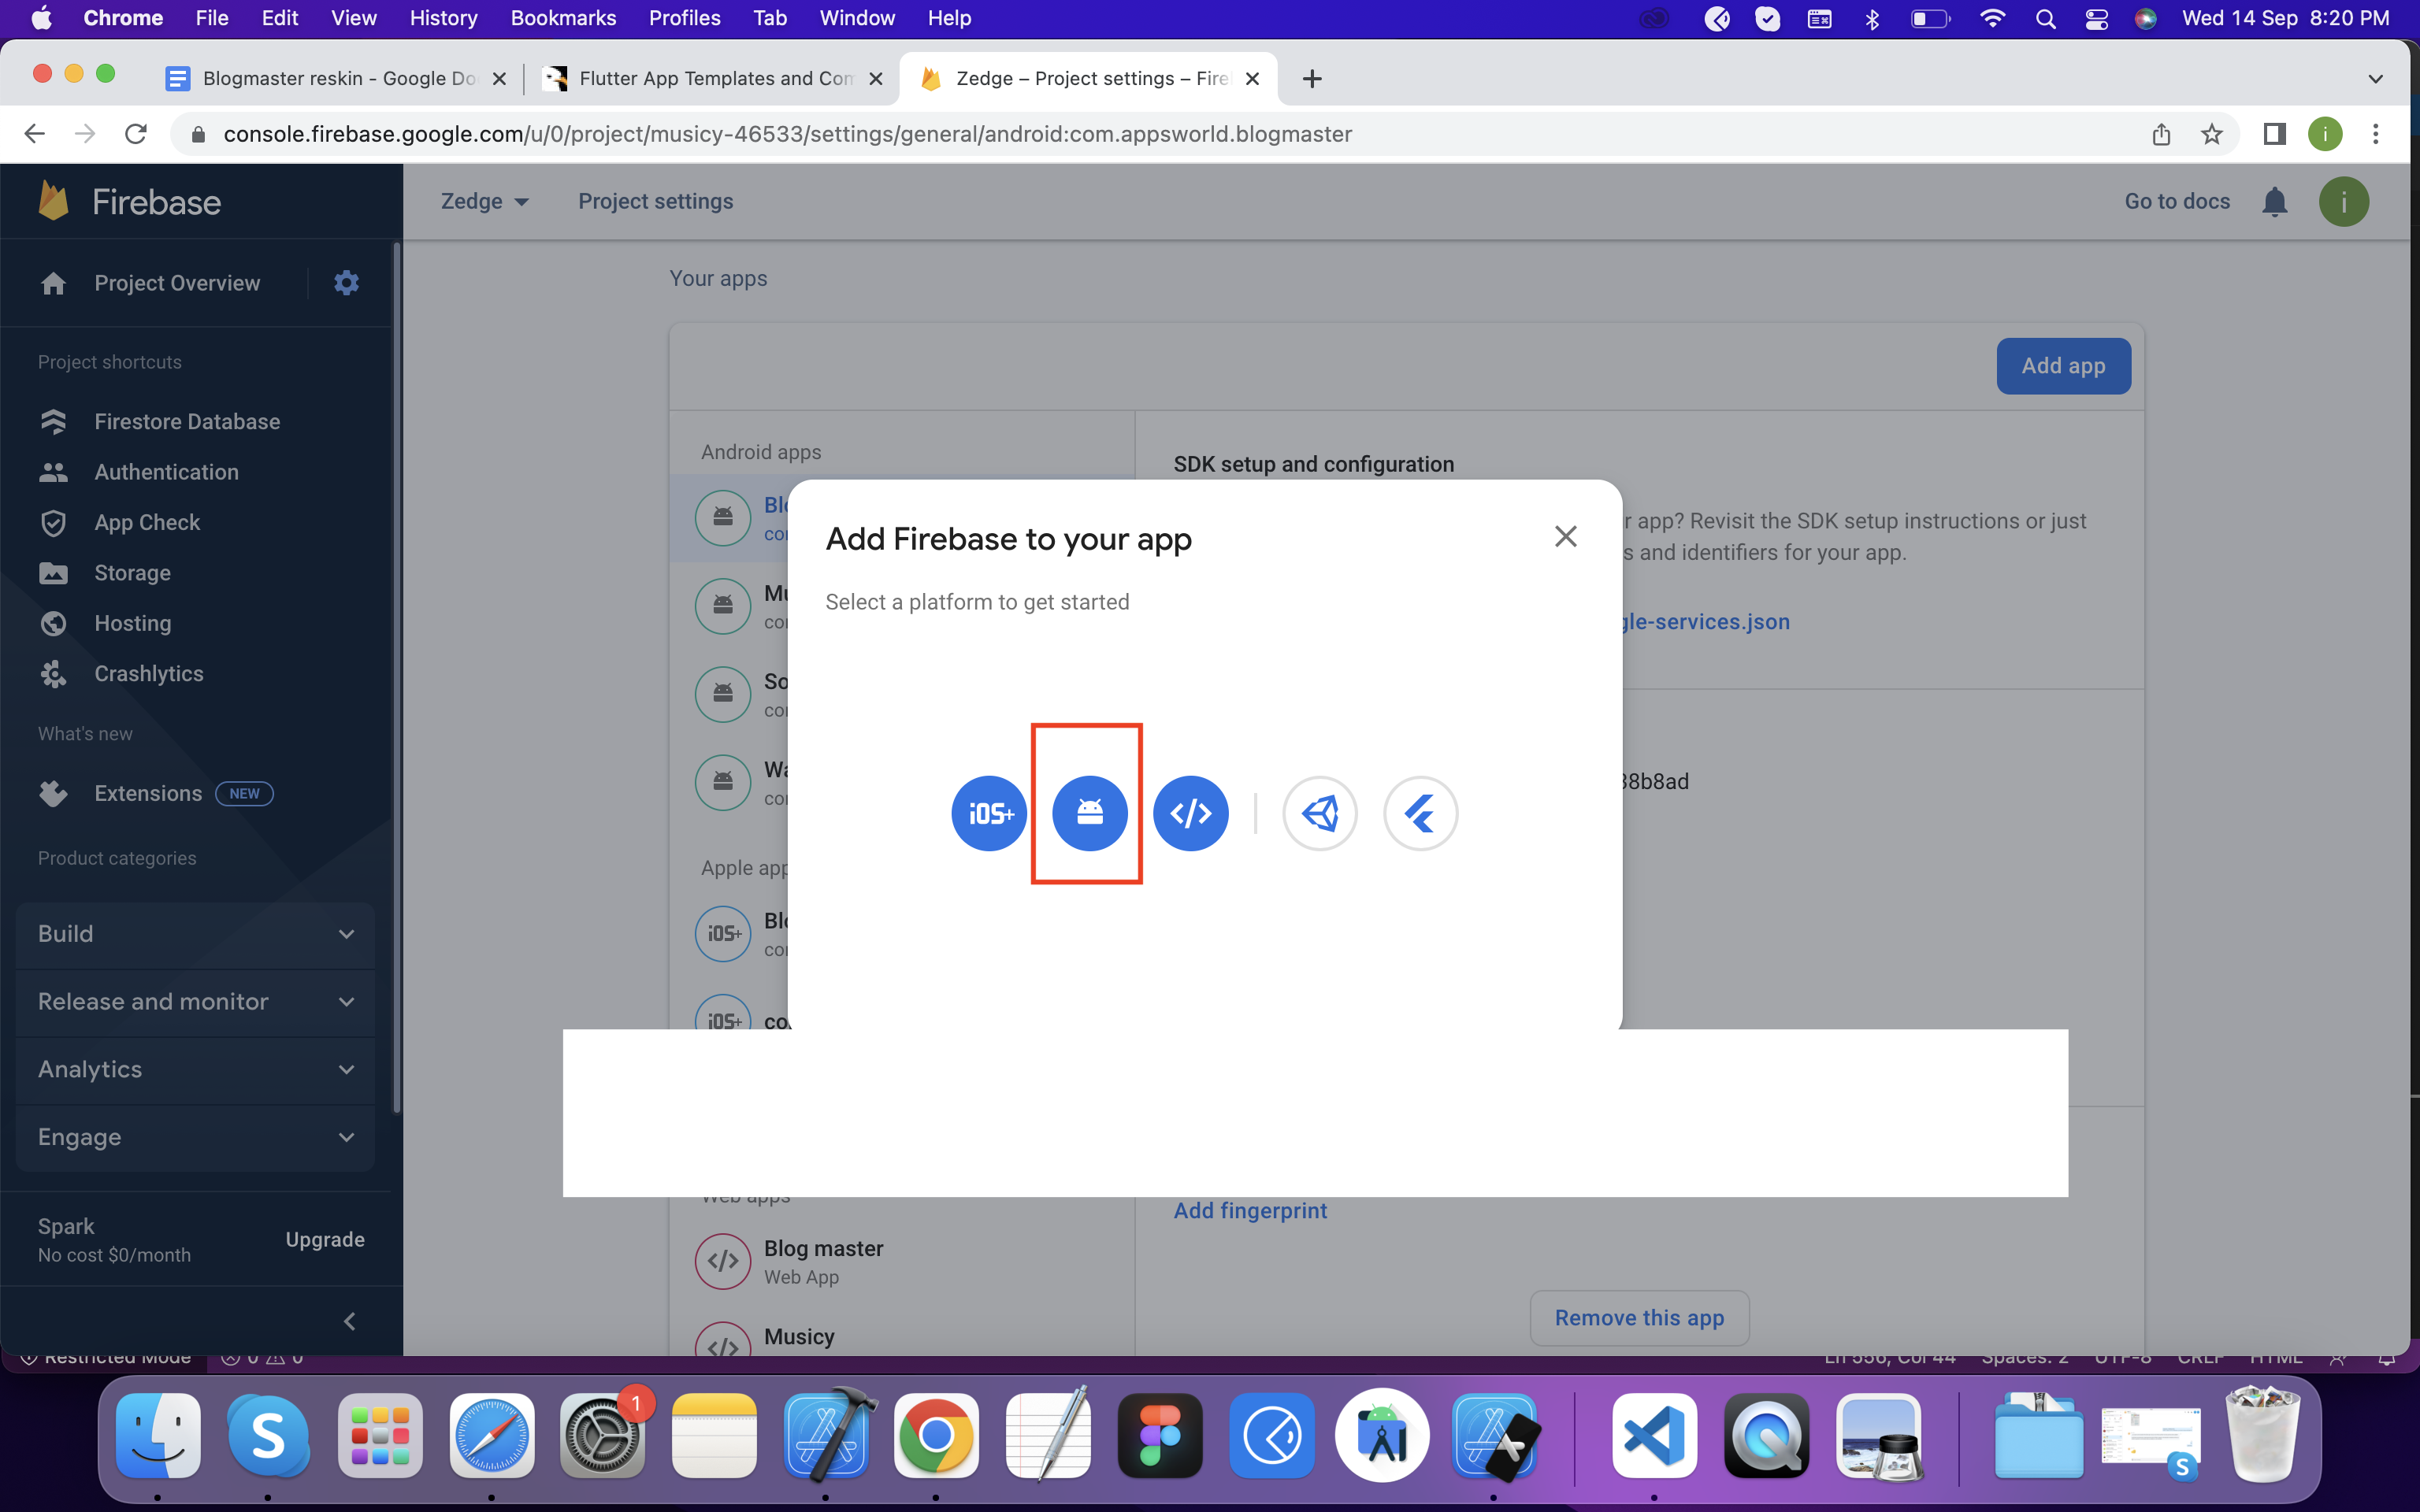
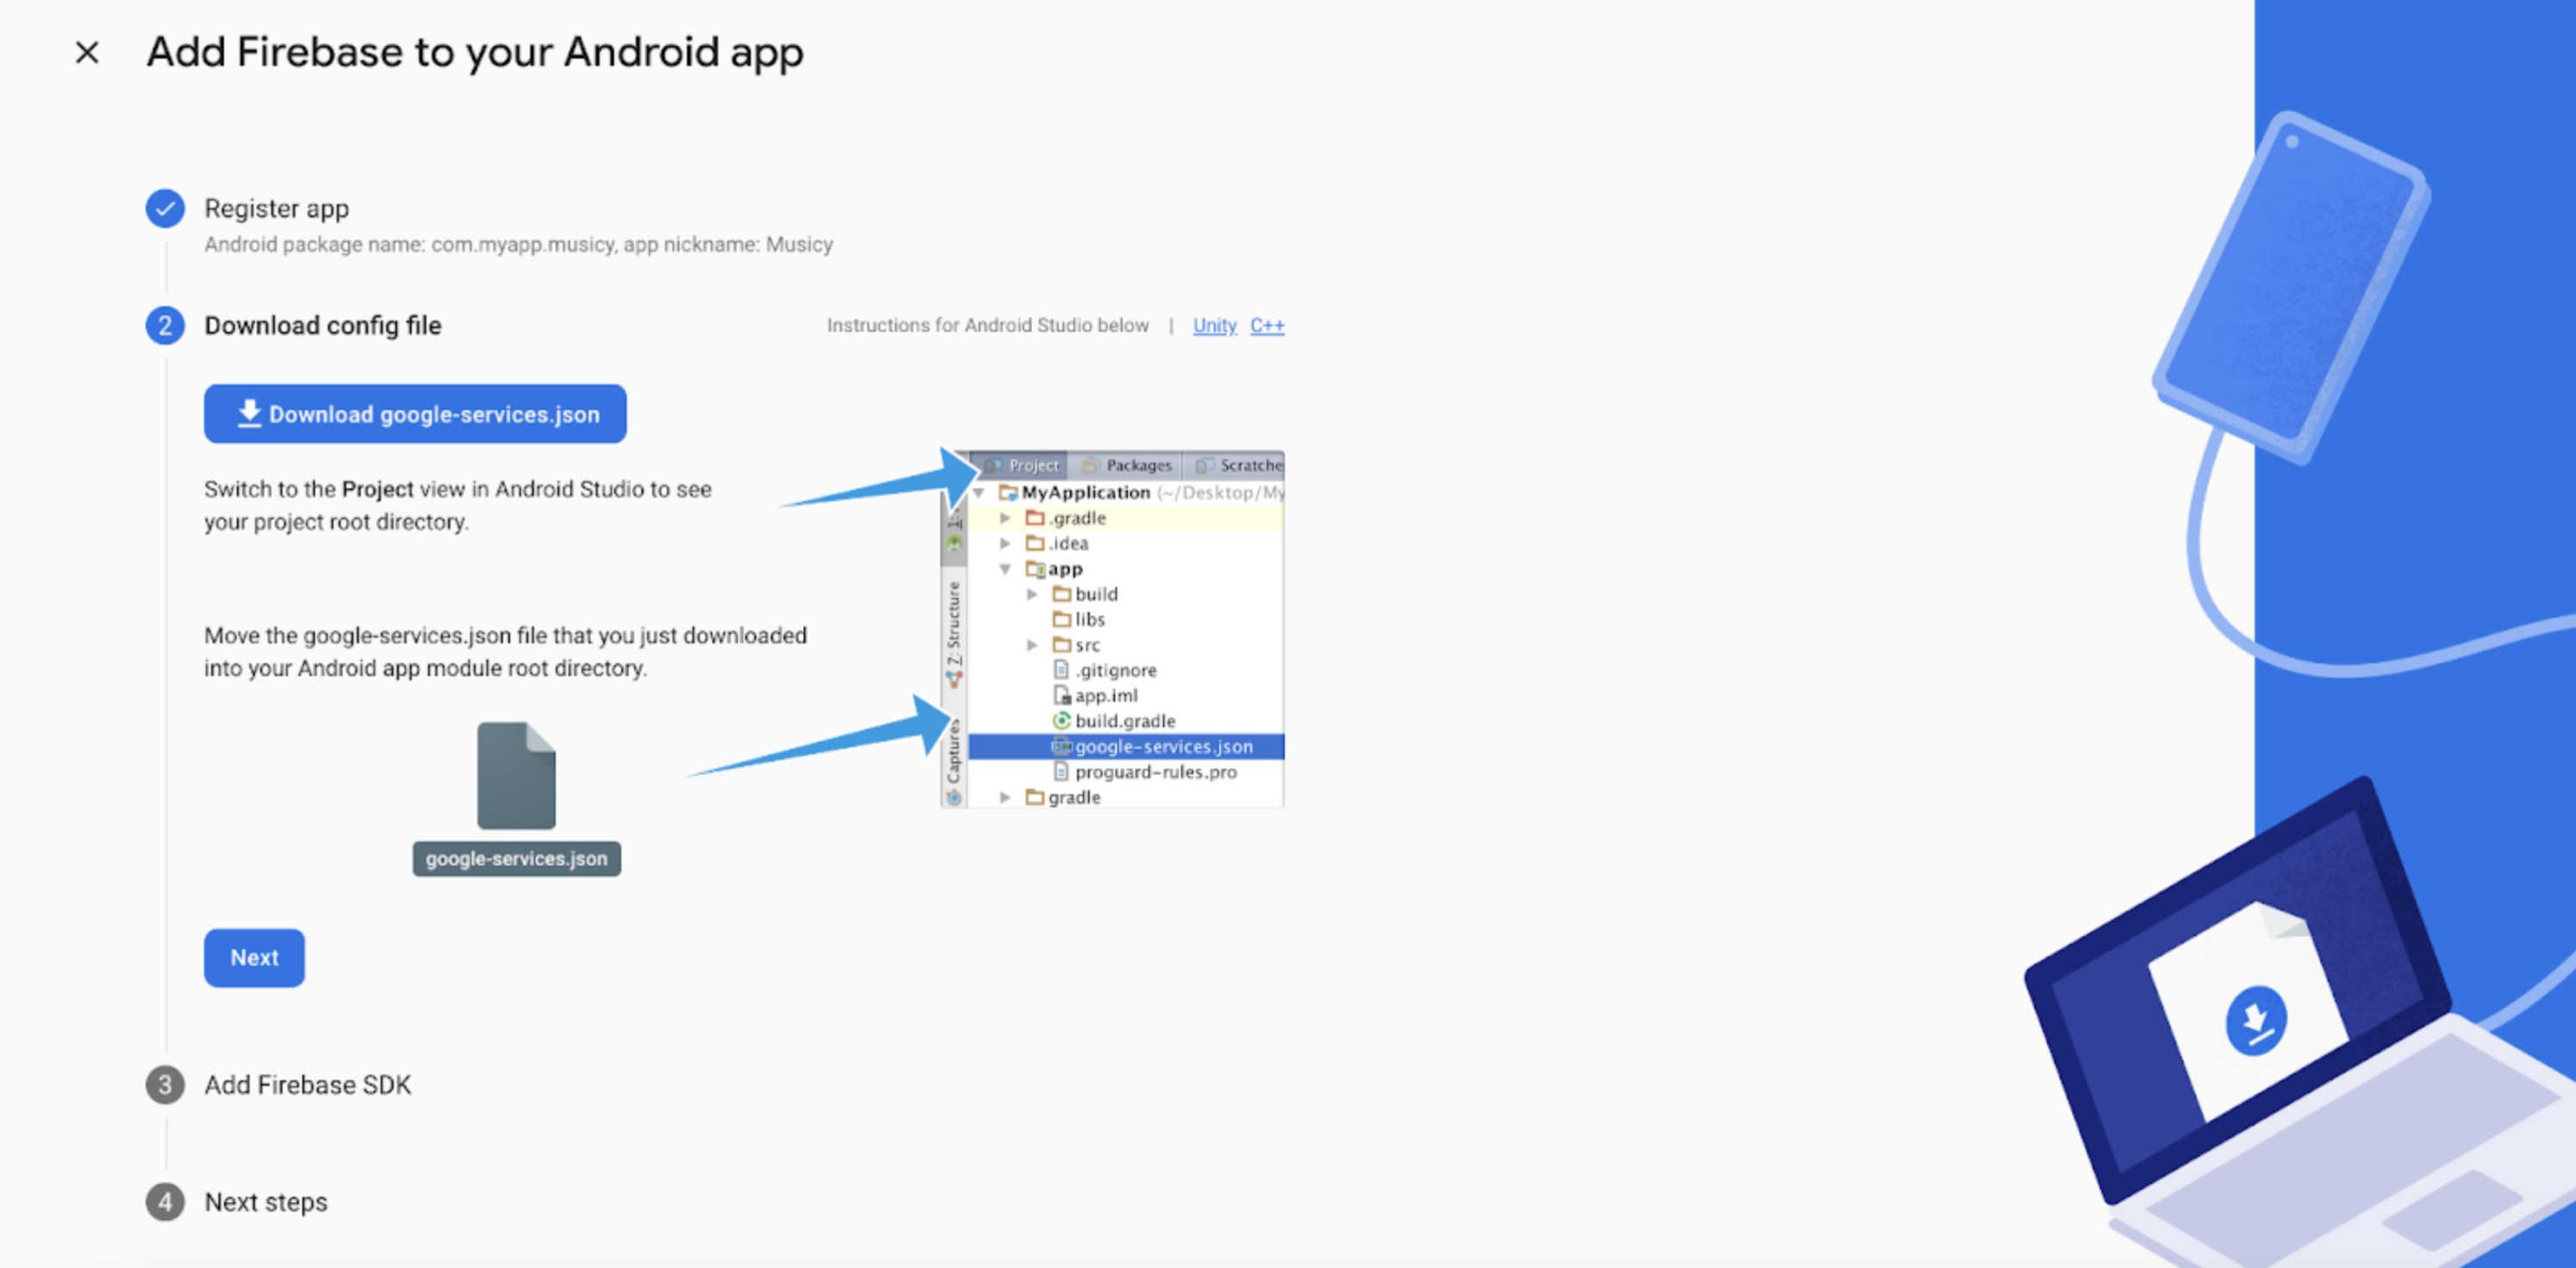
Create android app in firebase project
Step 3Follow the below screenshots to Create android app.
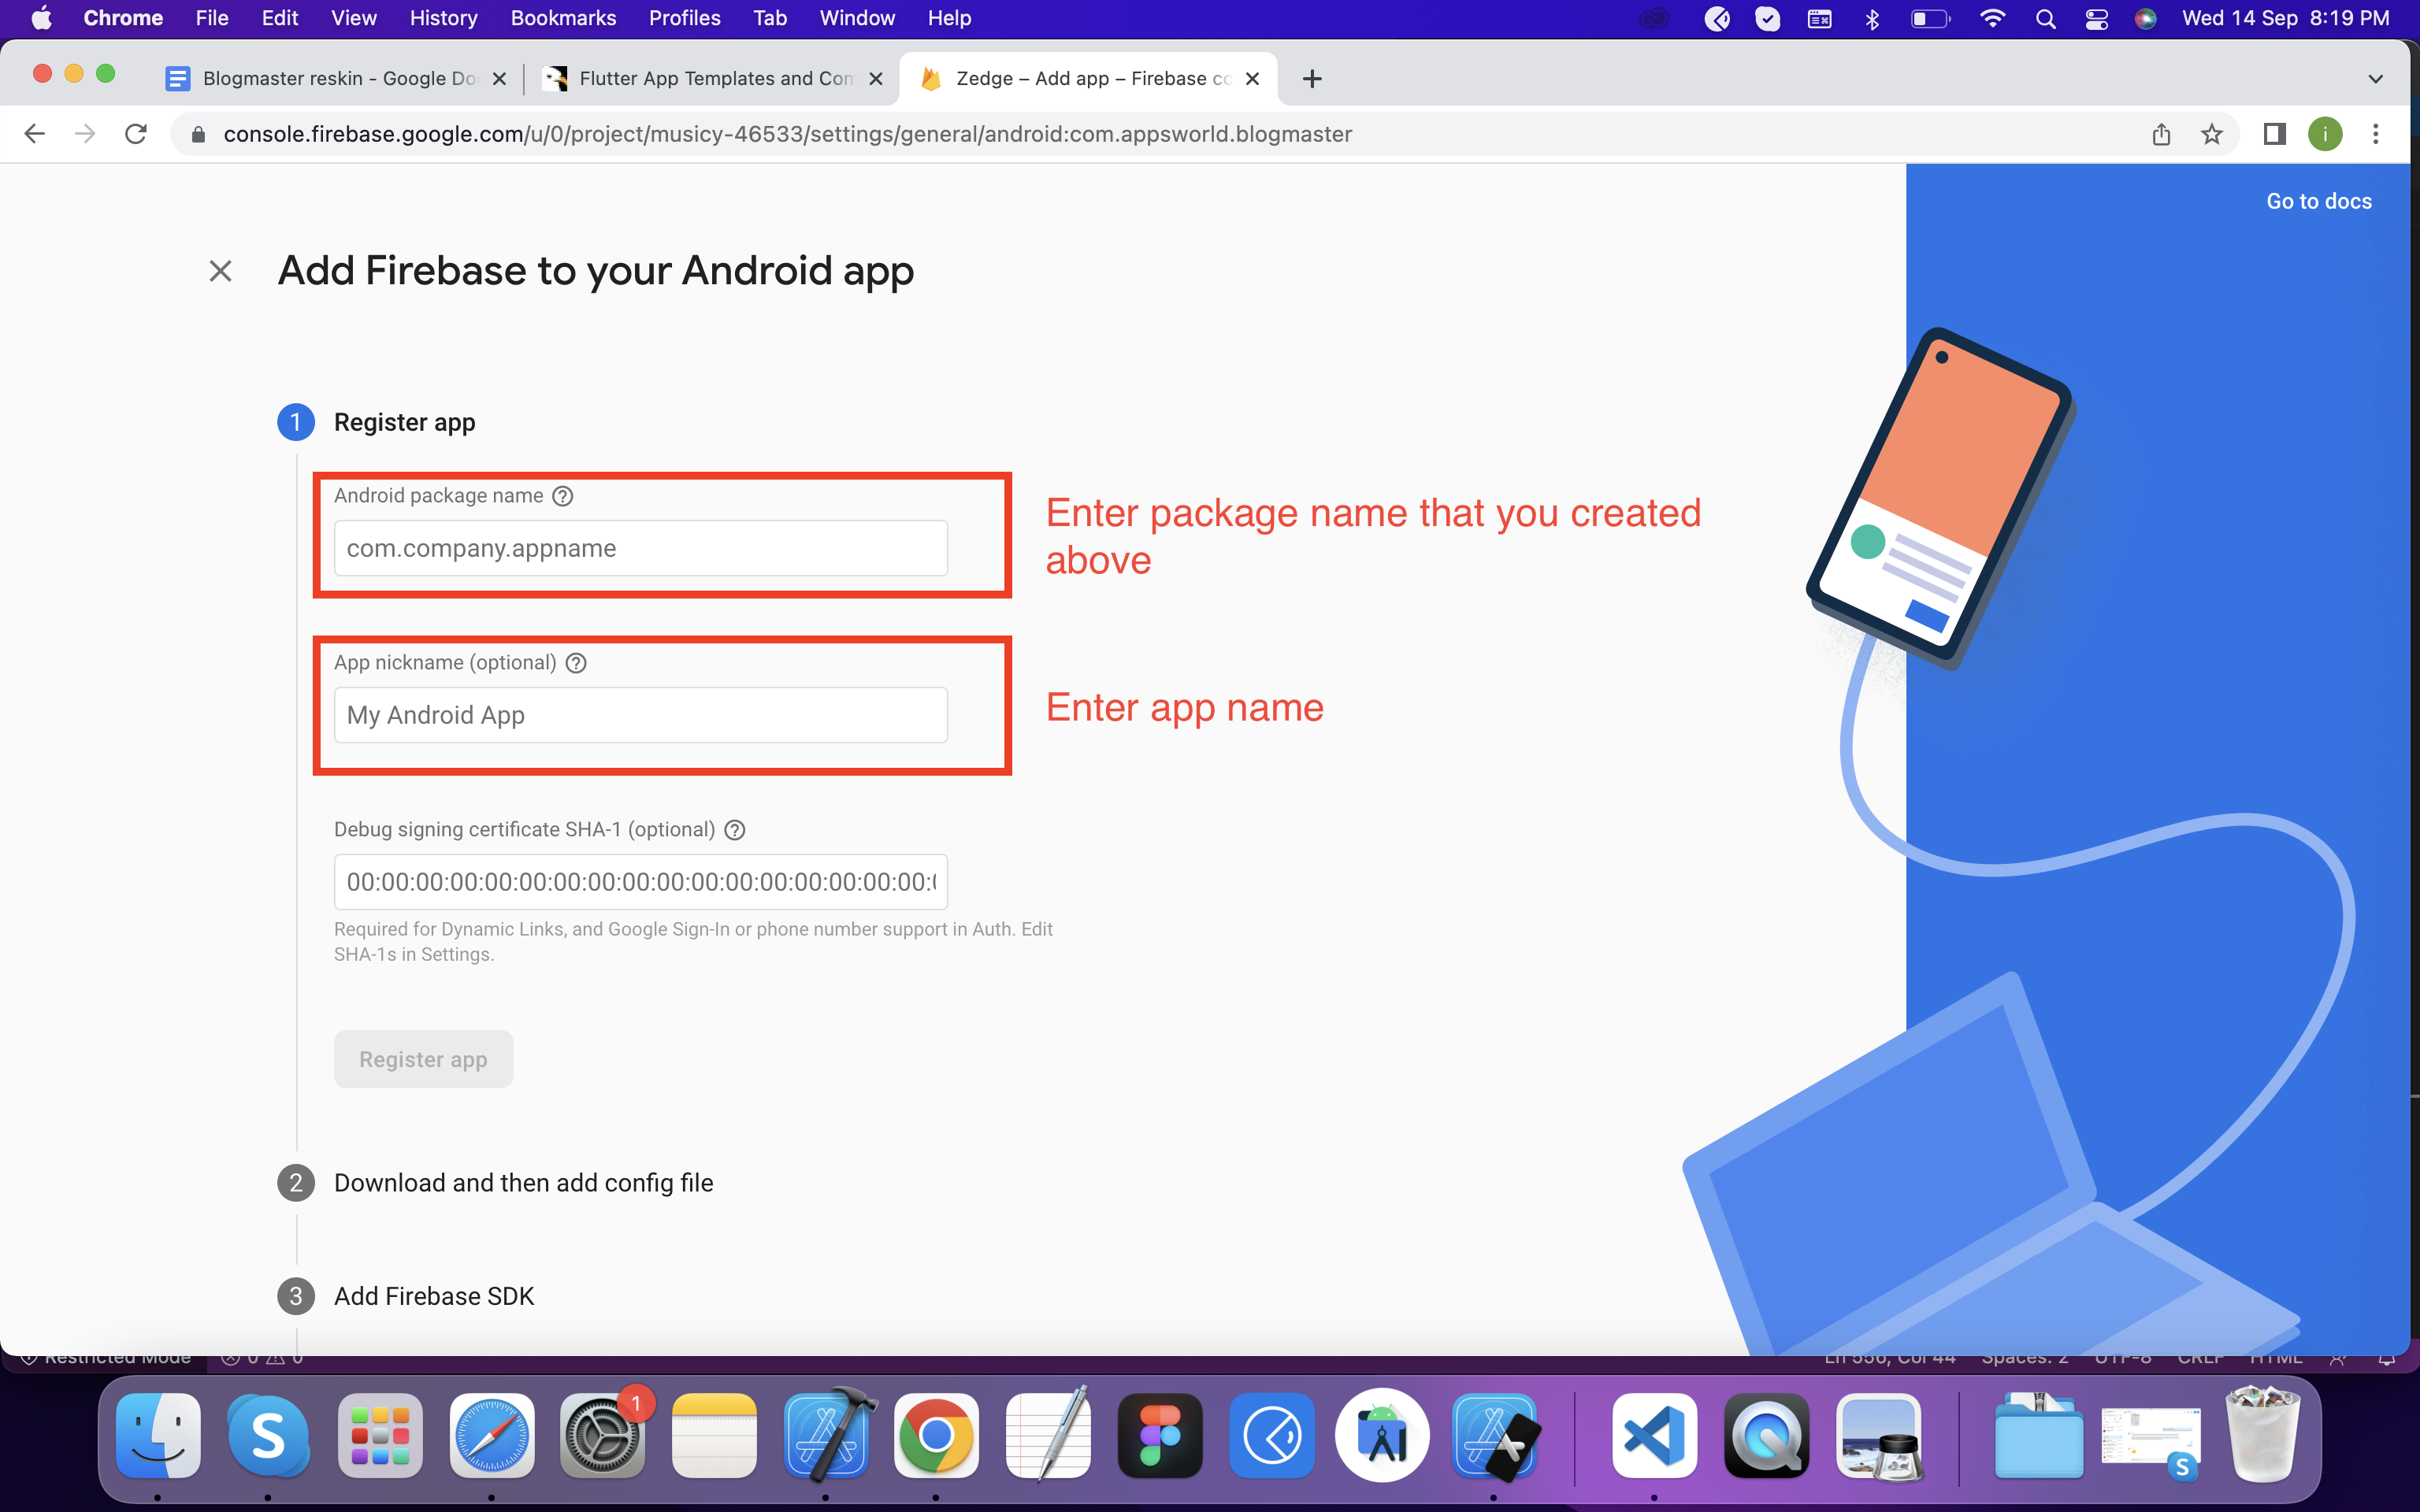
Download the json file , We will use it later in flutter app.
Step 4
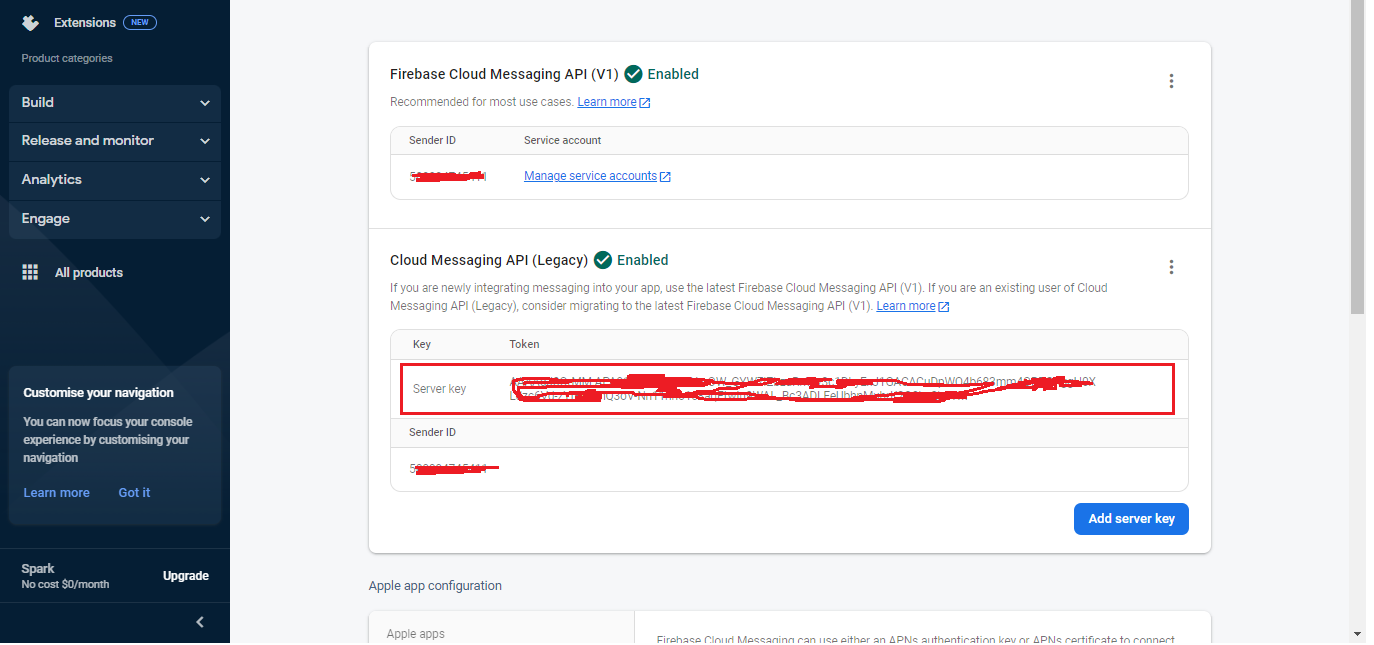
Download the service account key and get database url for nodejs setup
Copy the server key key for push notifictaion in backend server setup
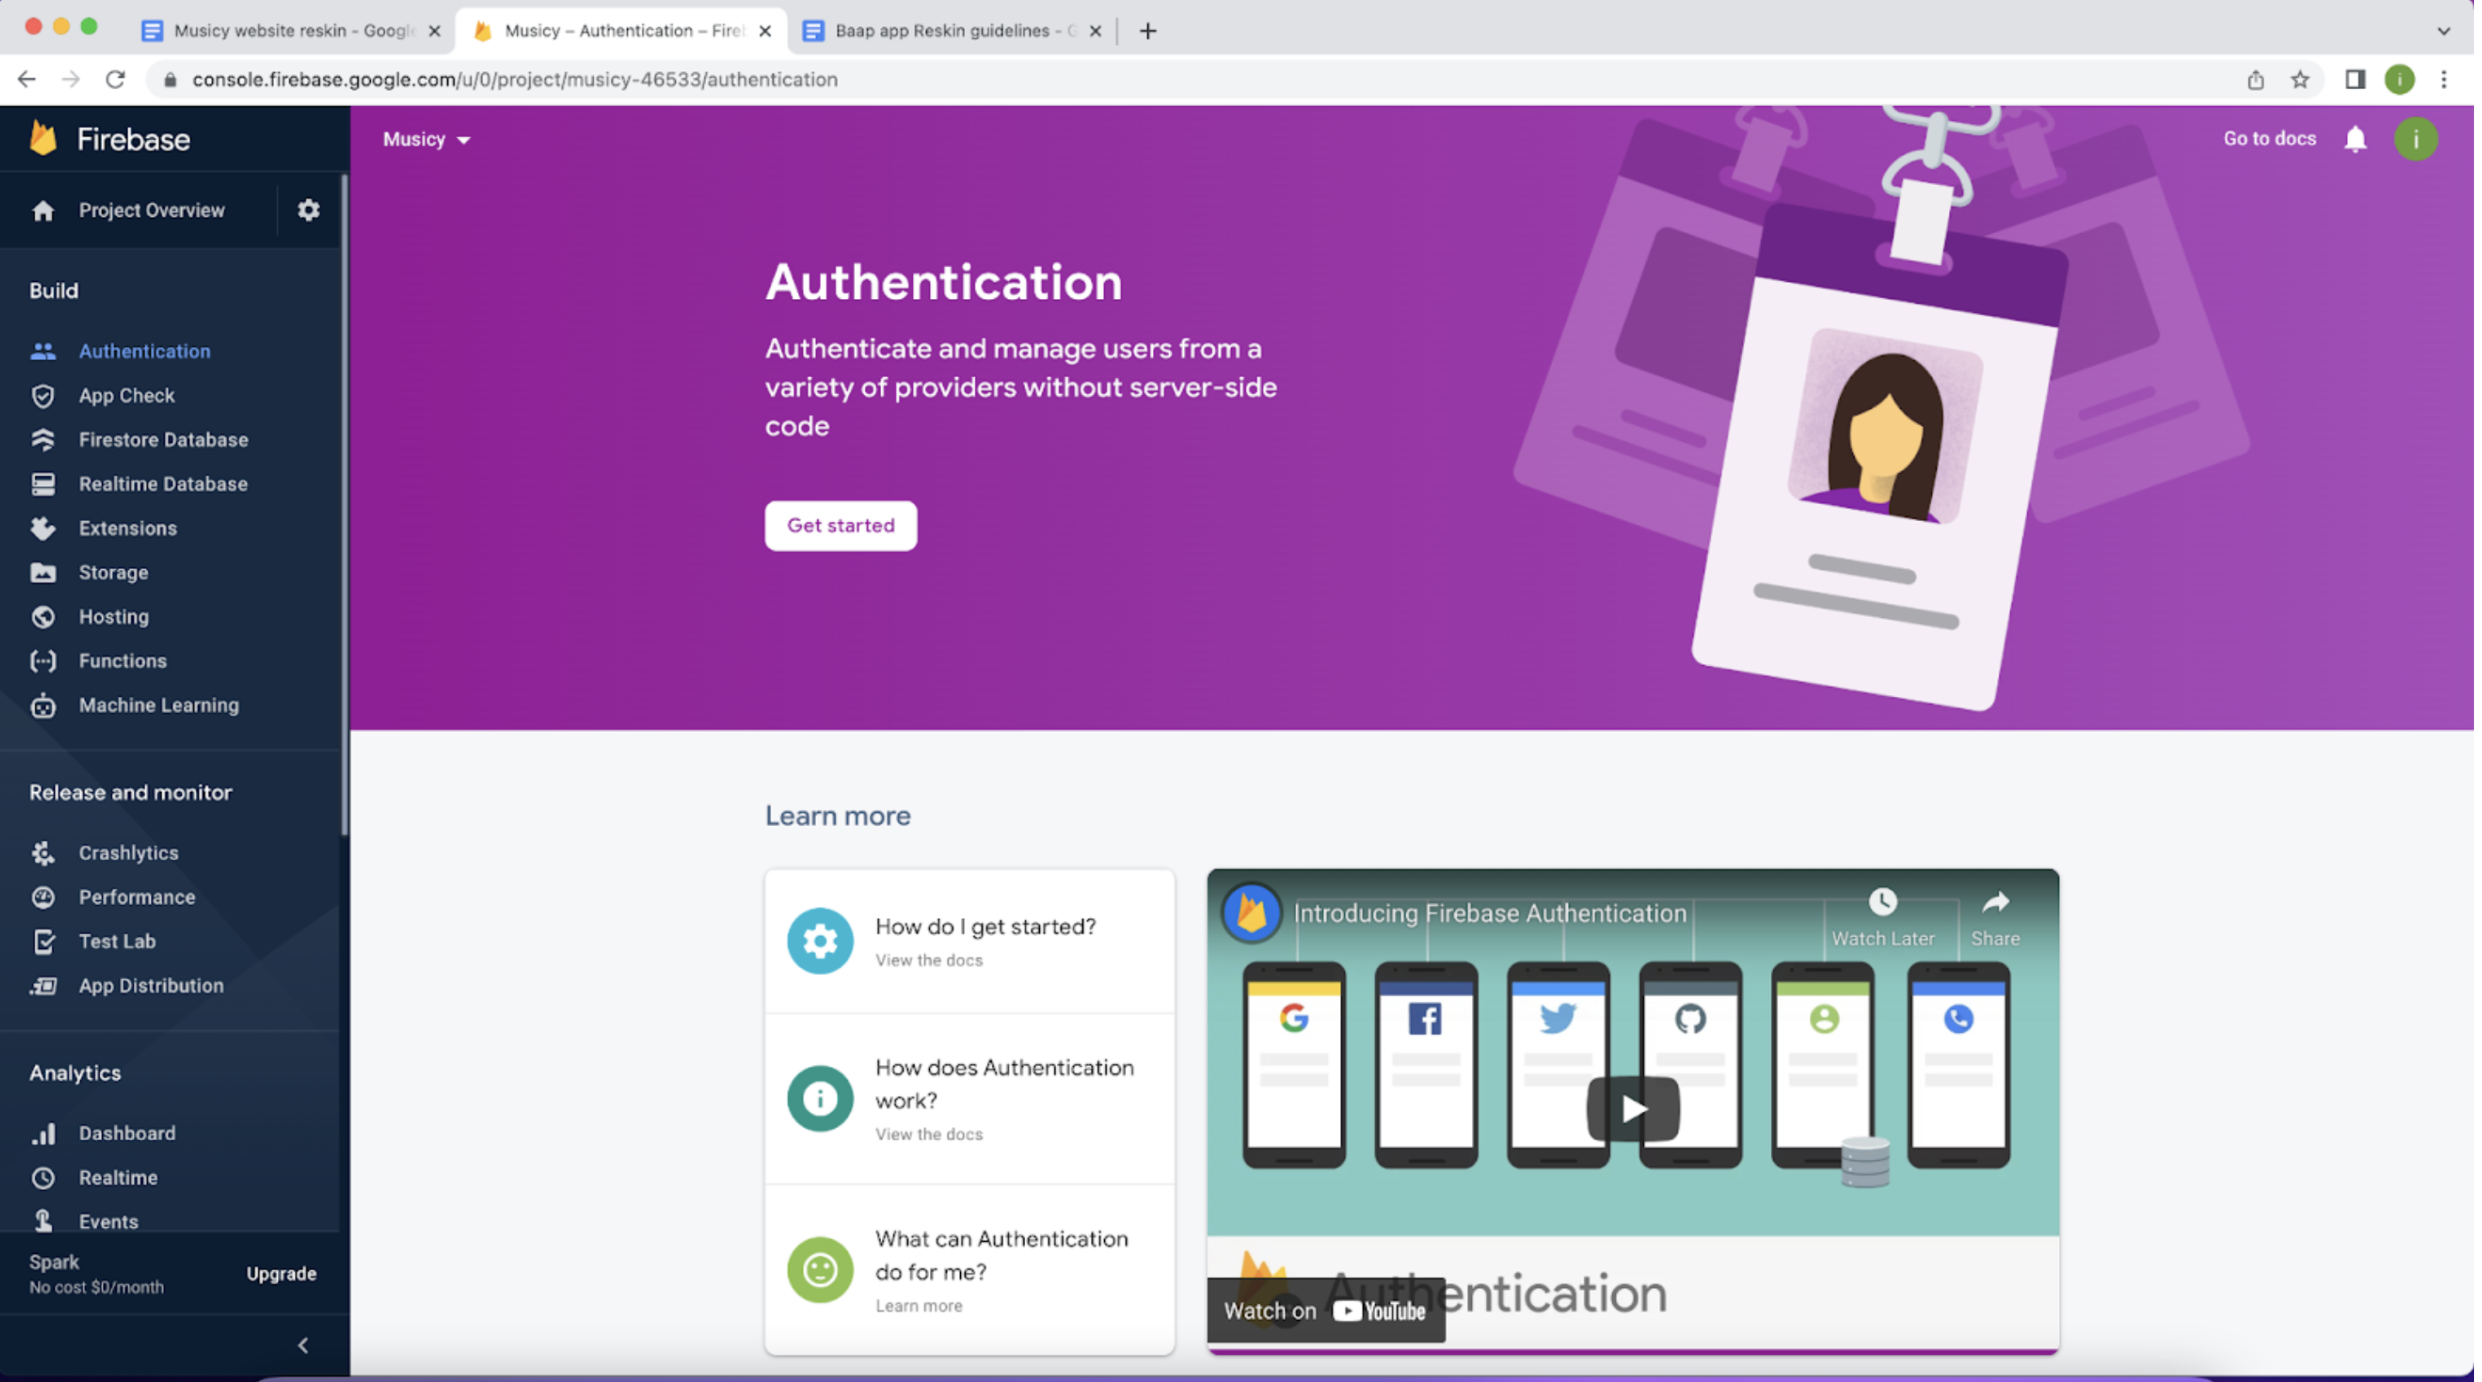
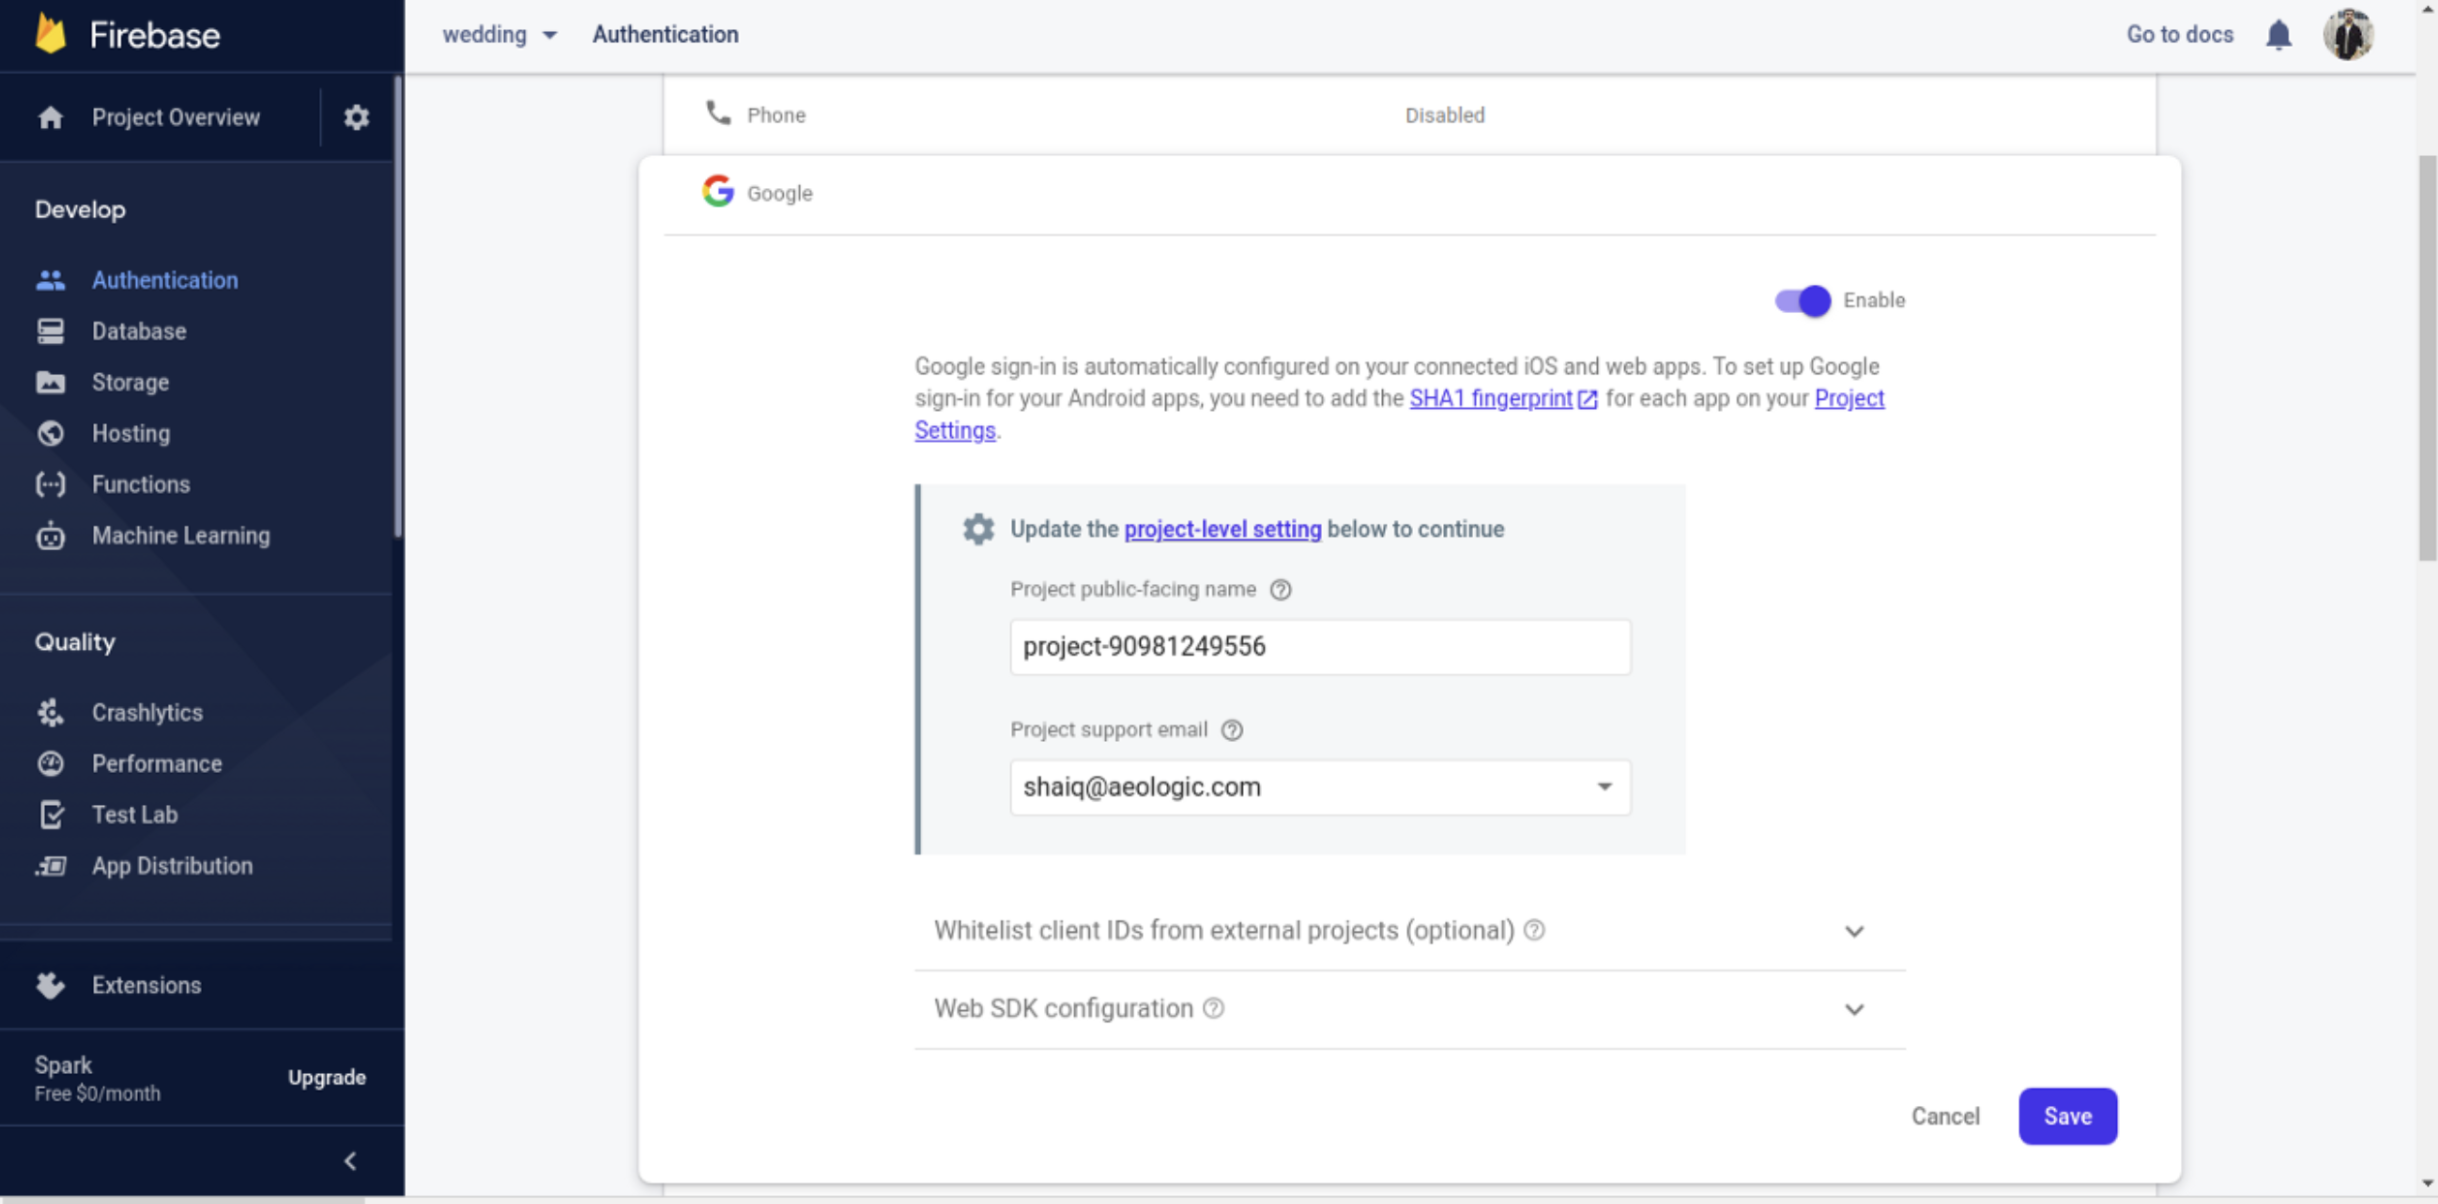
Enable social logins
Go to Authentication tab from left menu and click on get started
Google login
Select google sign in and enable it
Facebook login
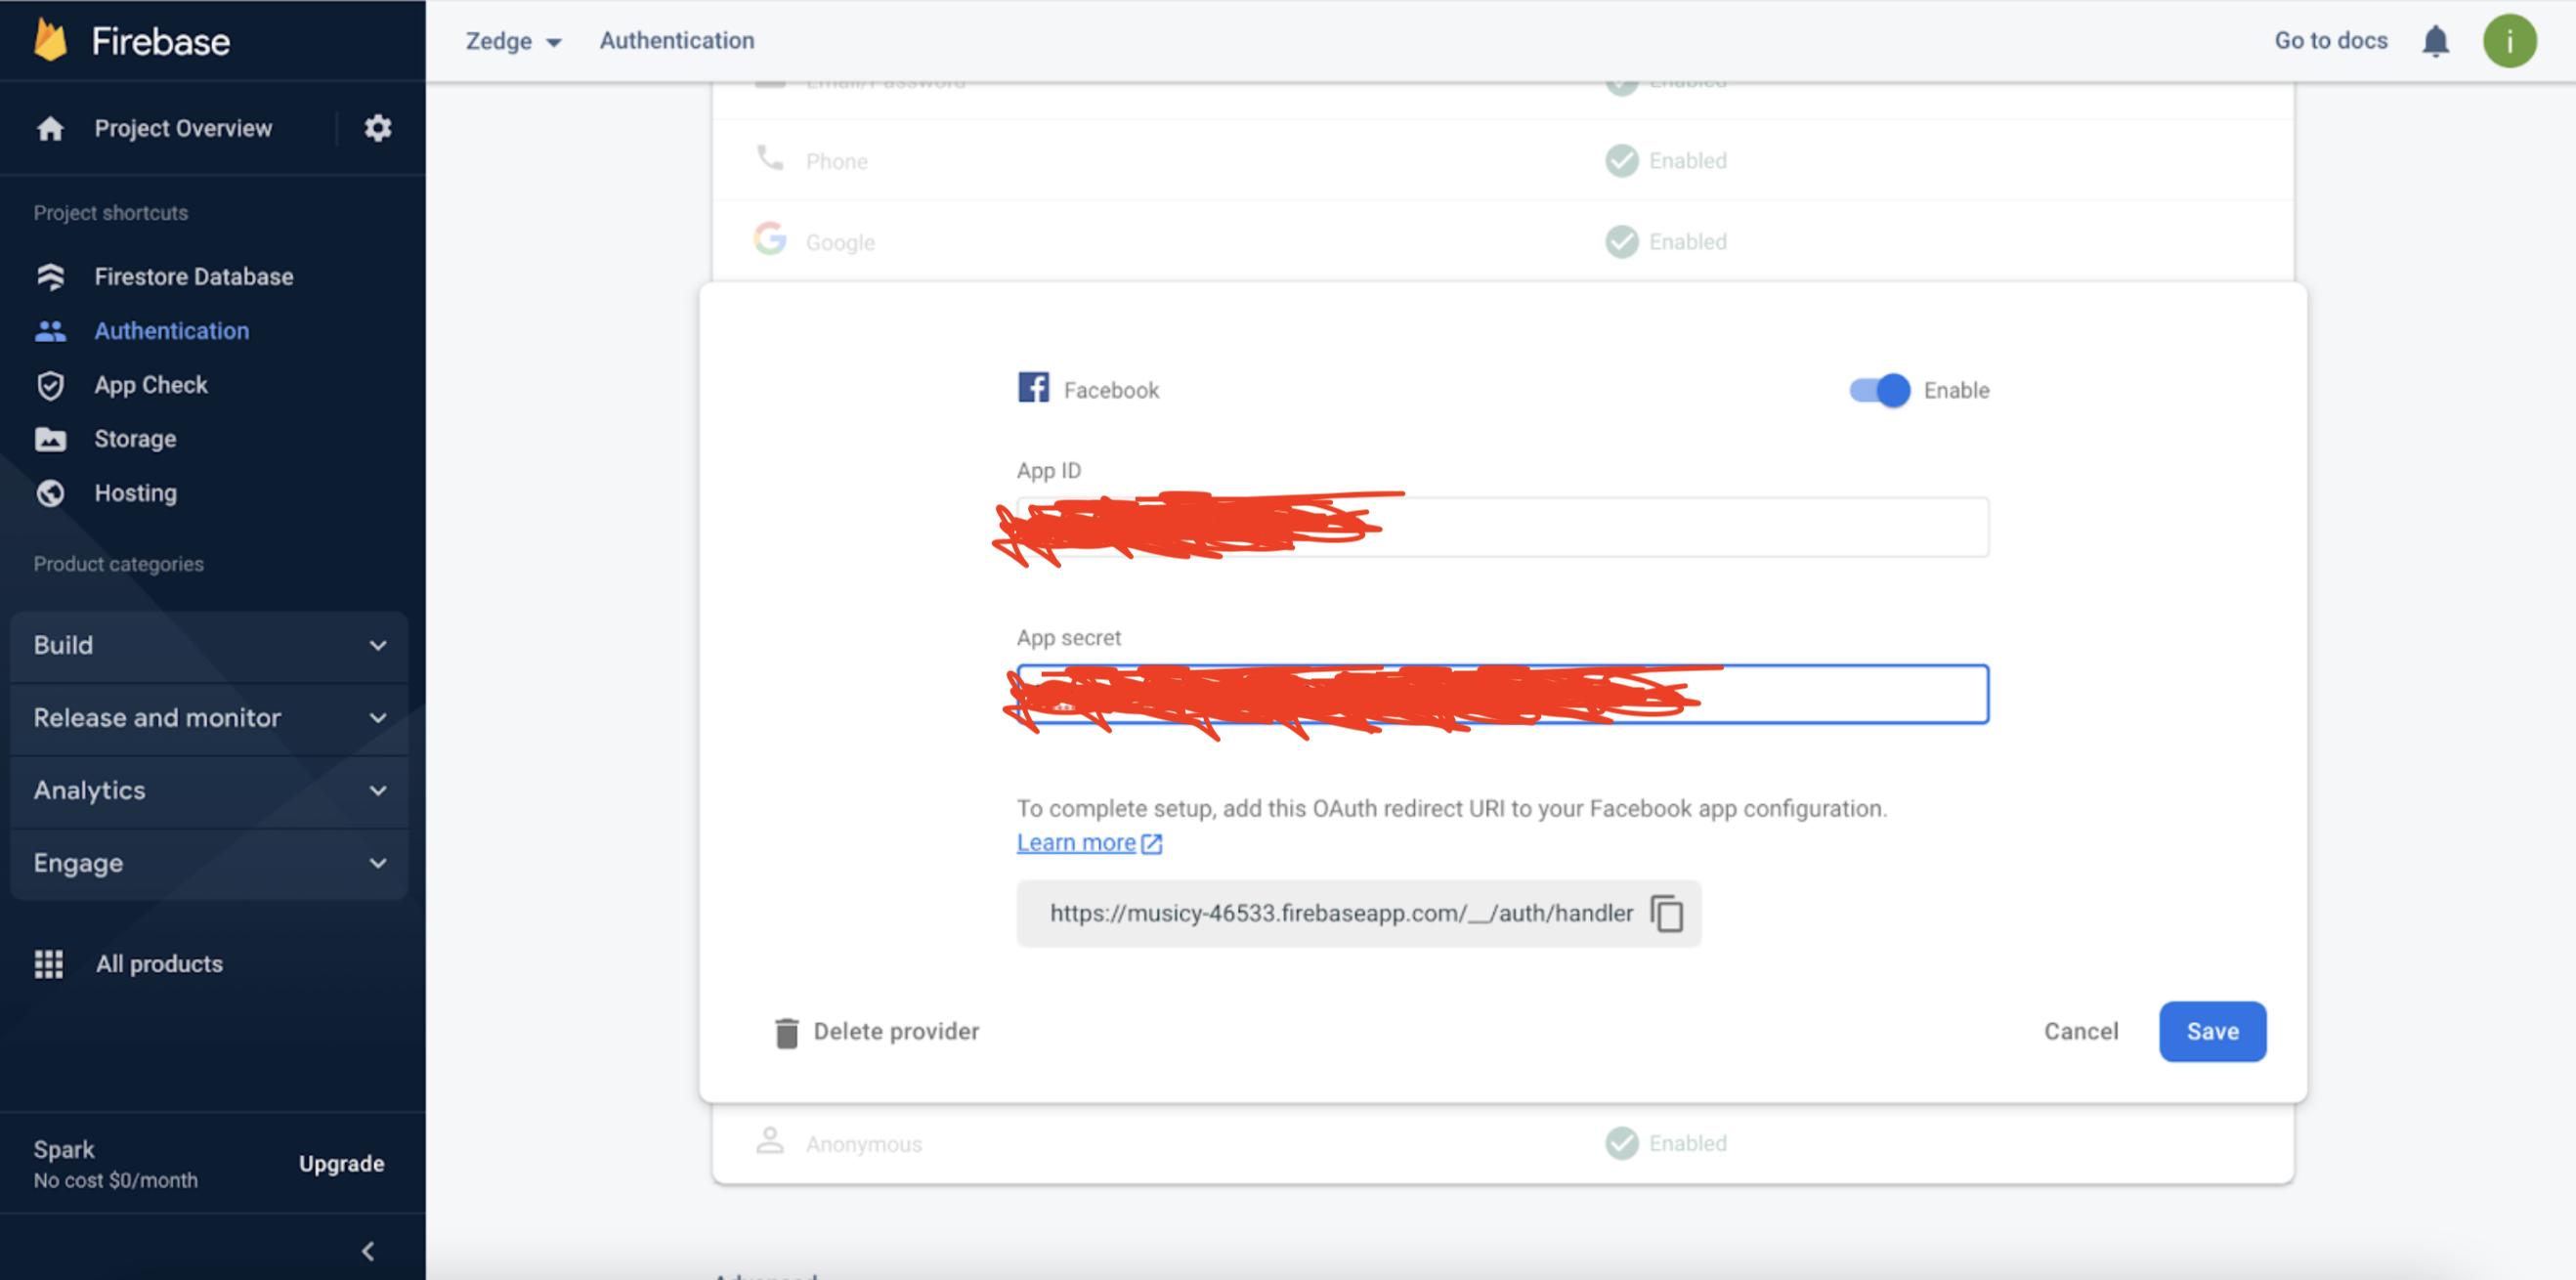
Link firebase project with source code
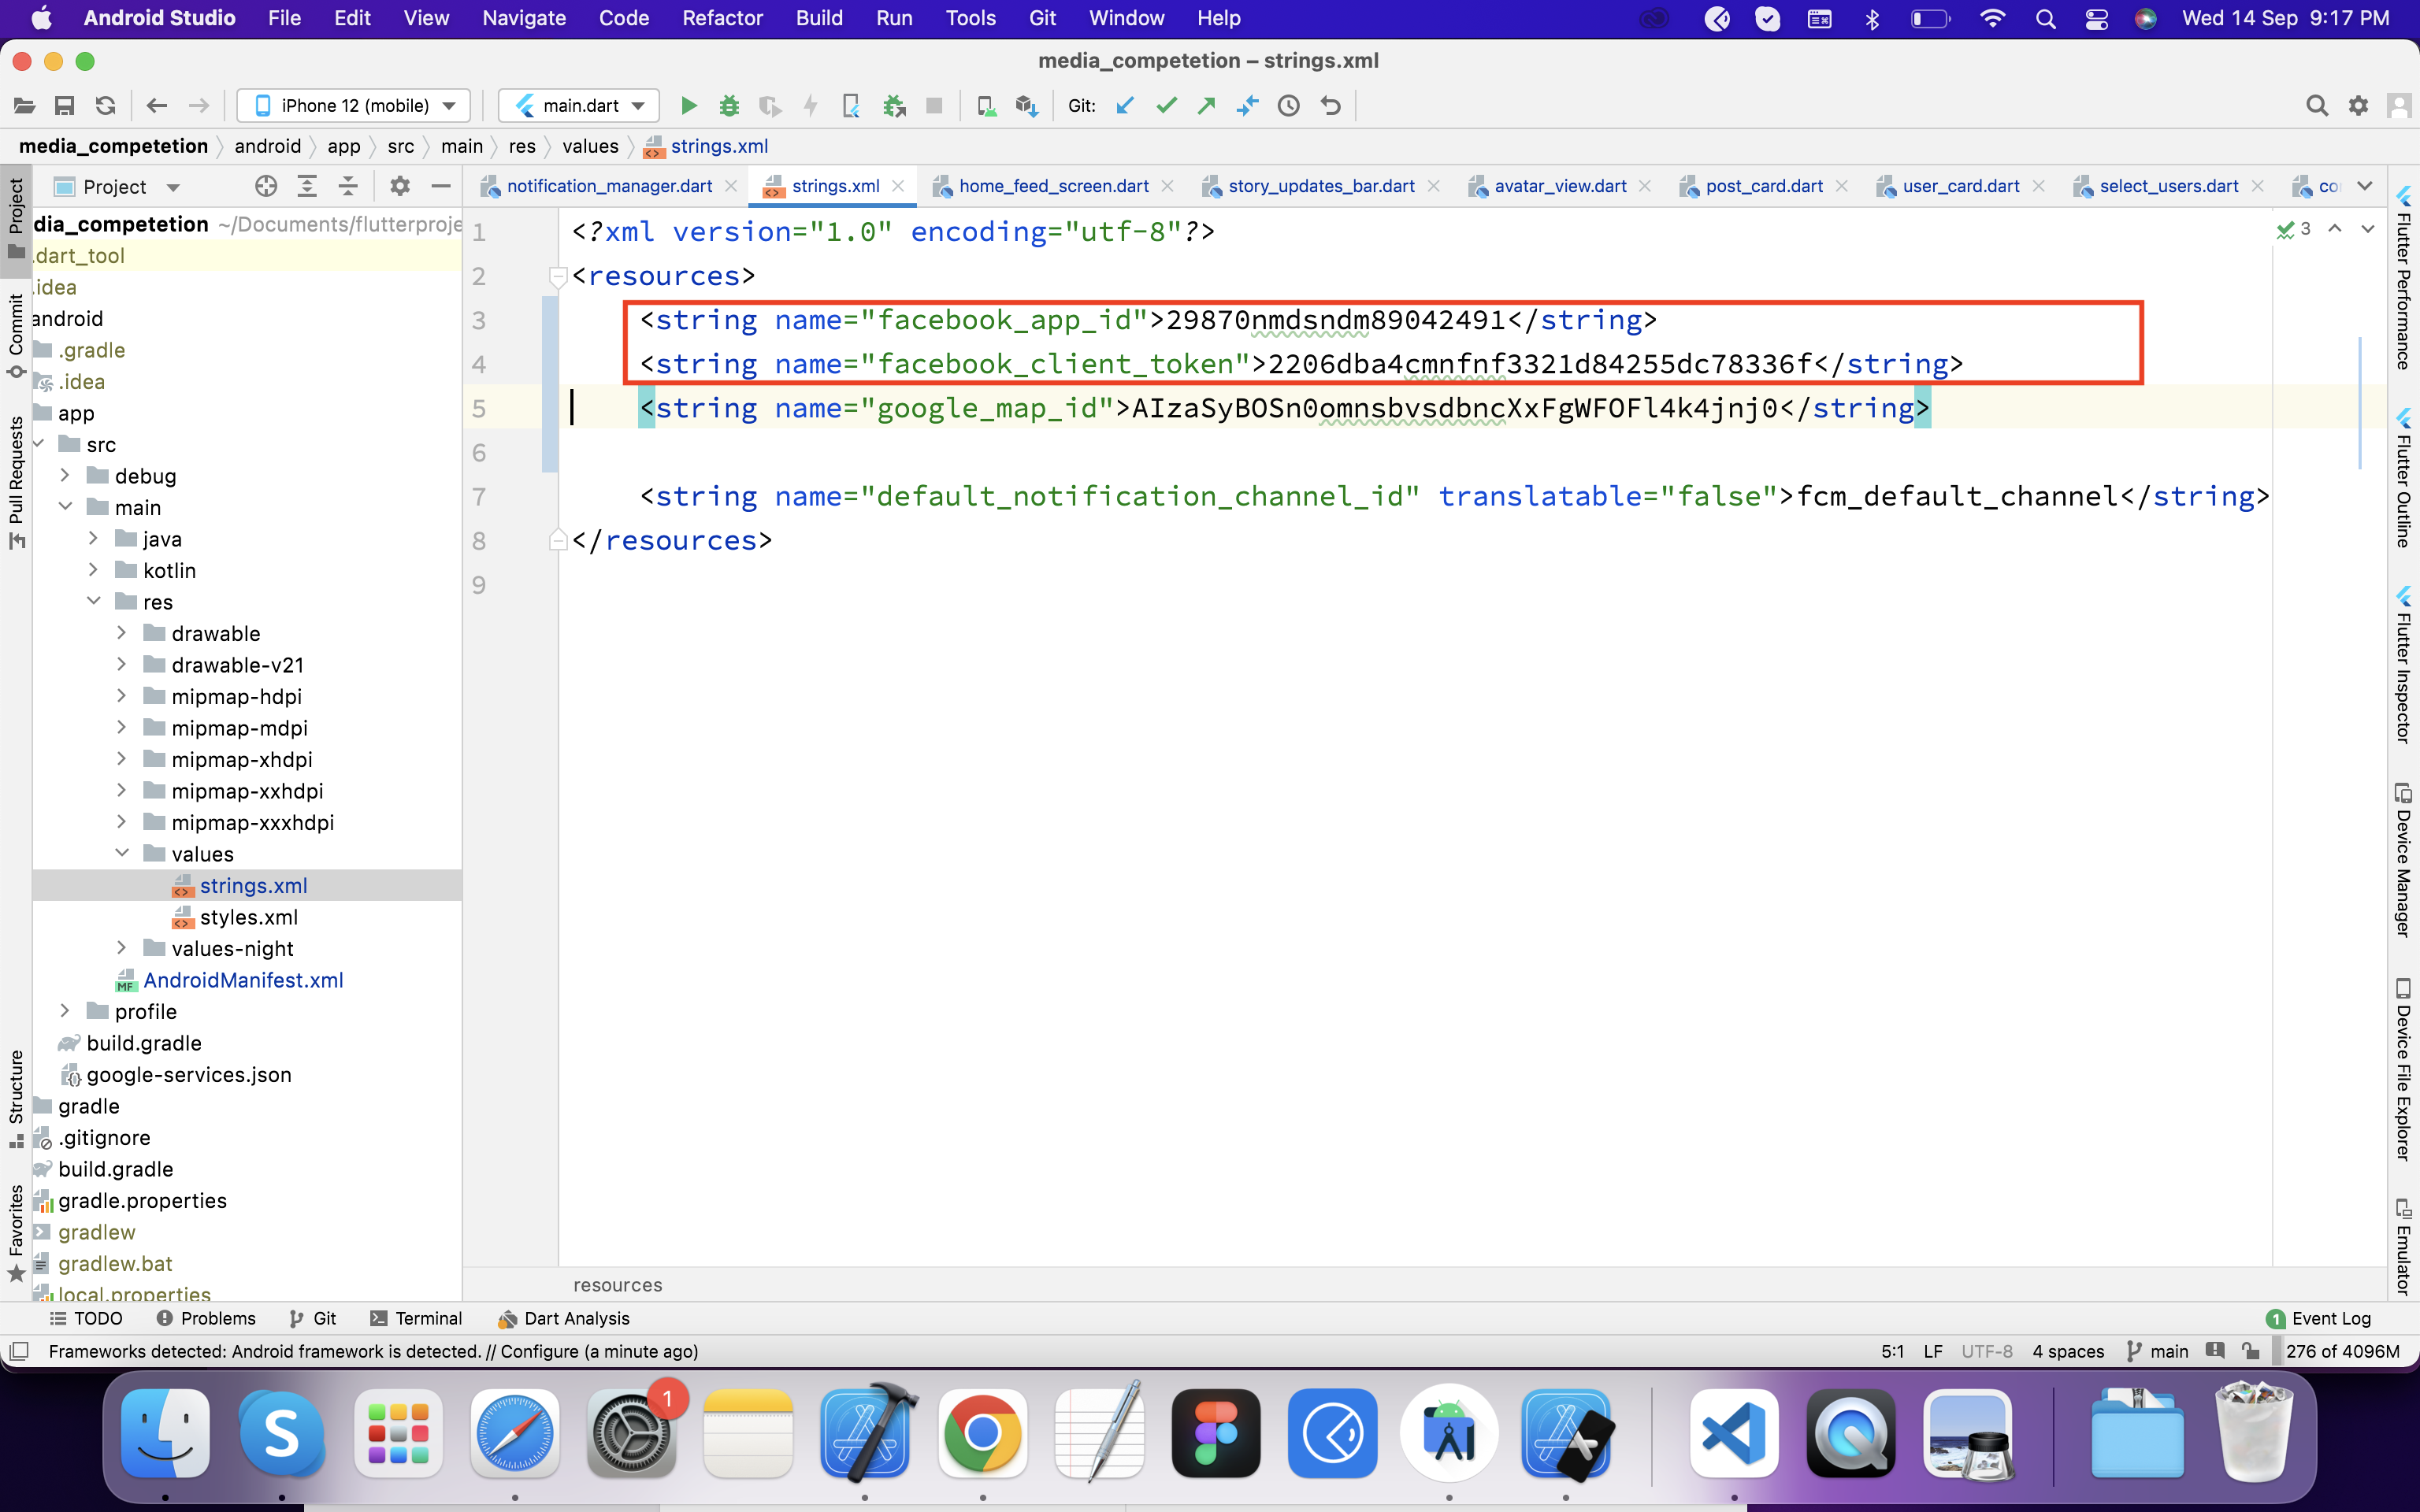
Third party api keys
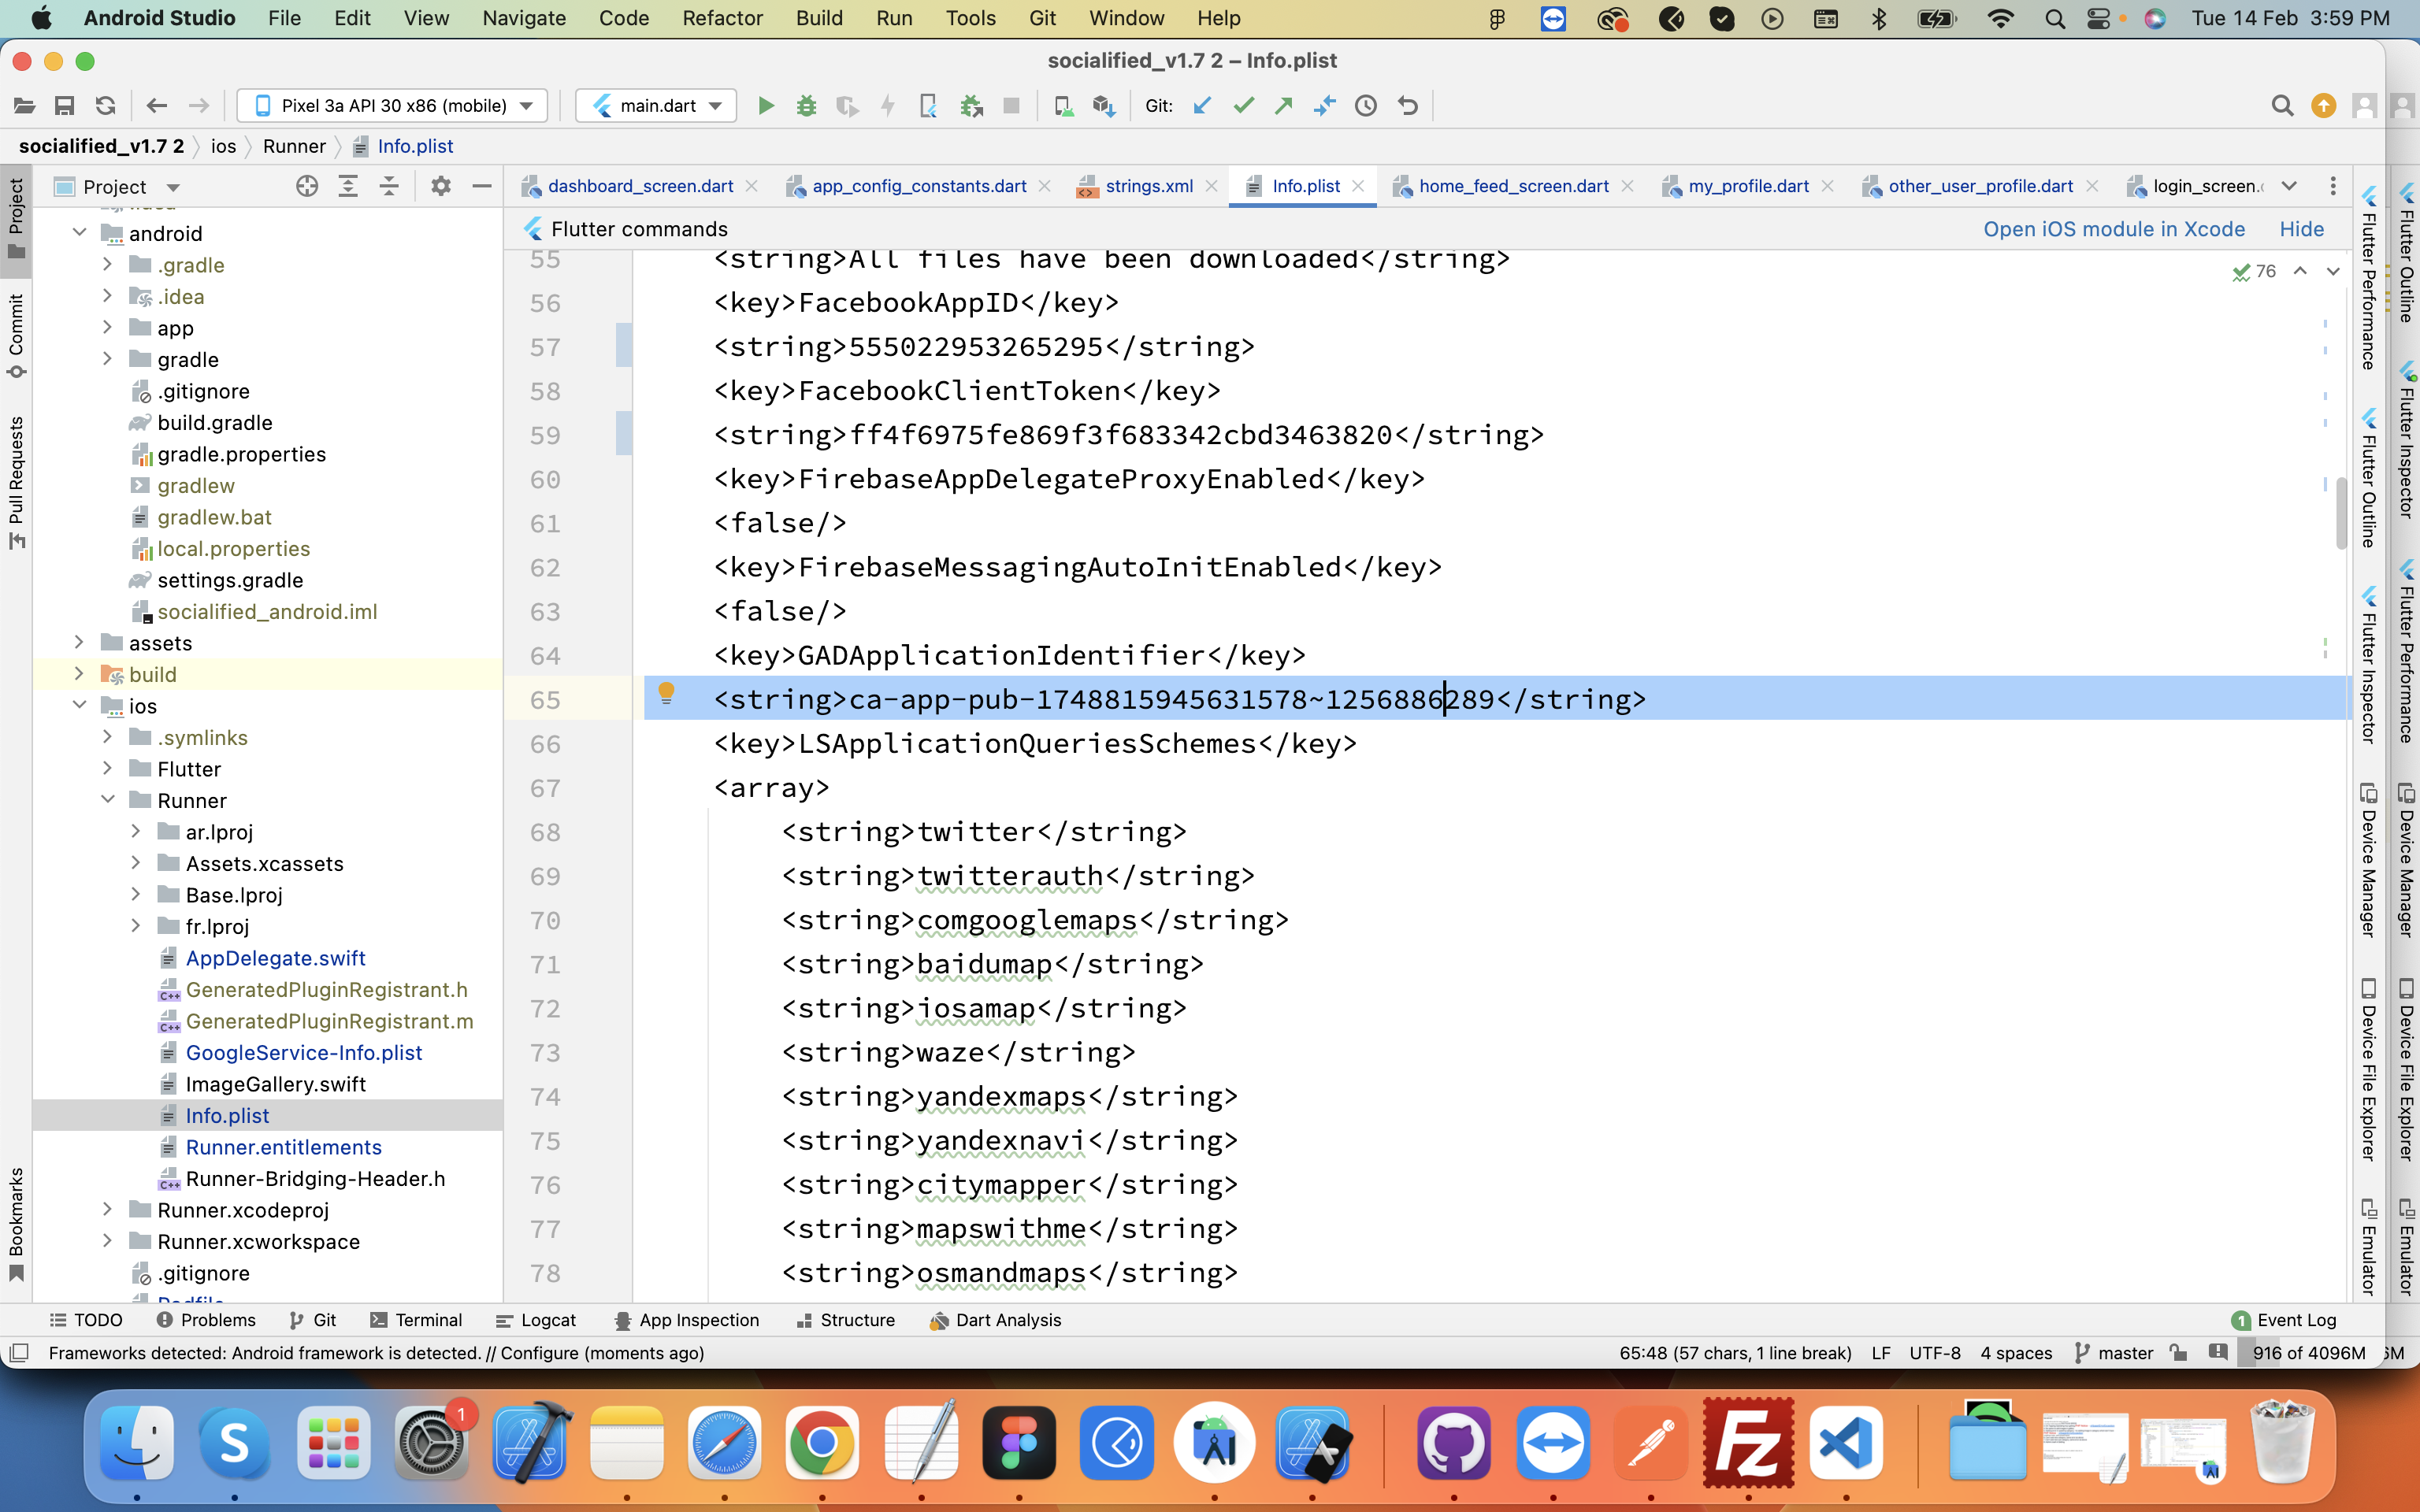
Setup Agora api key for audio video calling

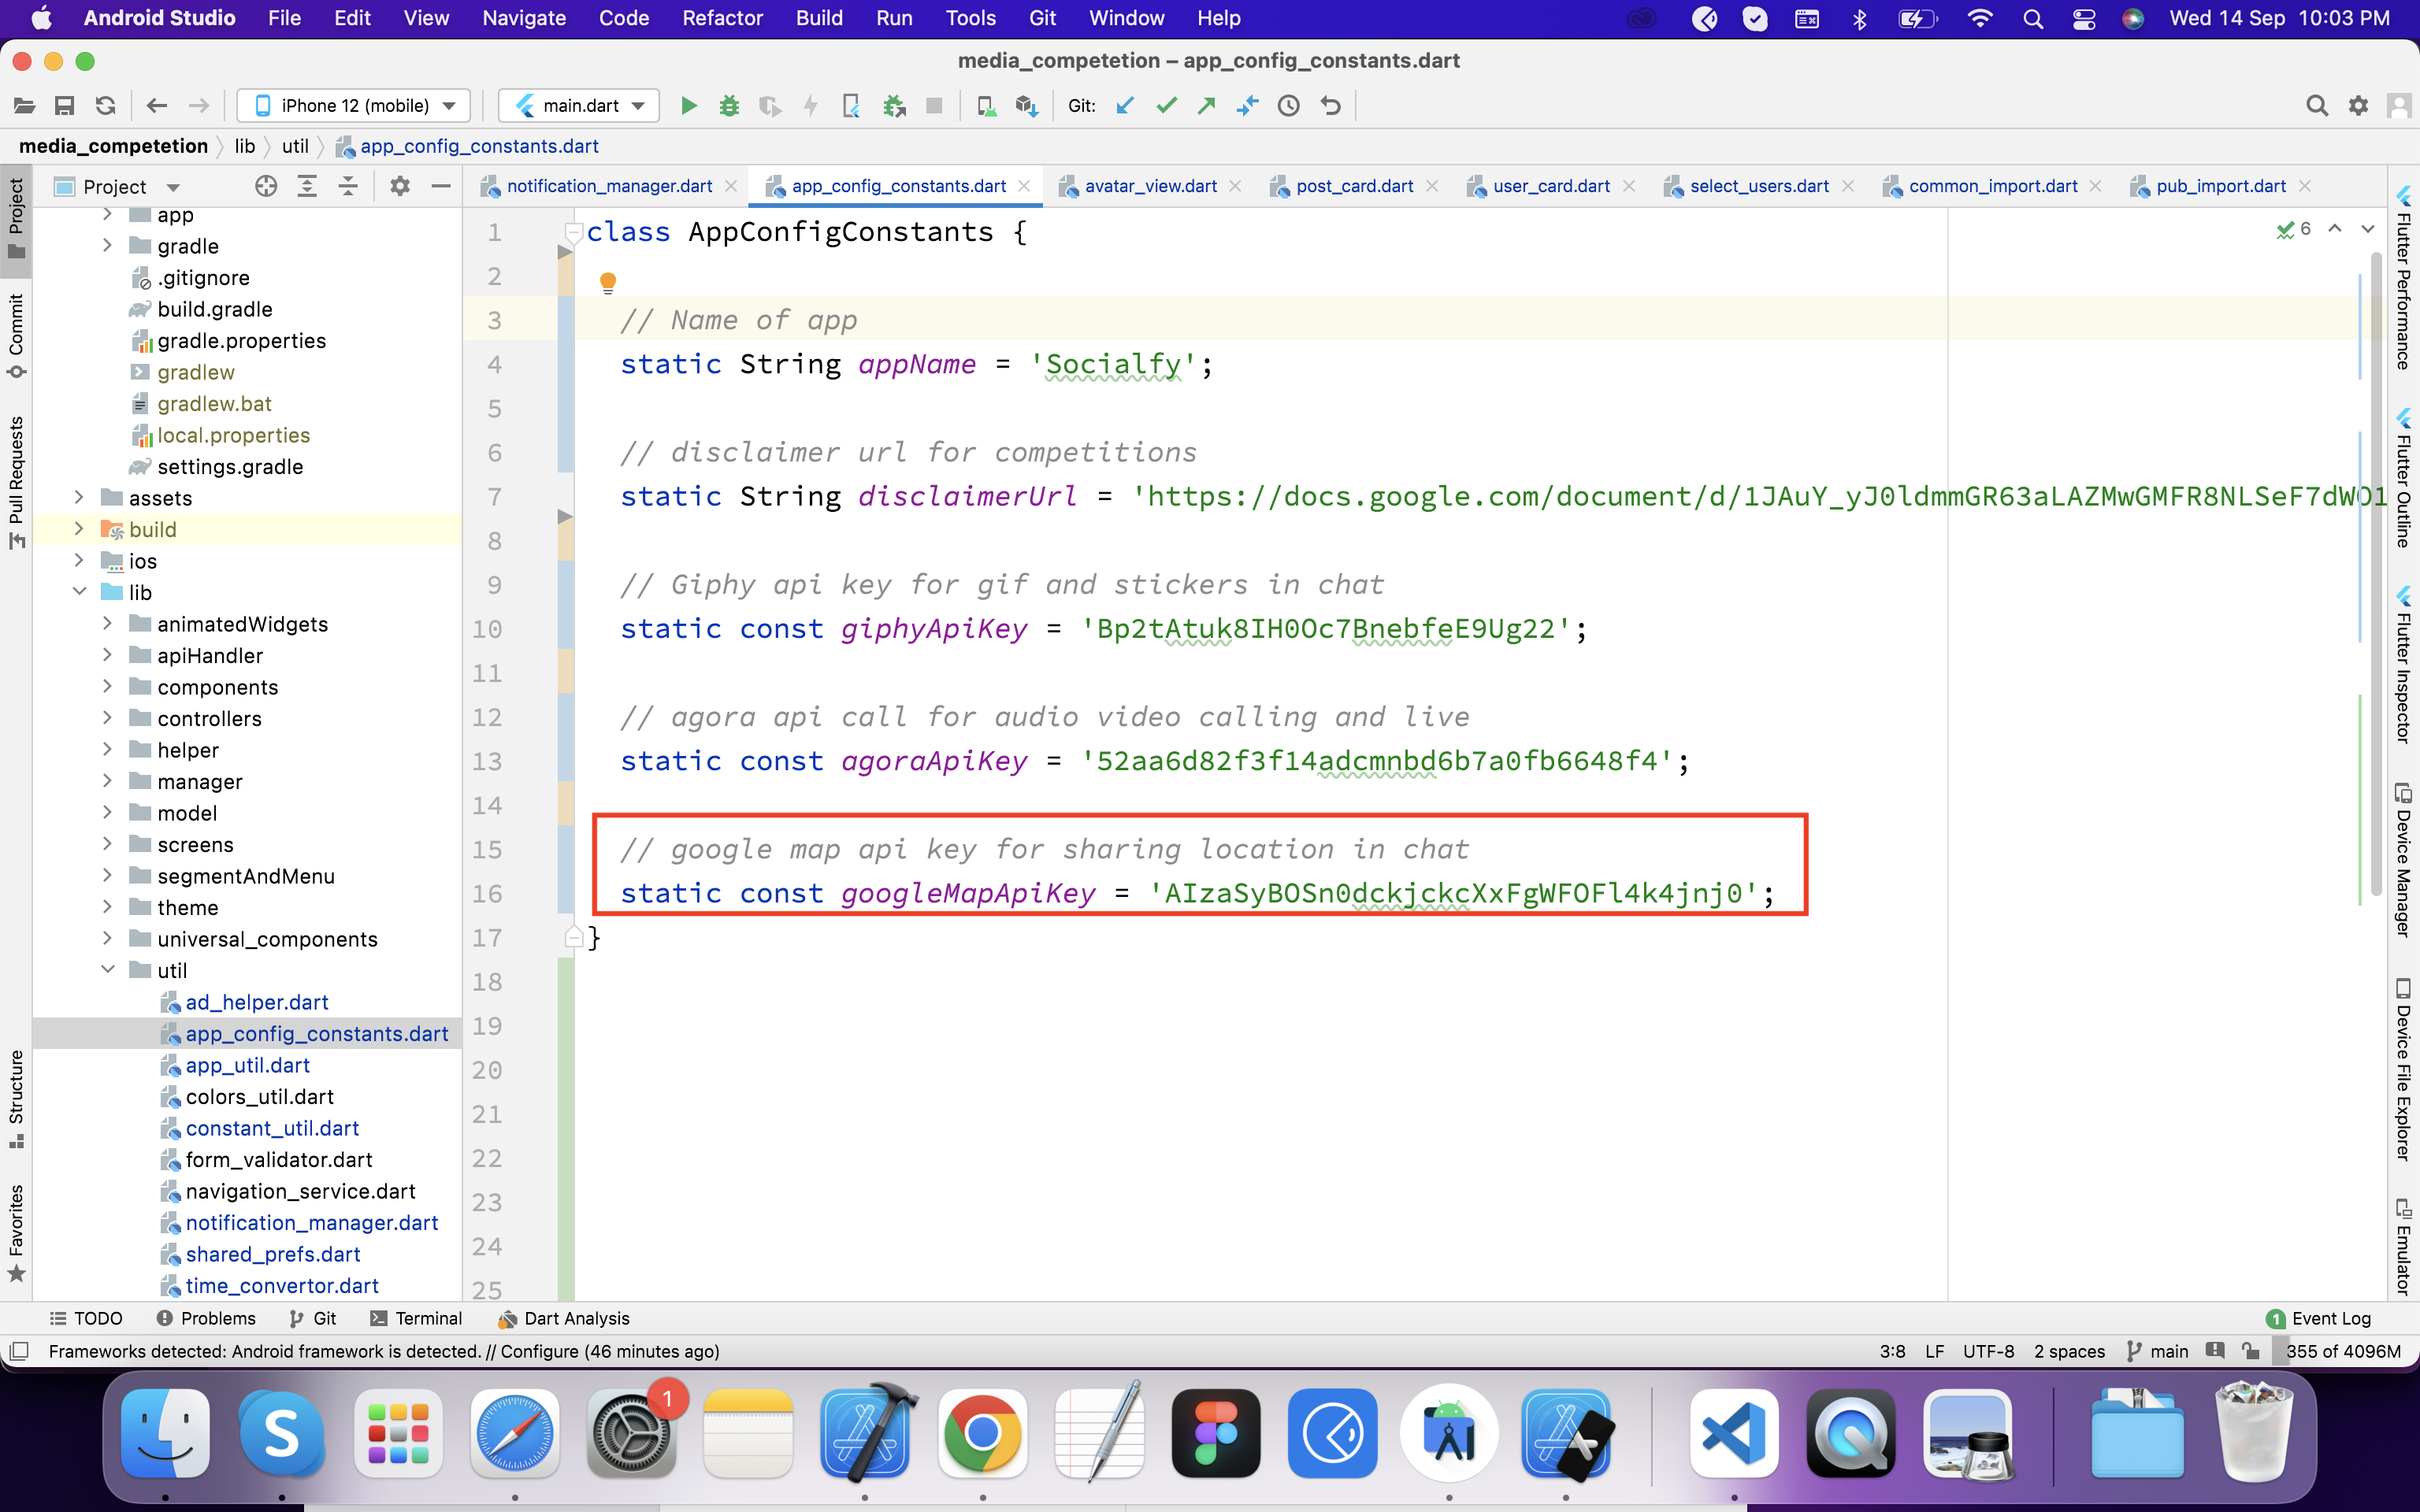
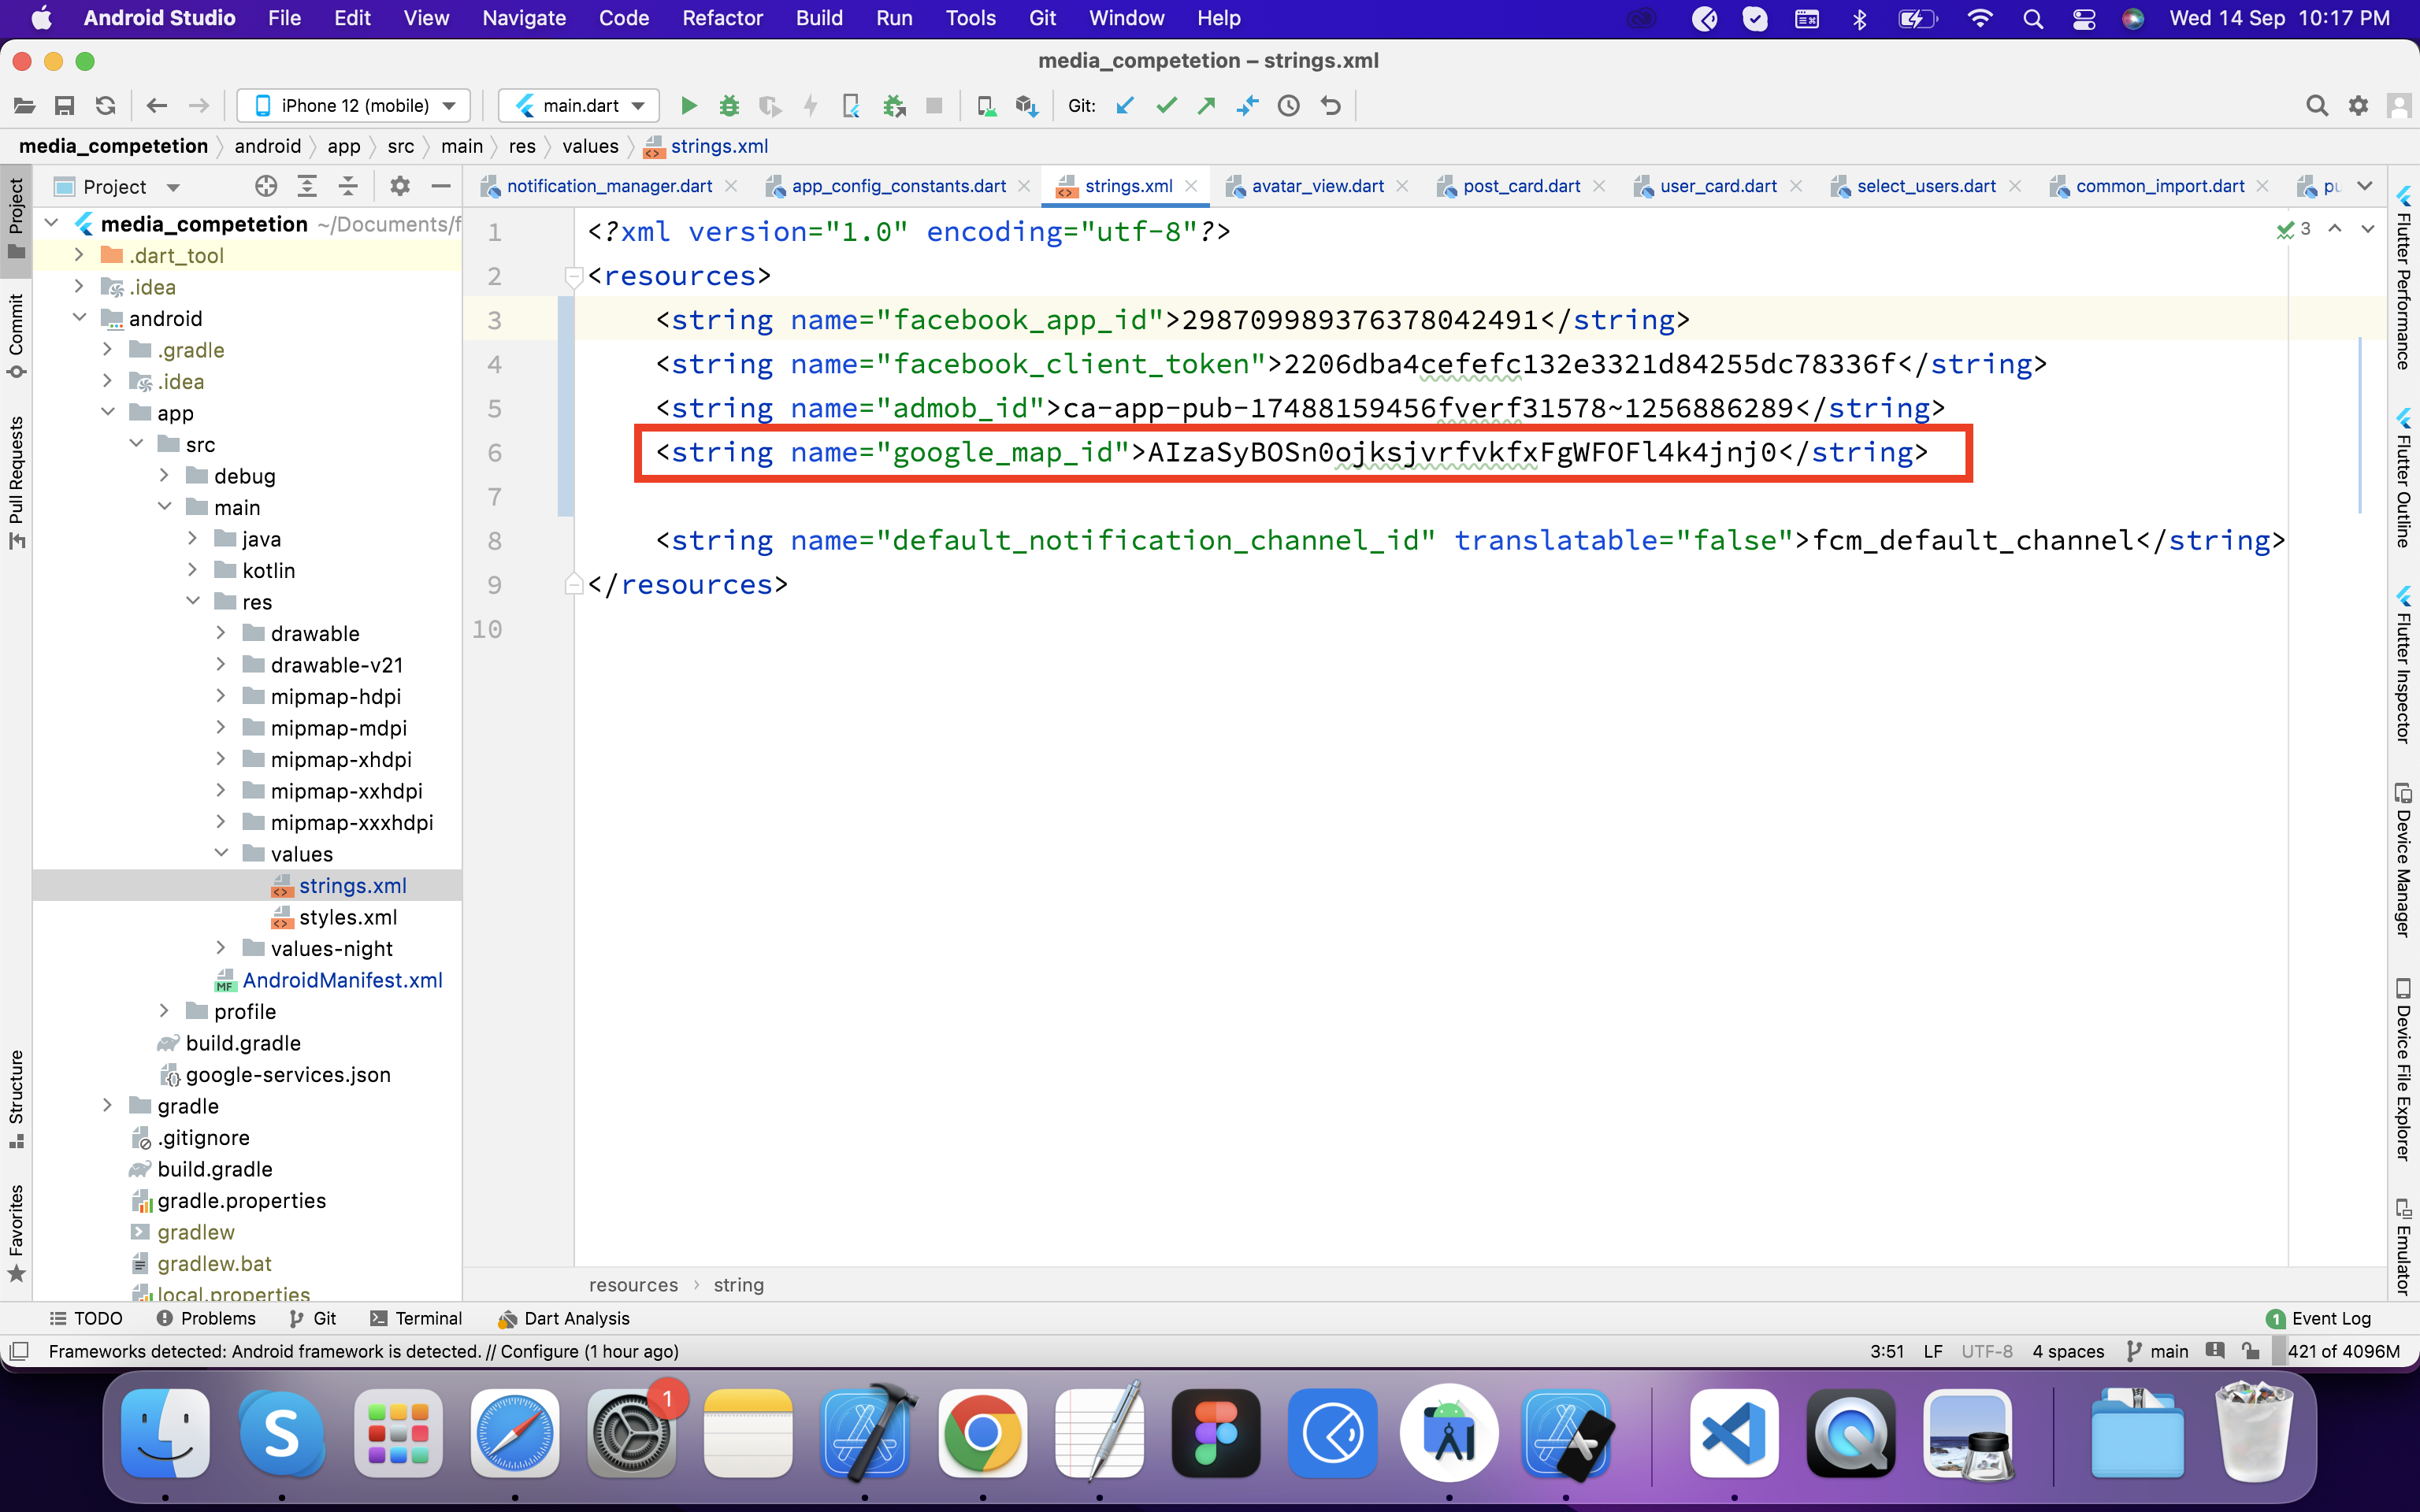
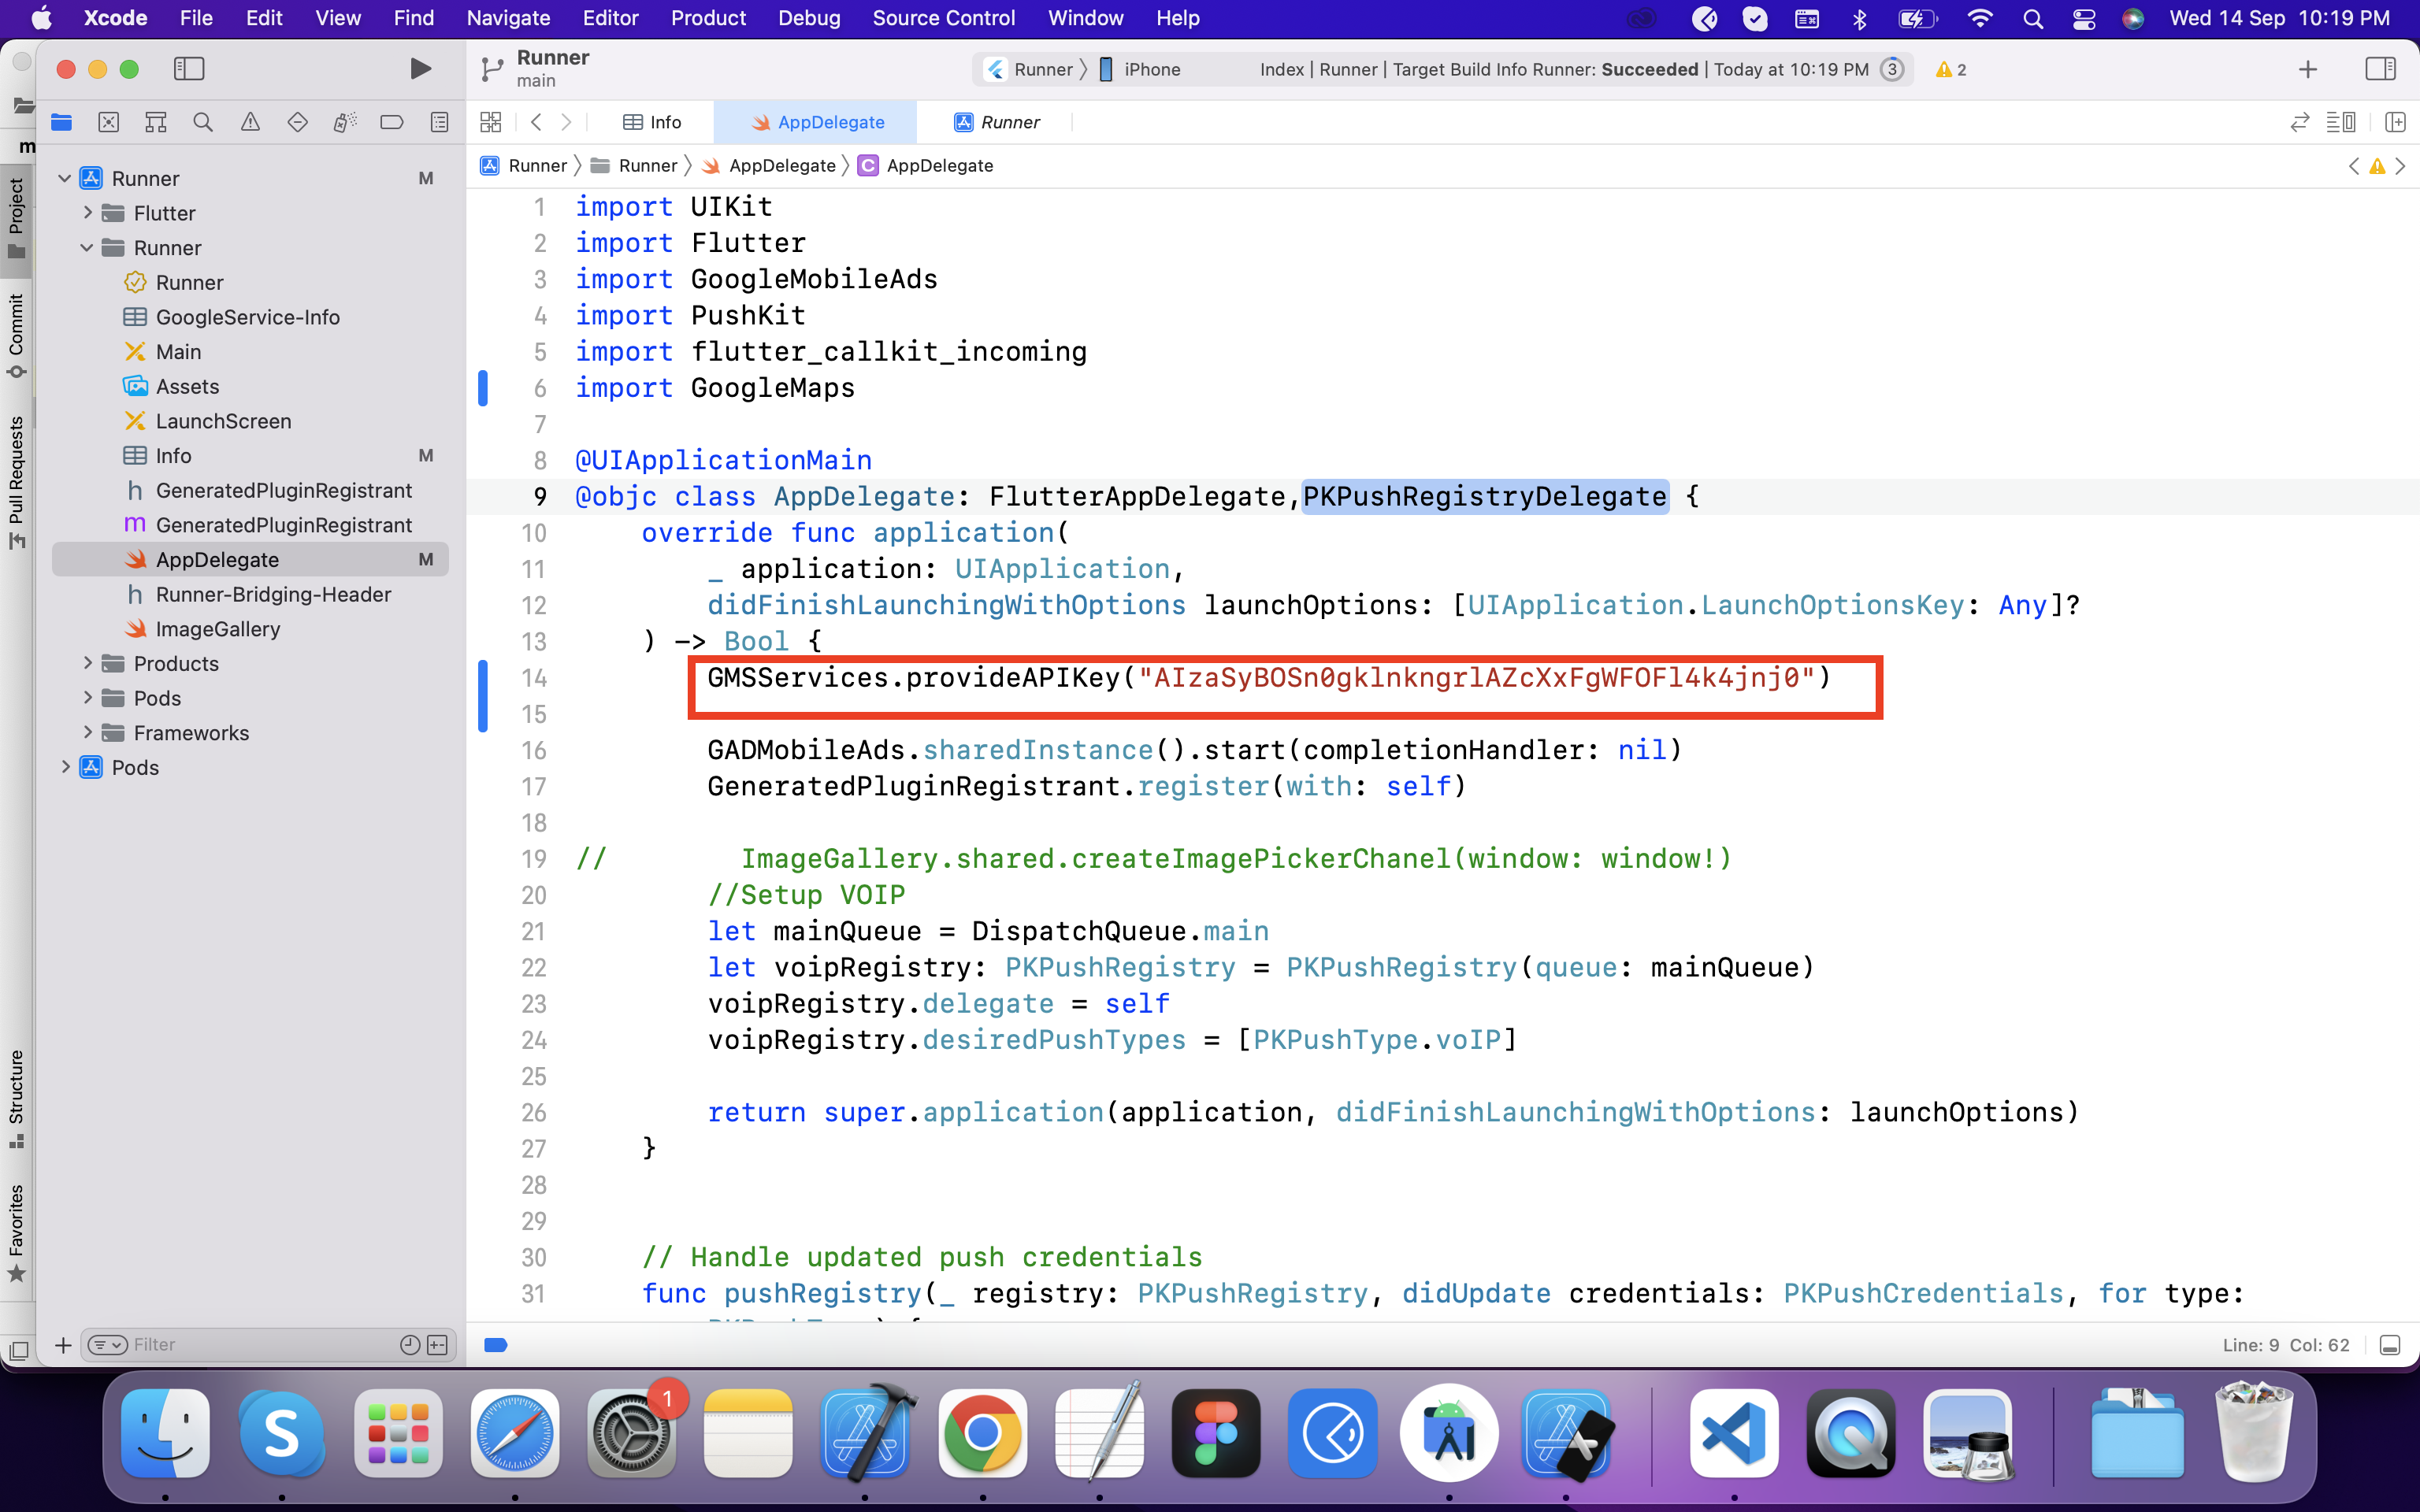
Setup Google map api key for showing google map for location sharing in chat
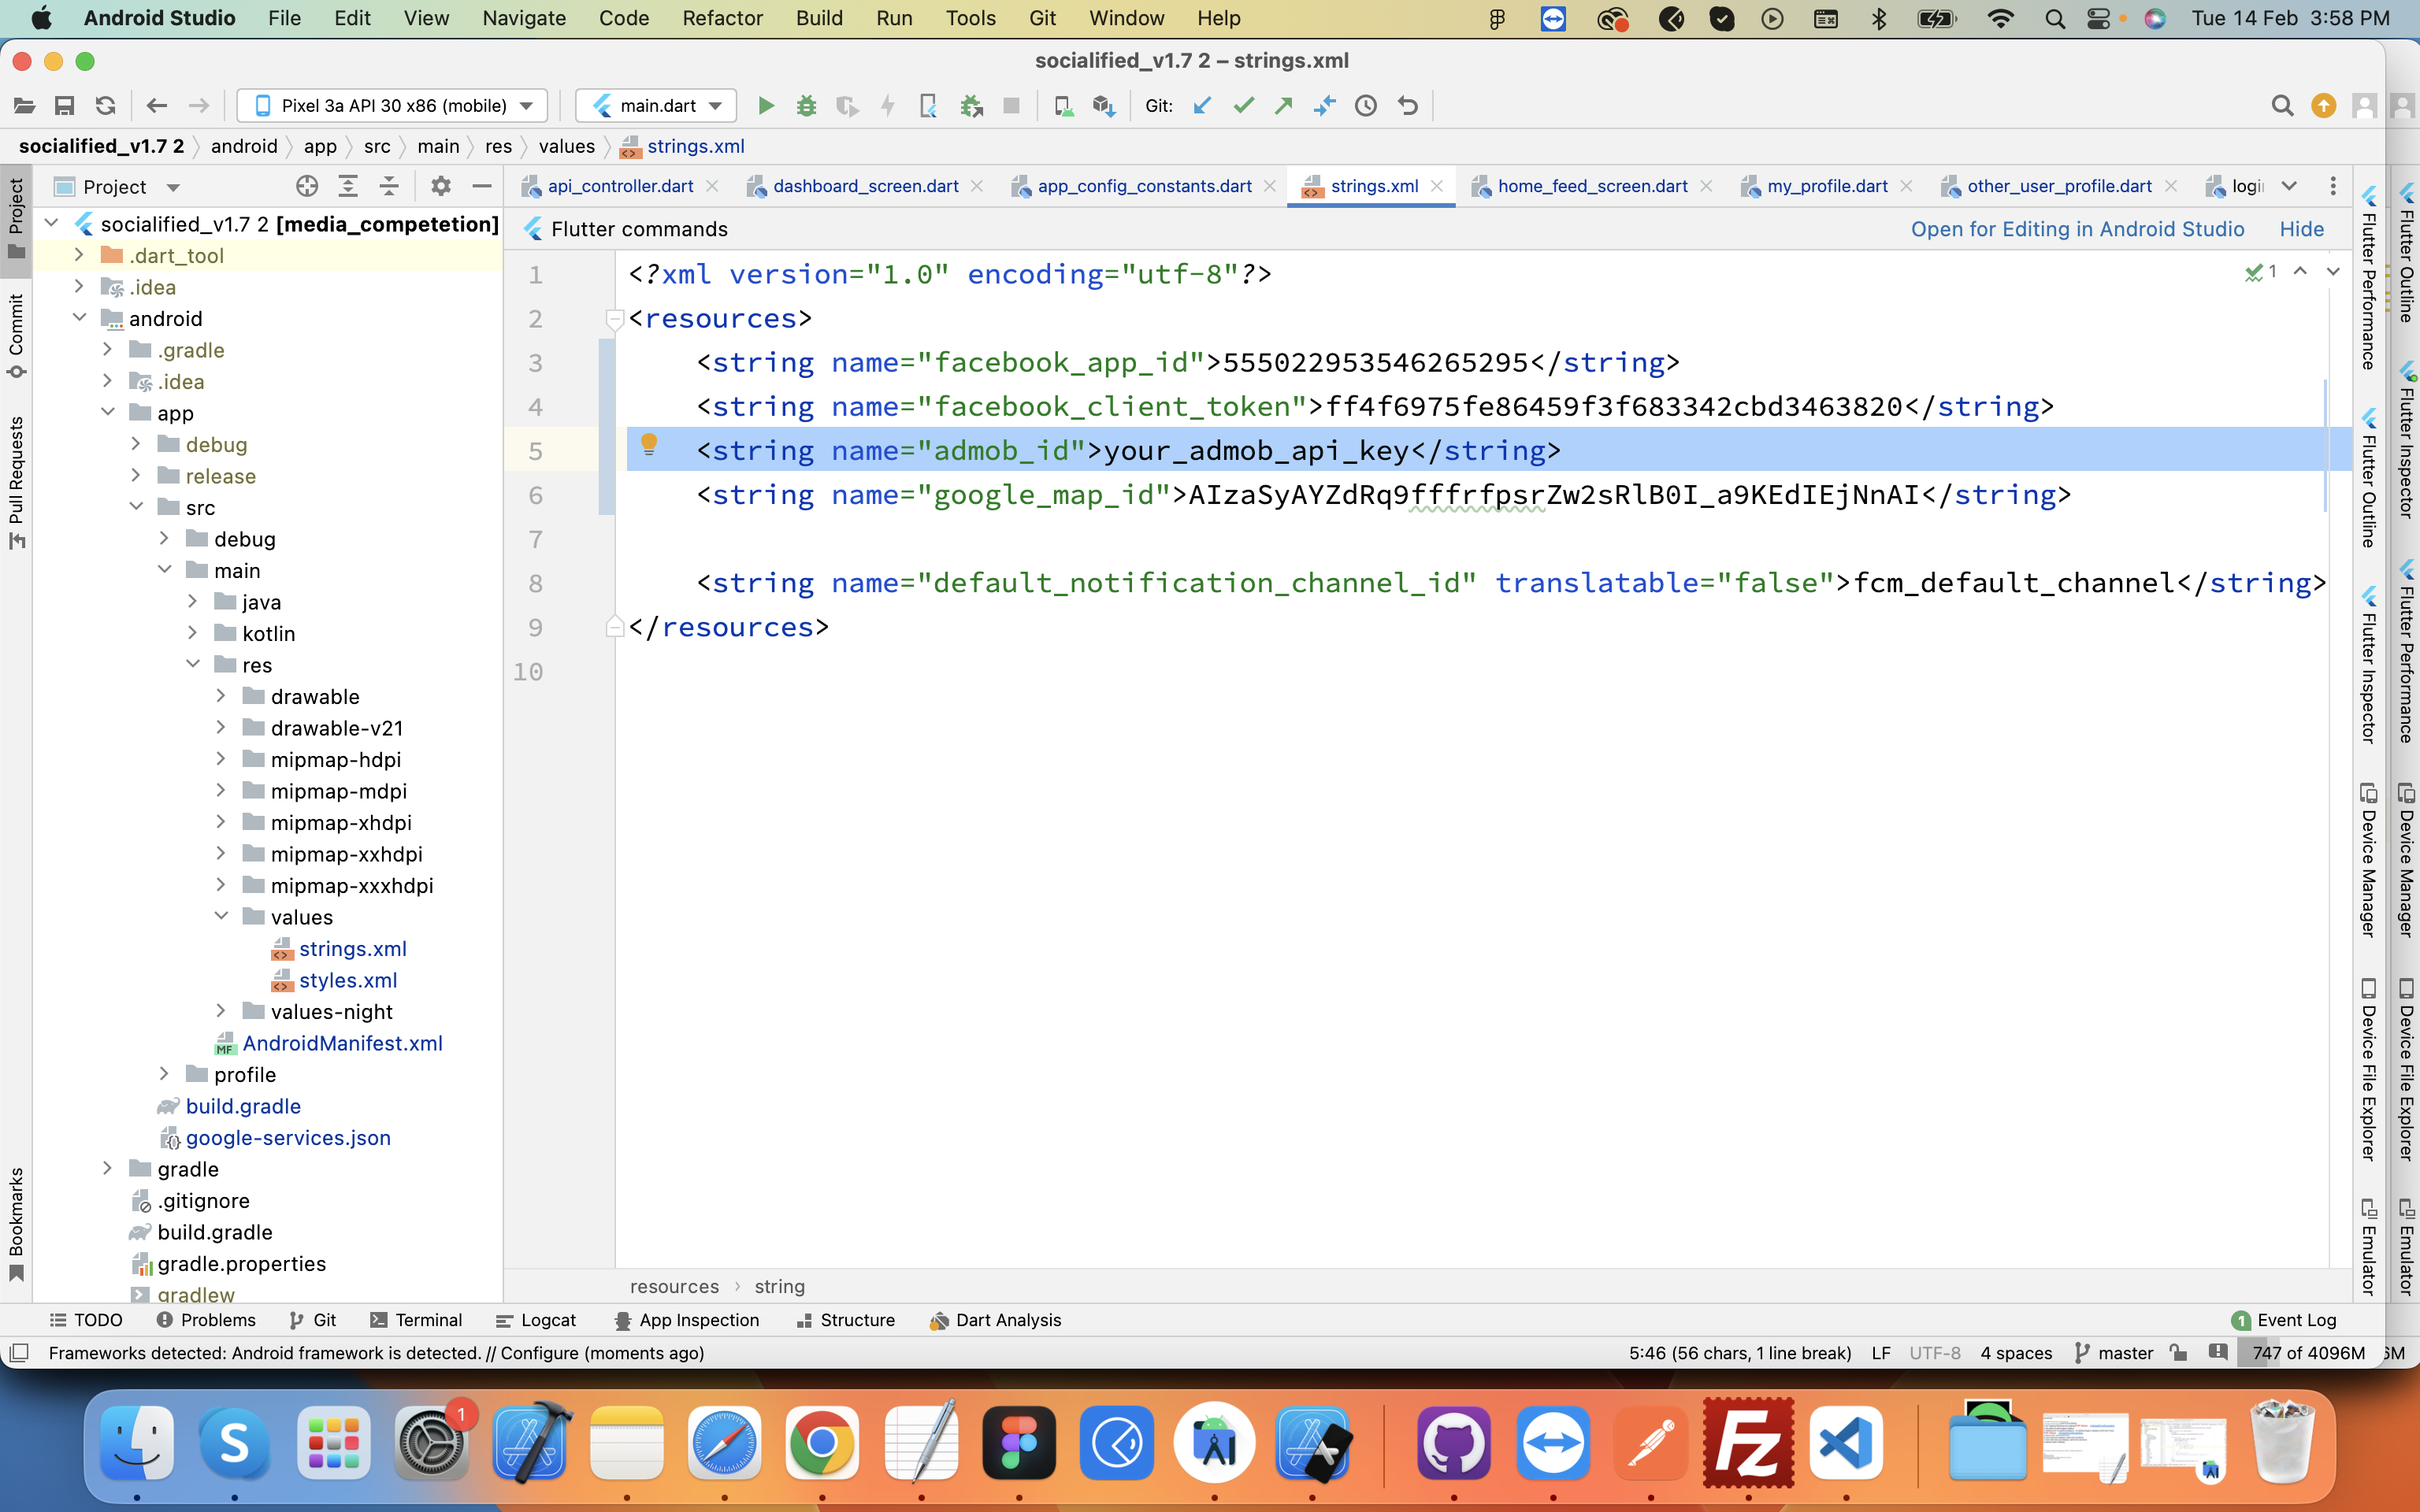
Setup Google Admob api key for showing google ads
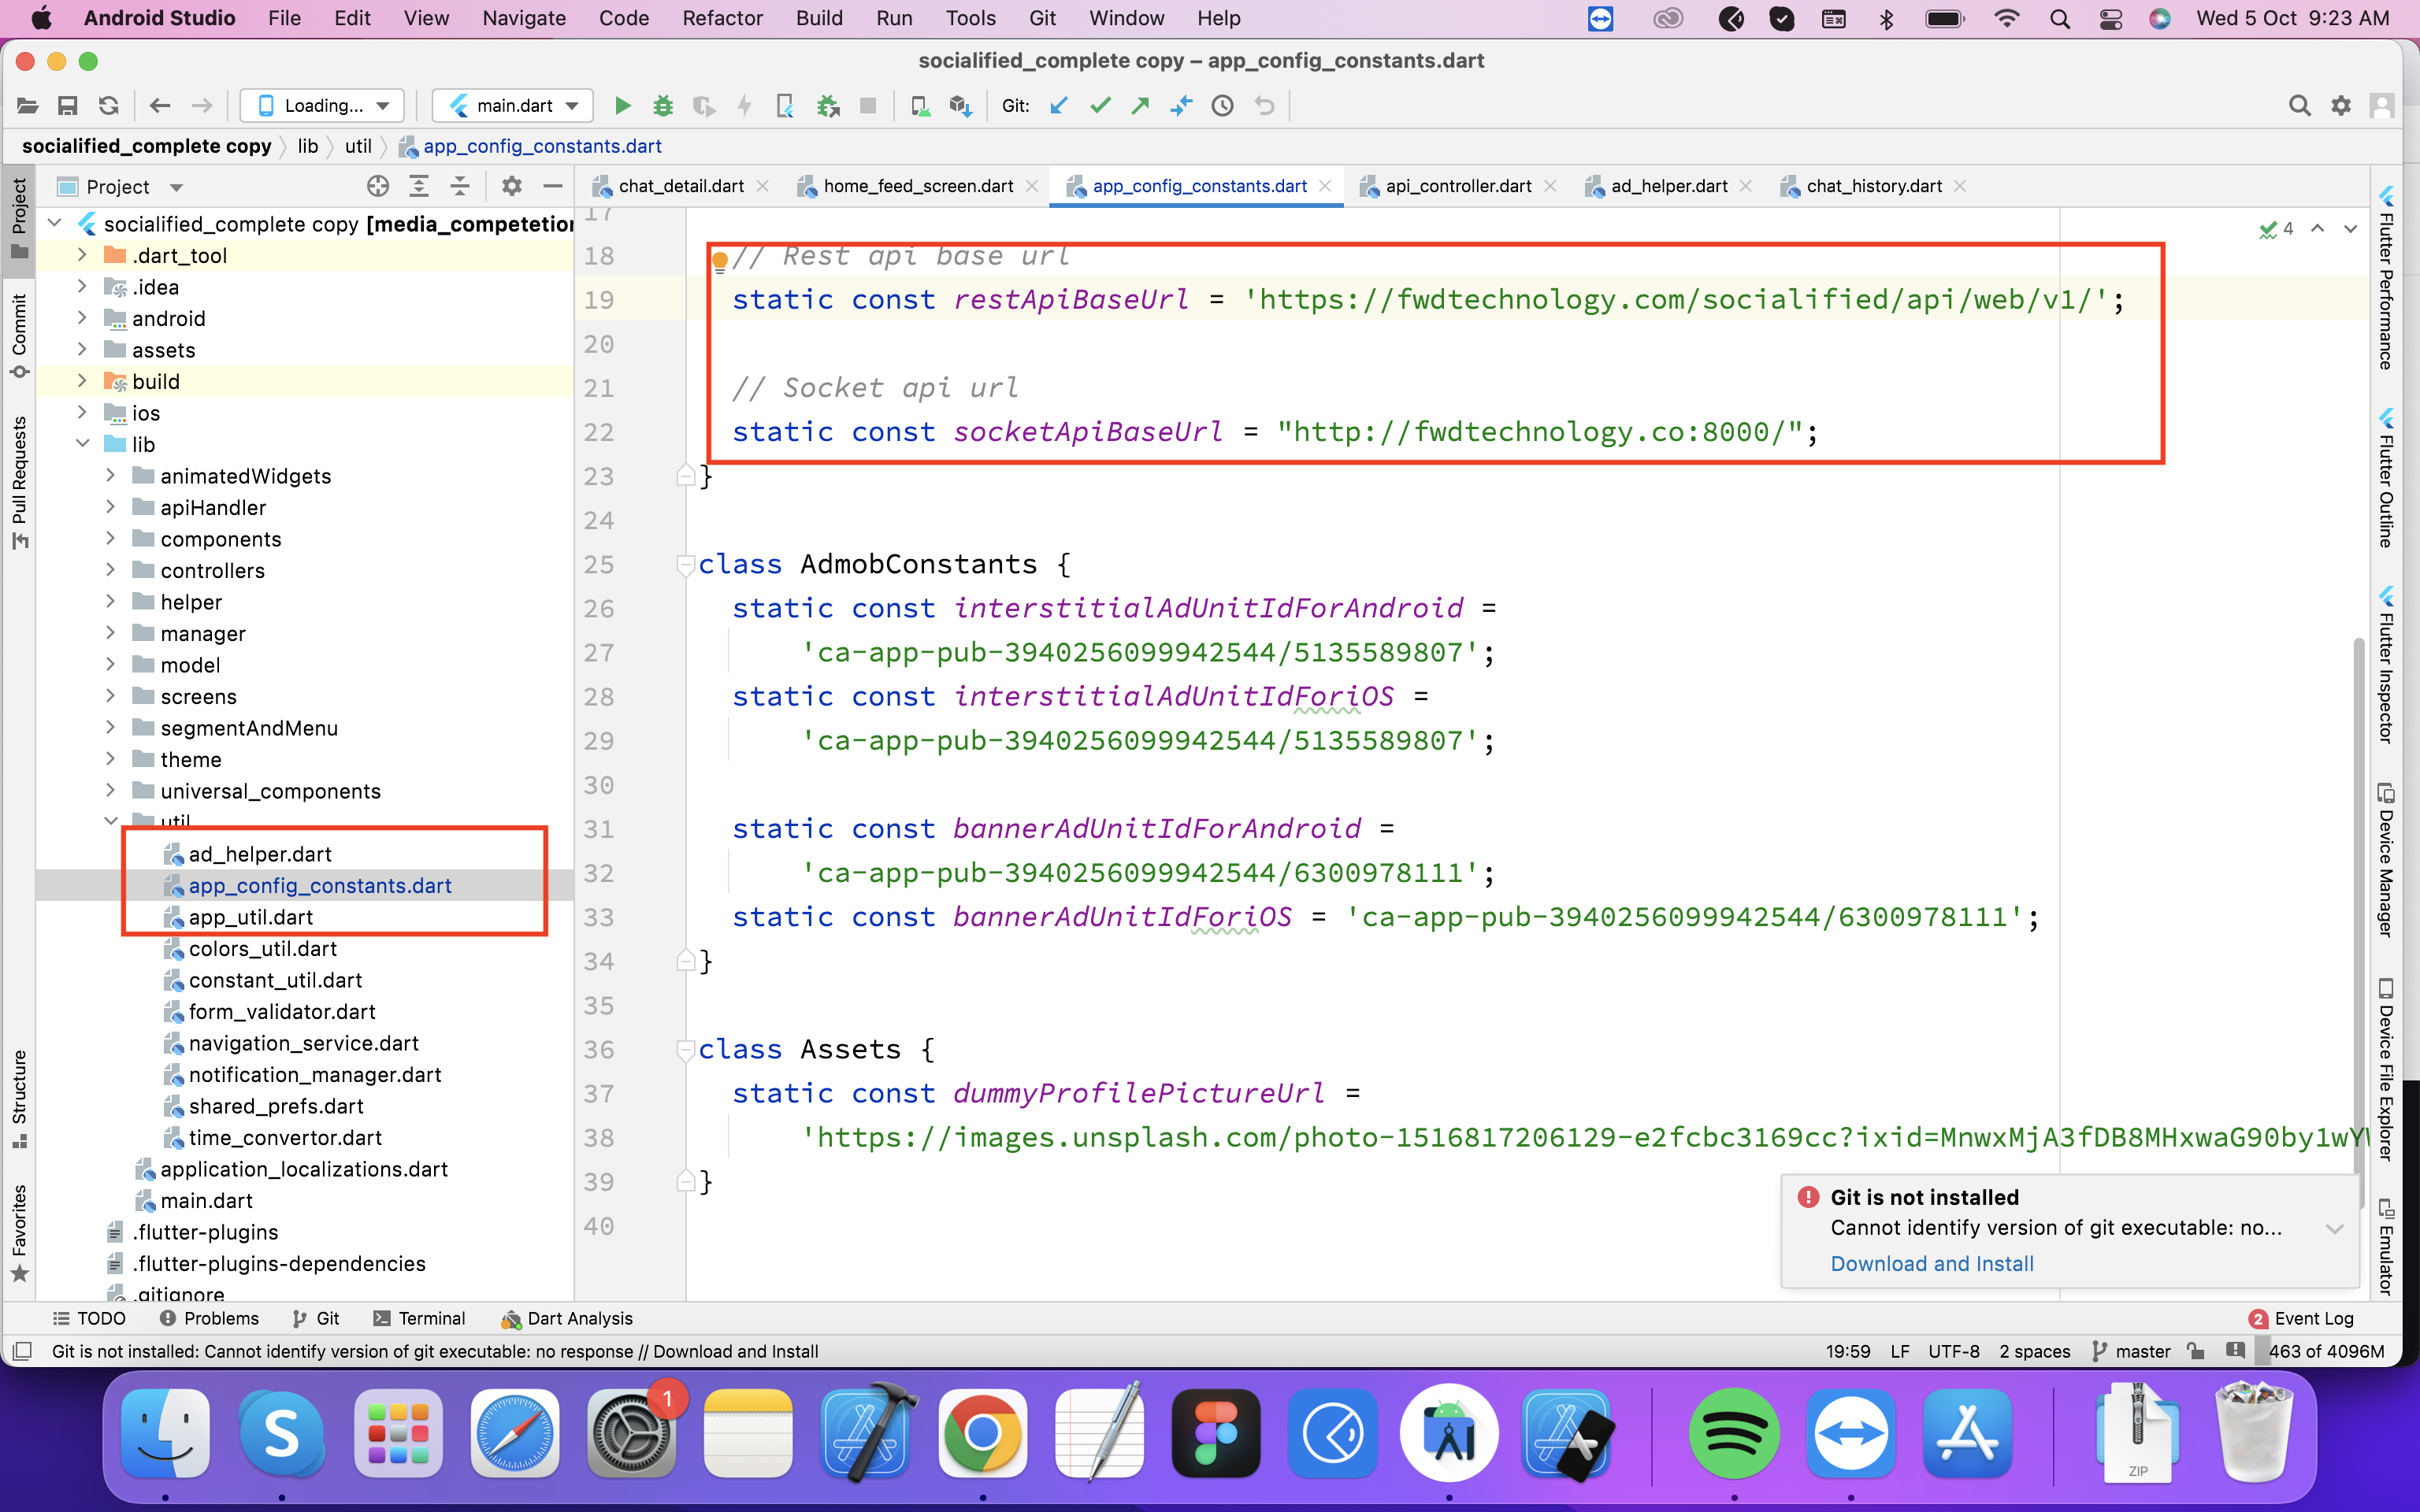
Change api urls
Go to "app_config_constants.dart" file and change api server(PHP) url and socket server(Node.js) url as shown in below screenshot
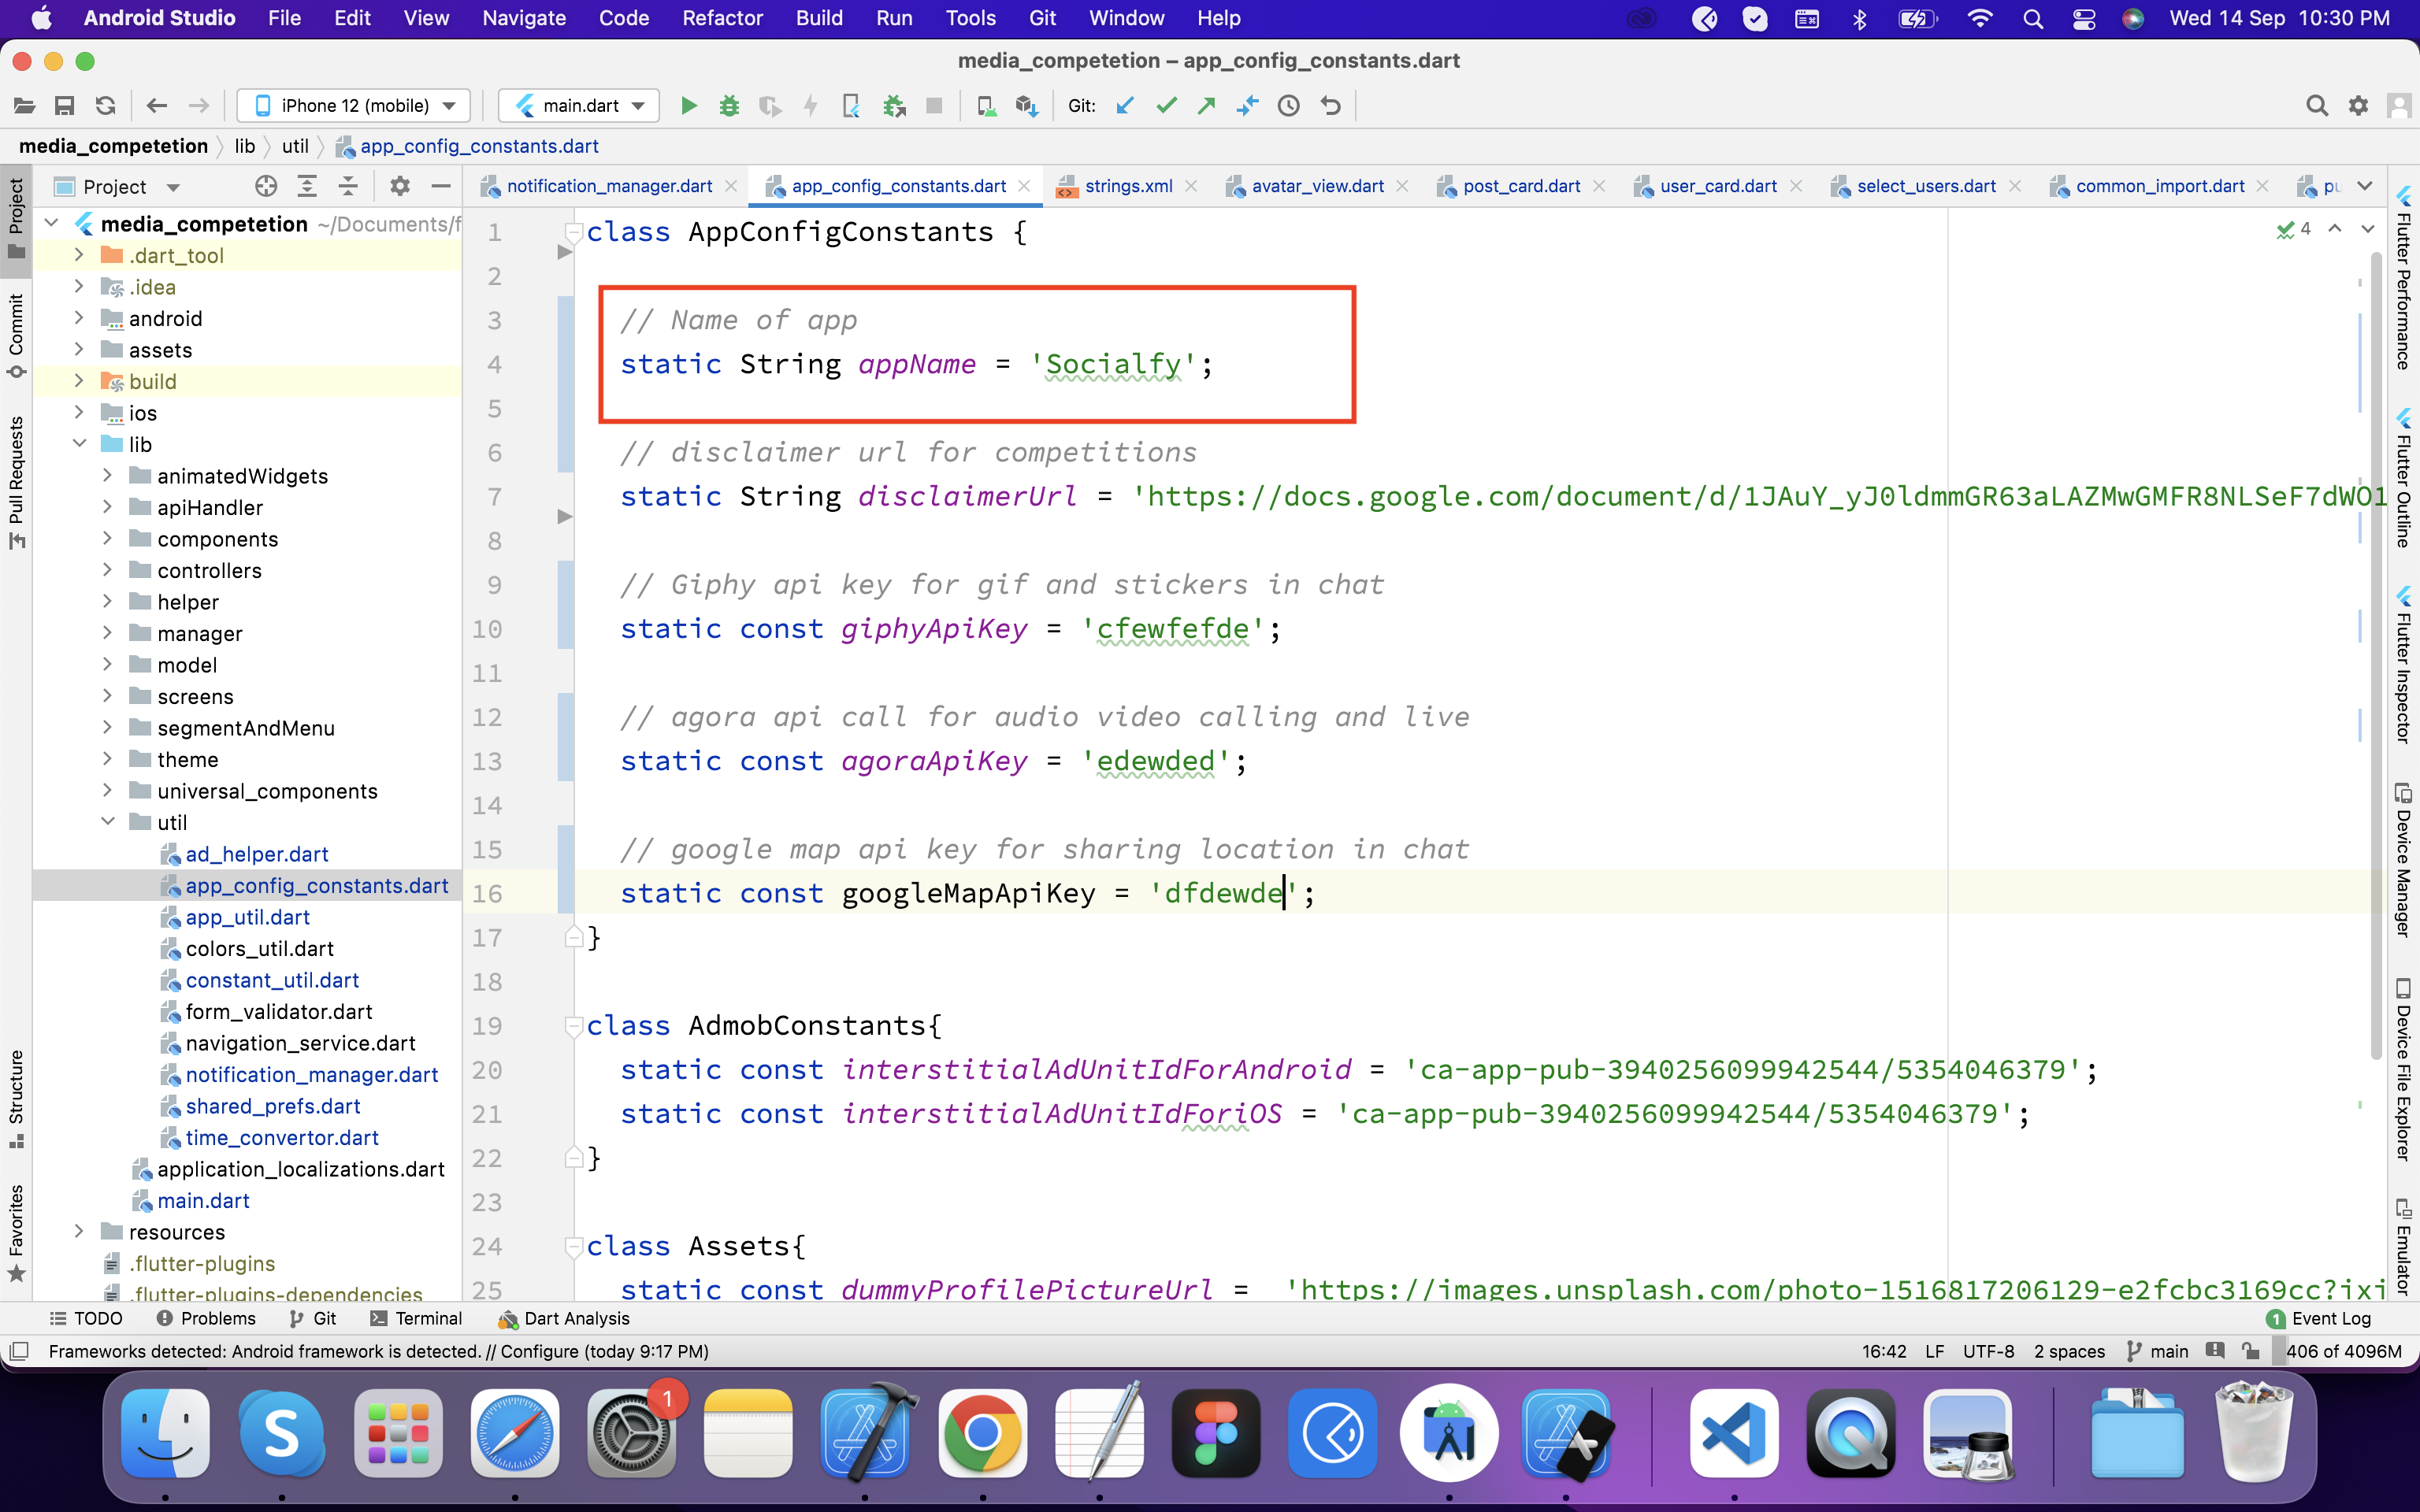
Change app name
Go to "app_config_constants.dart" file and change app and as below screenshot
Change app version for force update
Go to "app_config_constants.dart" file and change currentVersion value to current version number of the app that you are going to publish
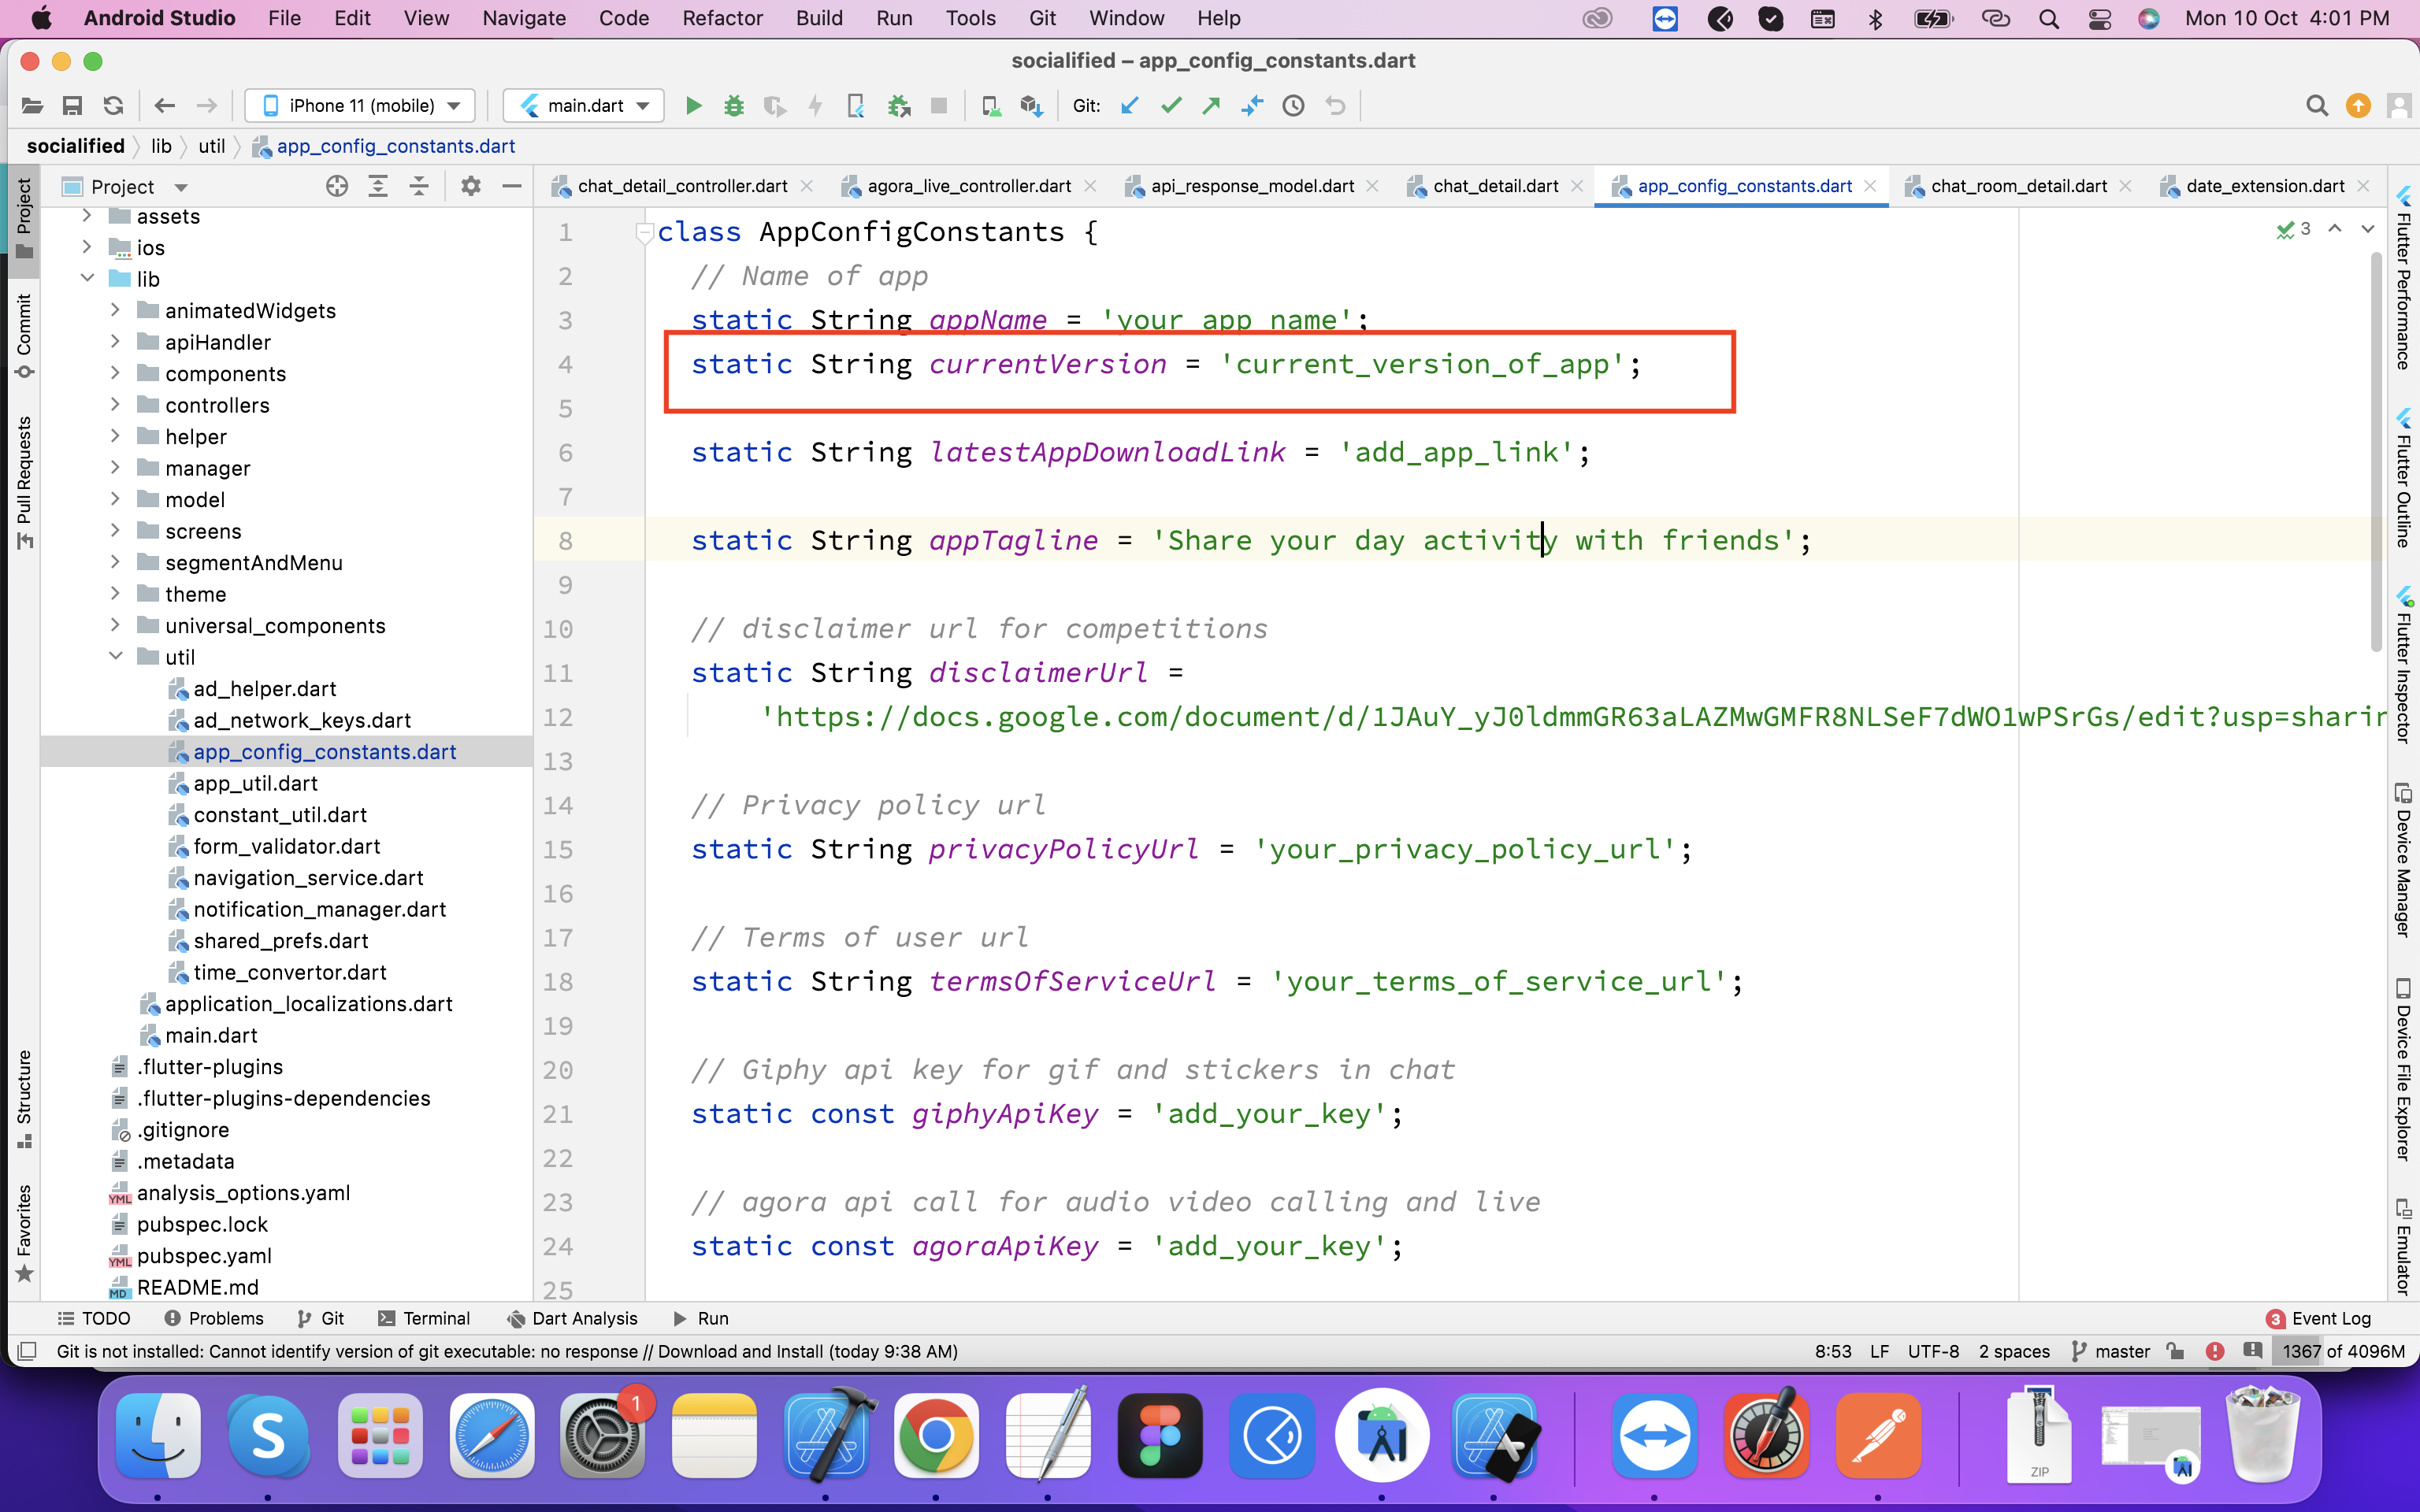
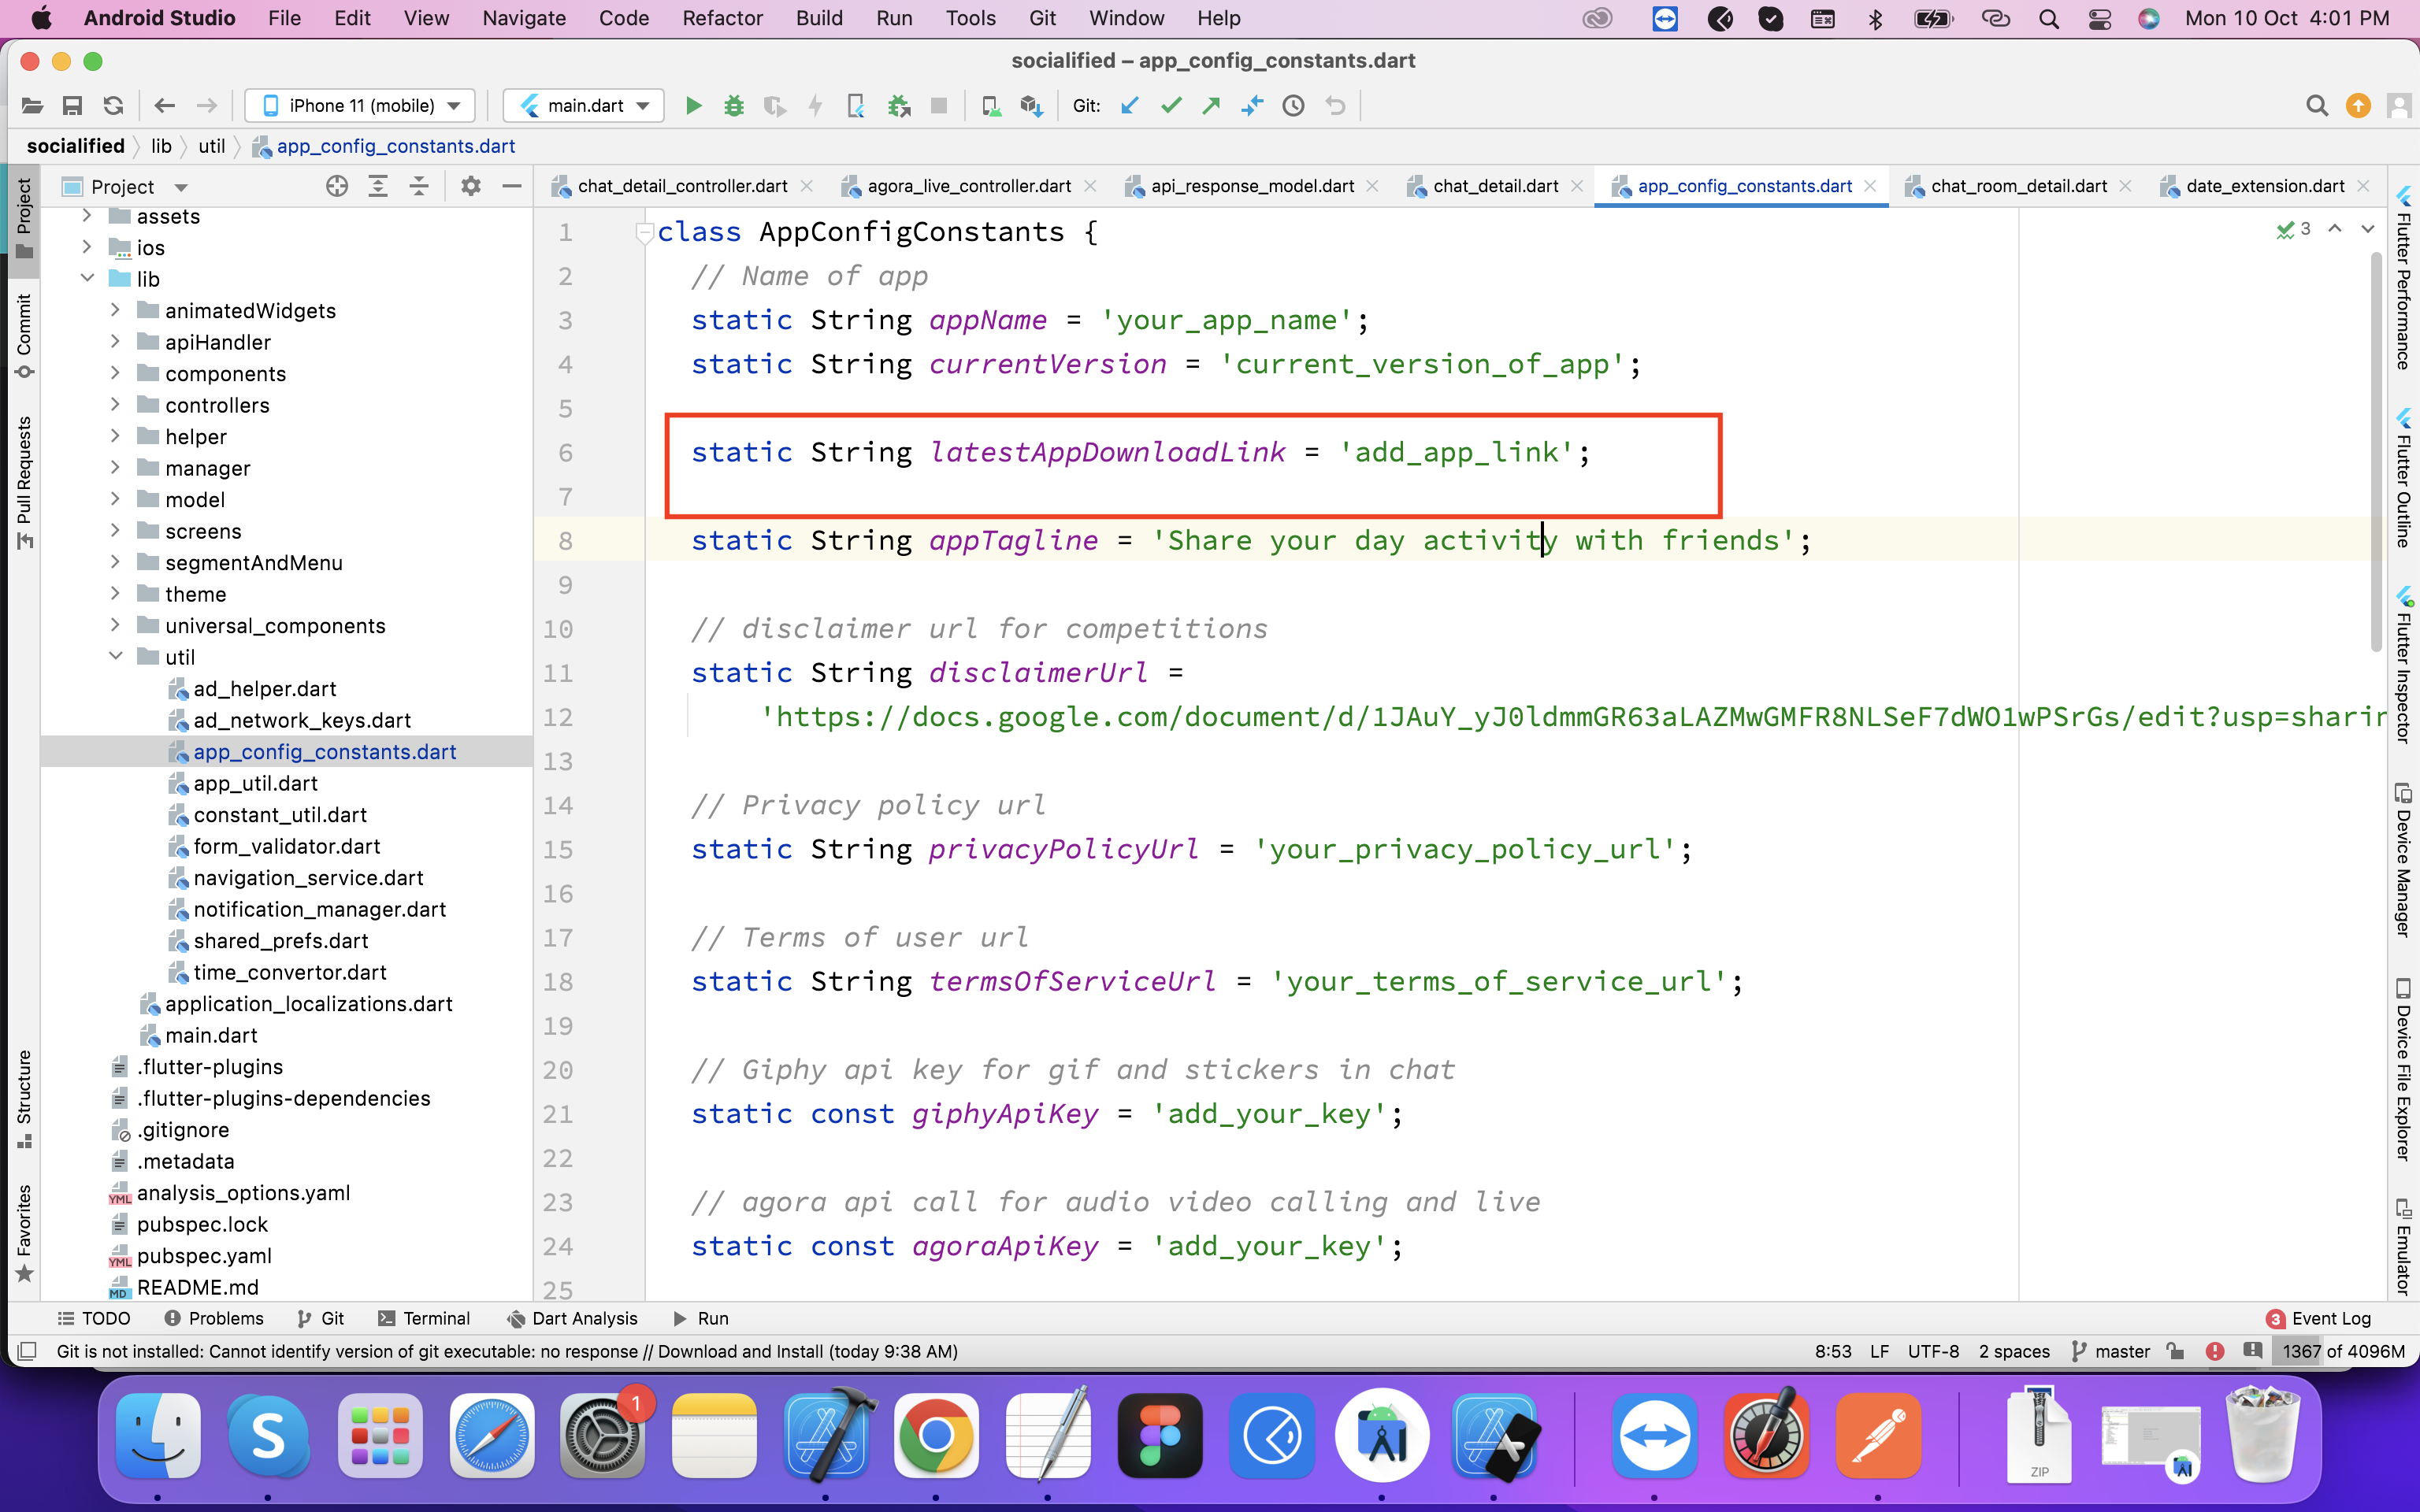
Change app link
Go to "app_config_constants.dart" file and change app link to redirect user to download the latest app on force update
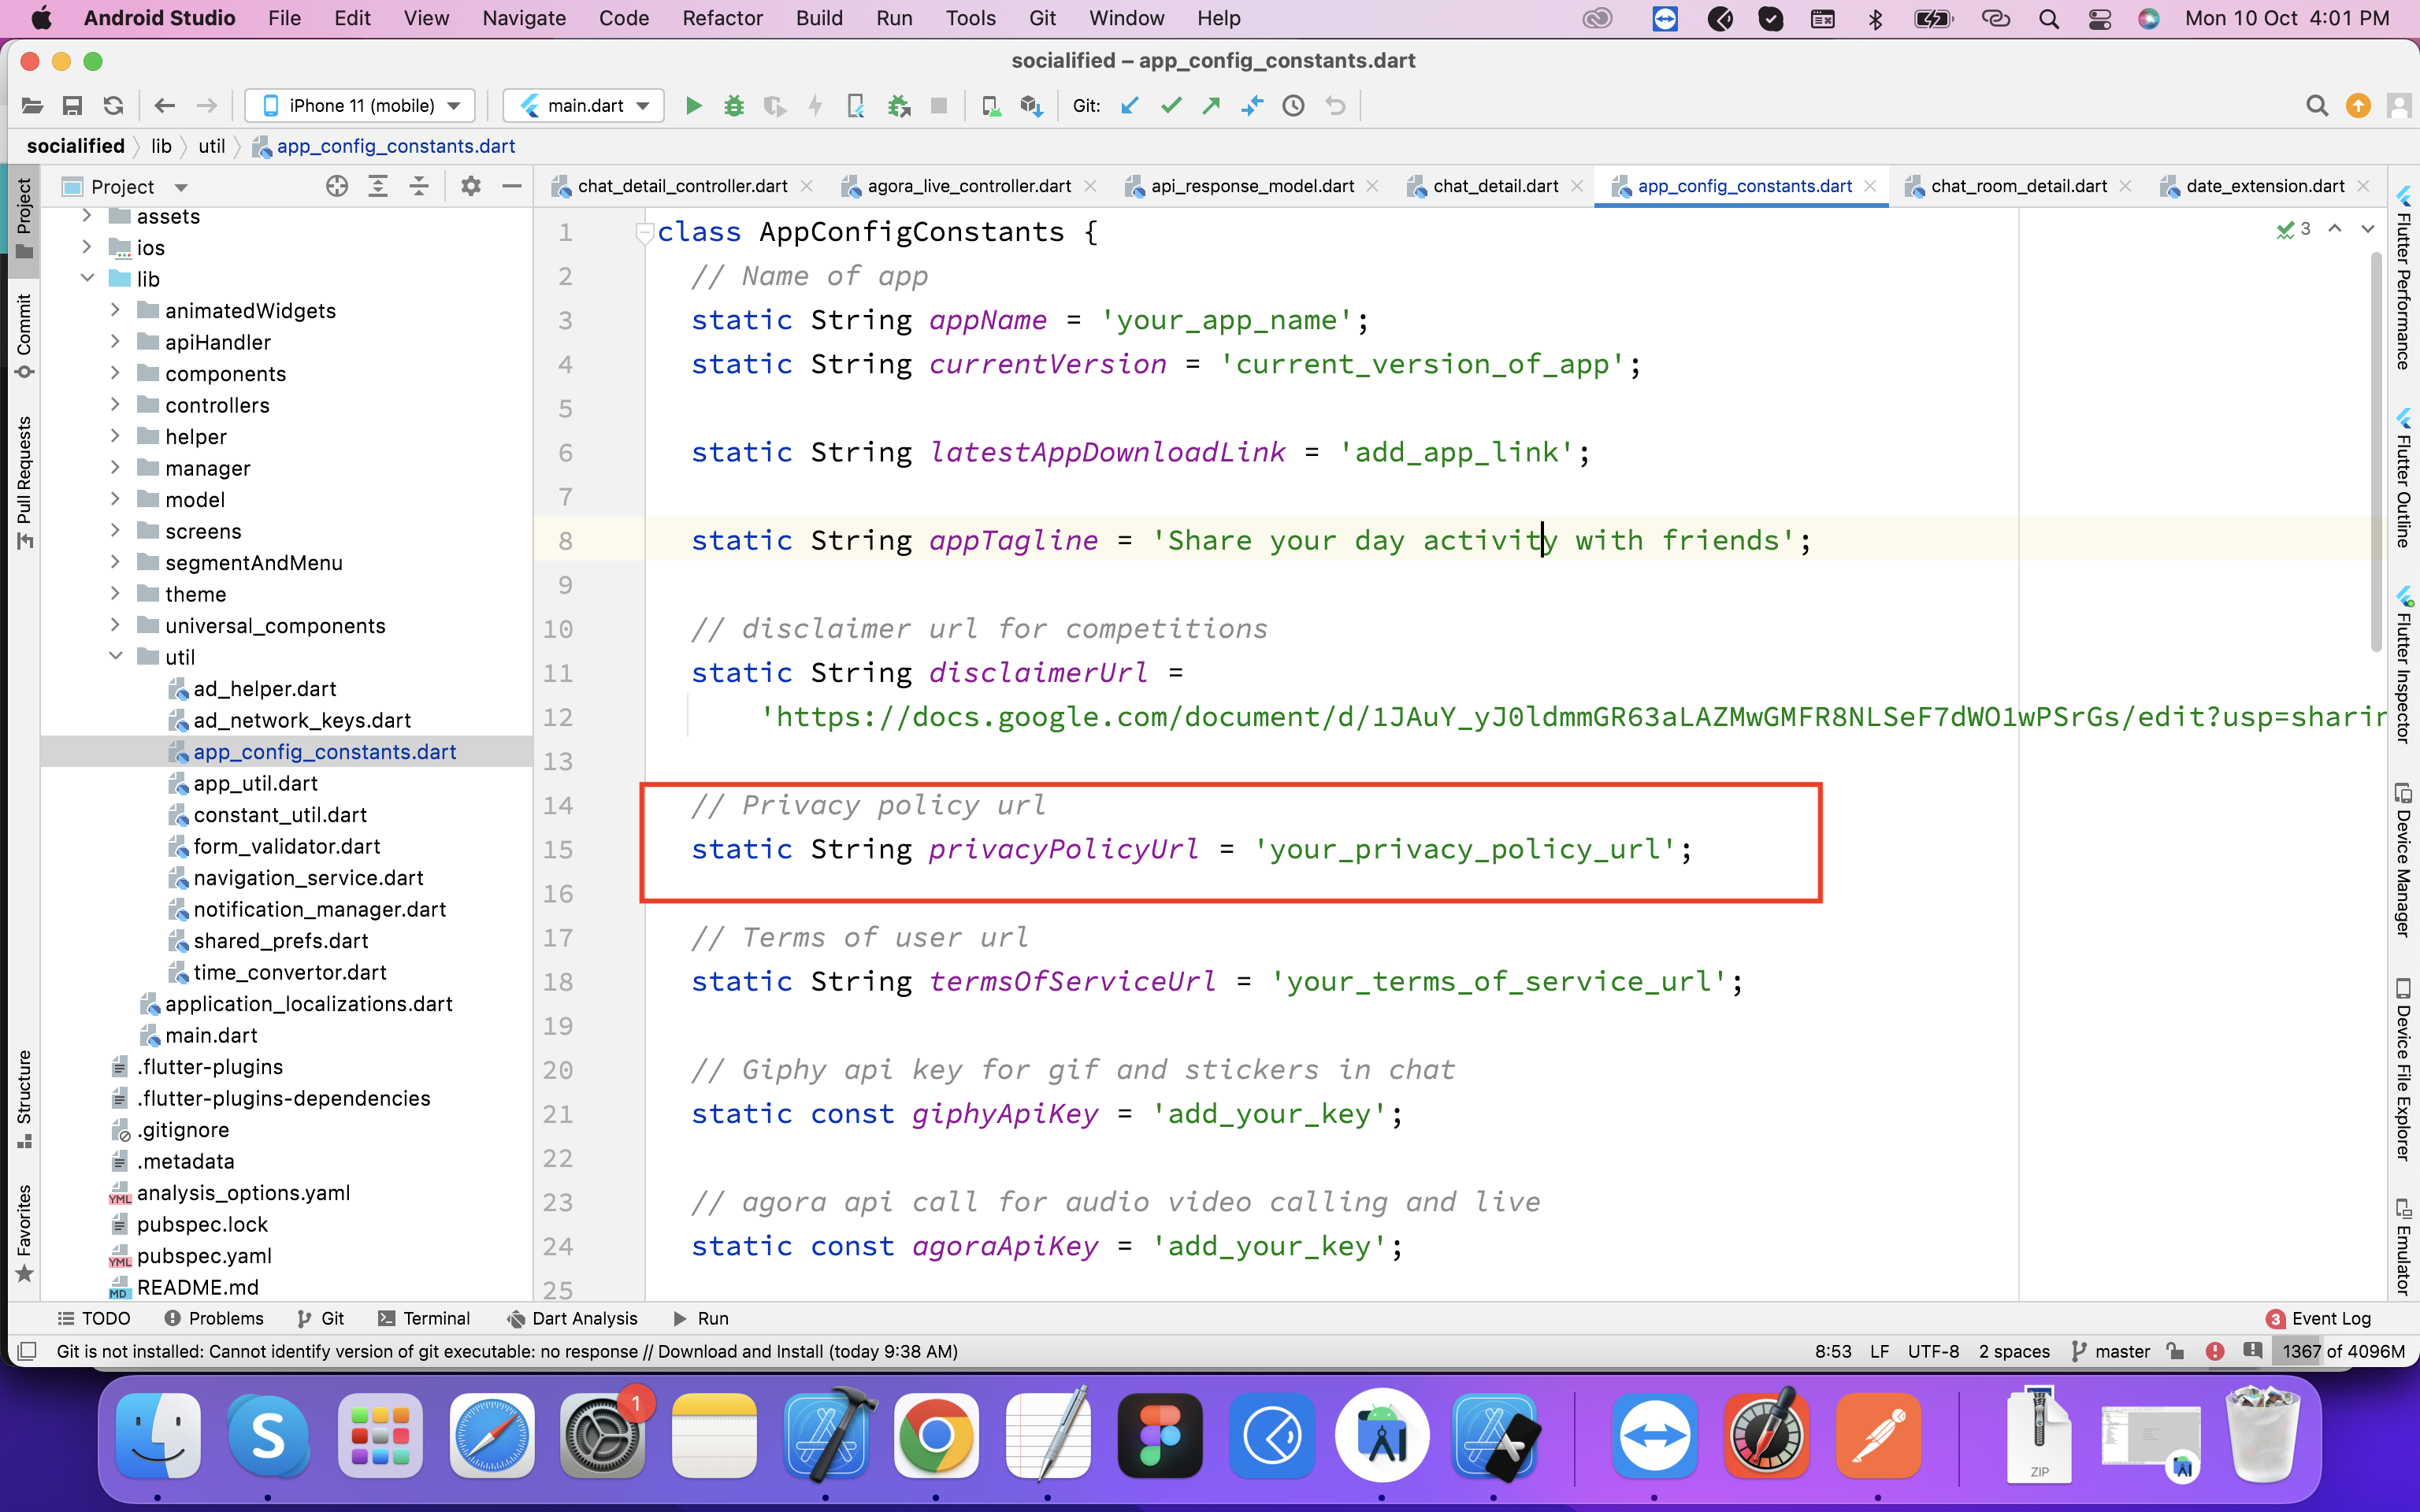
Change Privacy policy url
Go to "app_config_constants.dart" file and change privacy policy url that is needed in signup page
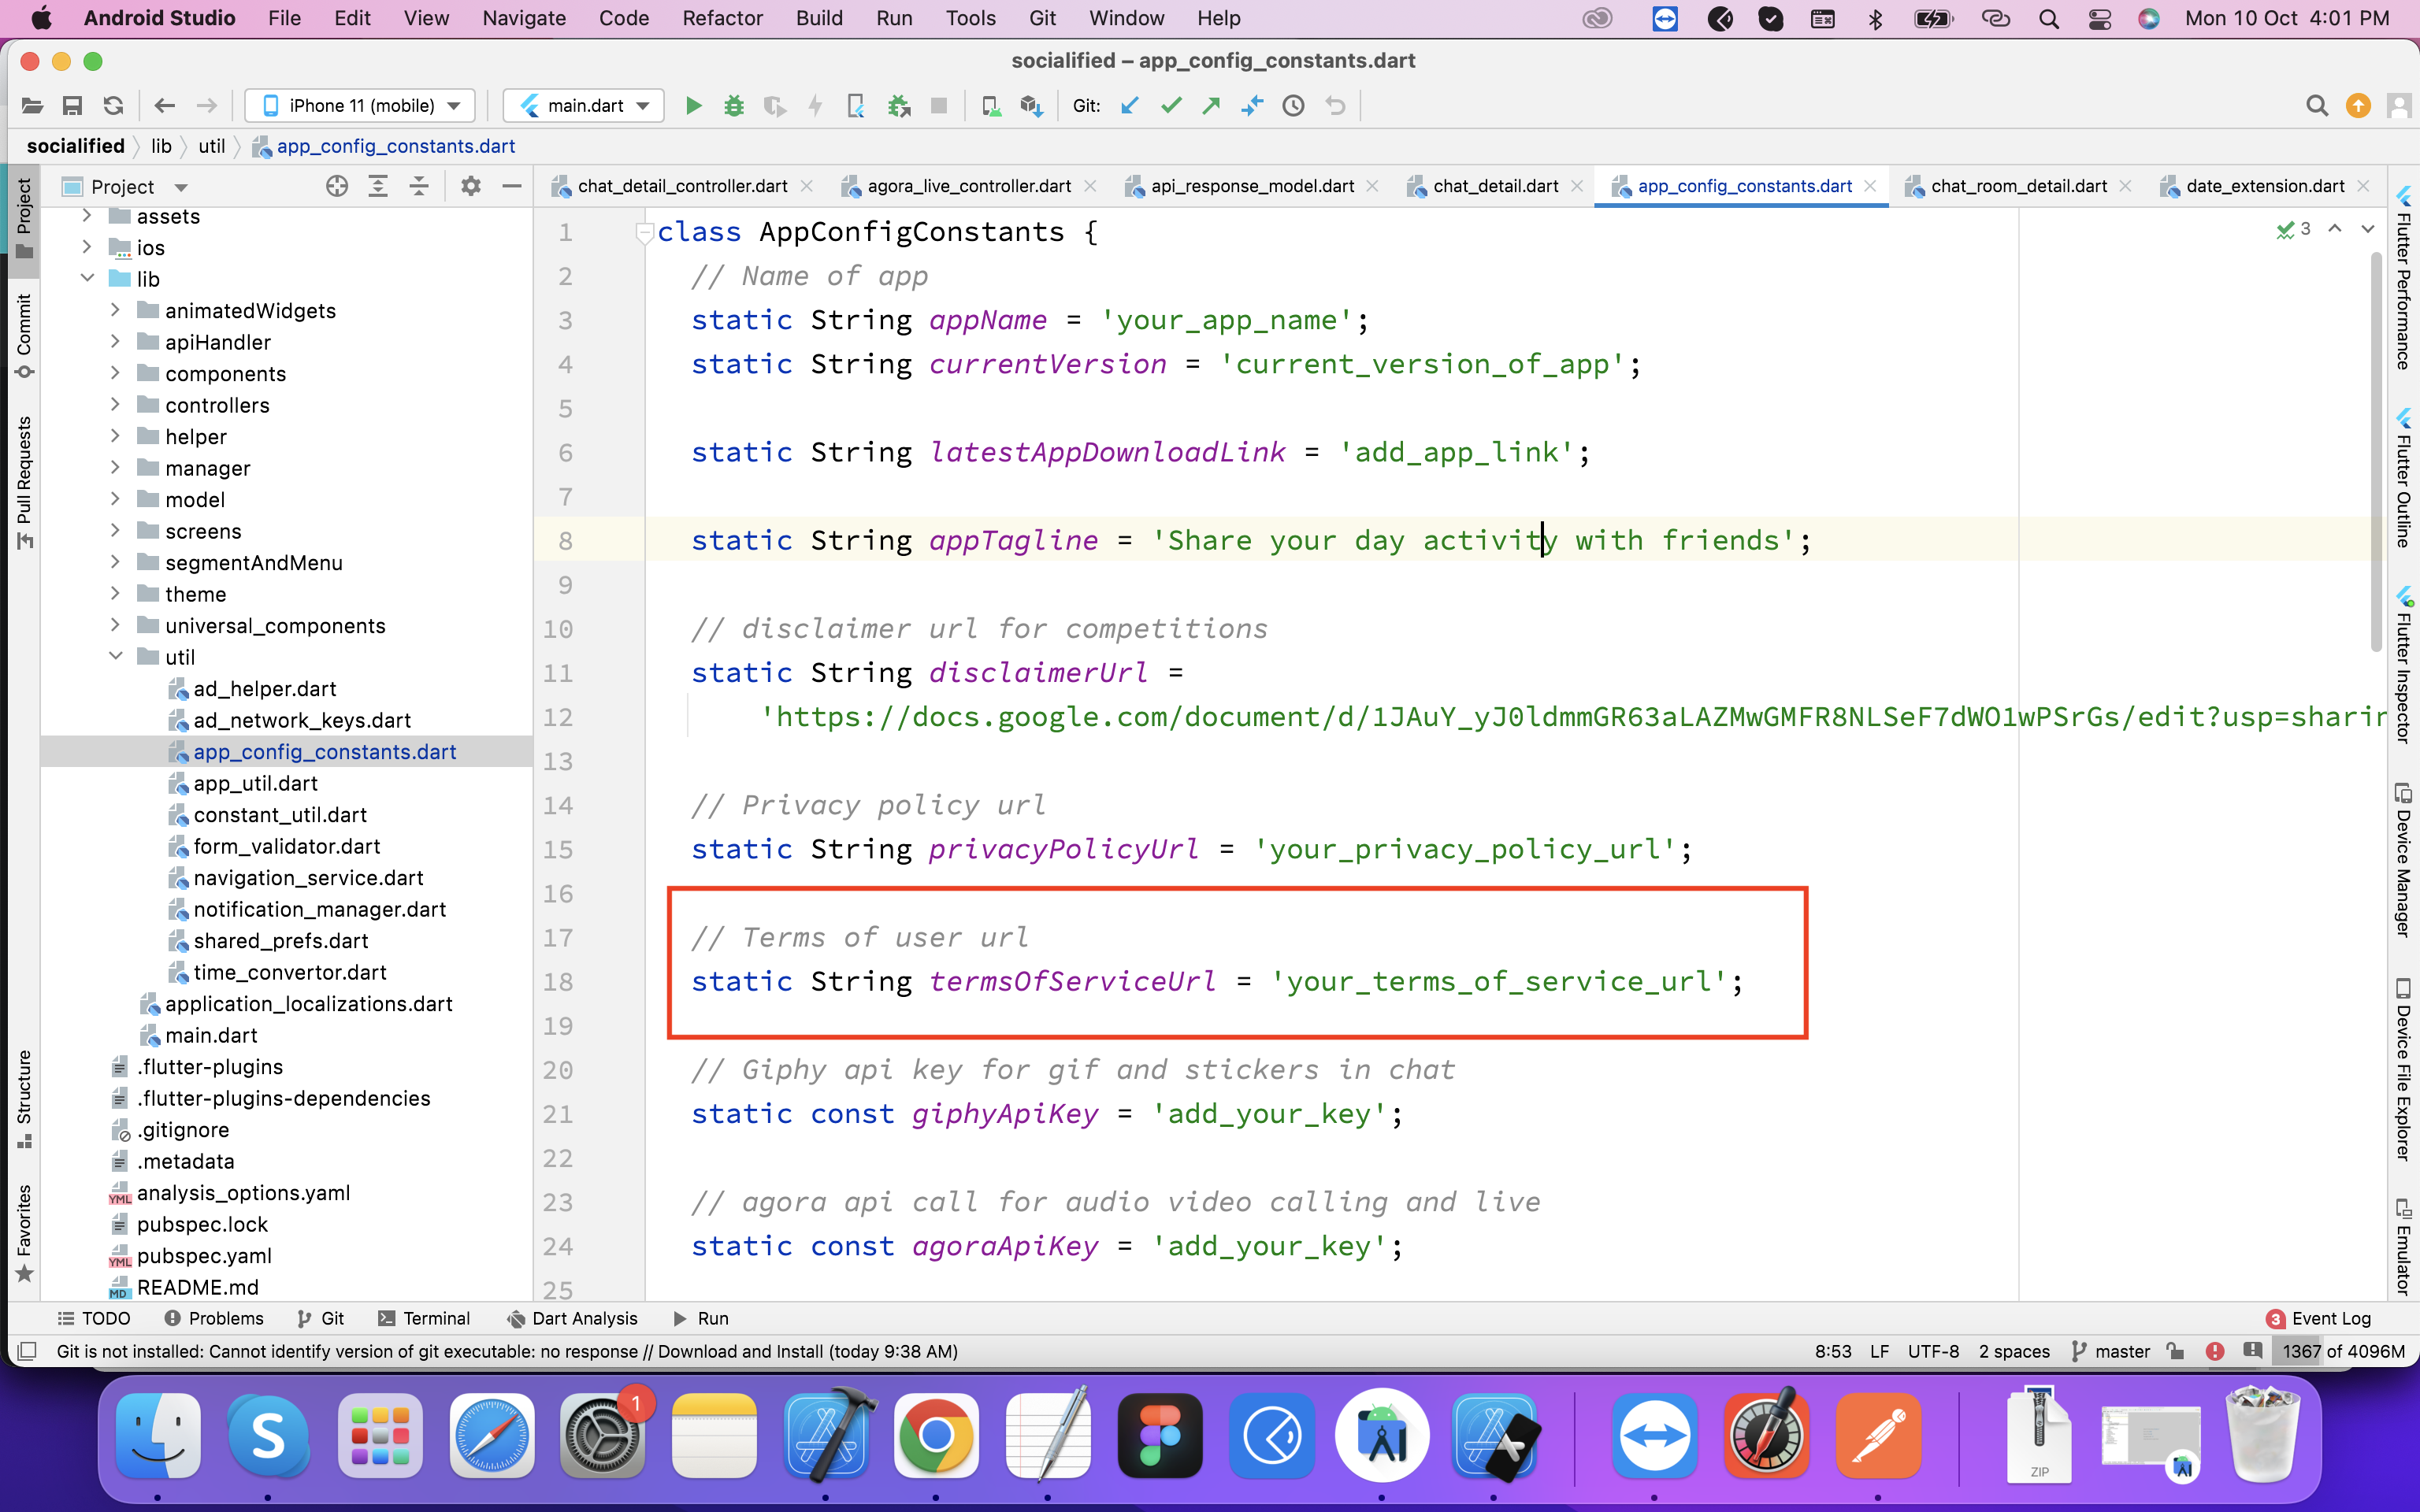
Change app Terms of service url
Go to "app_config_constants.dart" file and change terms of service that is needed in signup page
Change color scheme
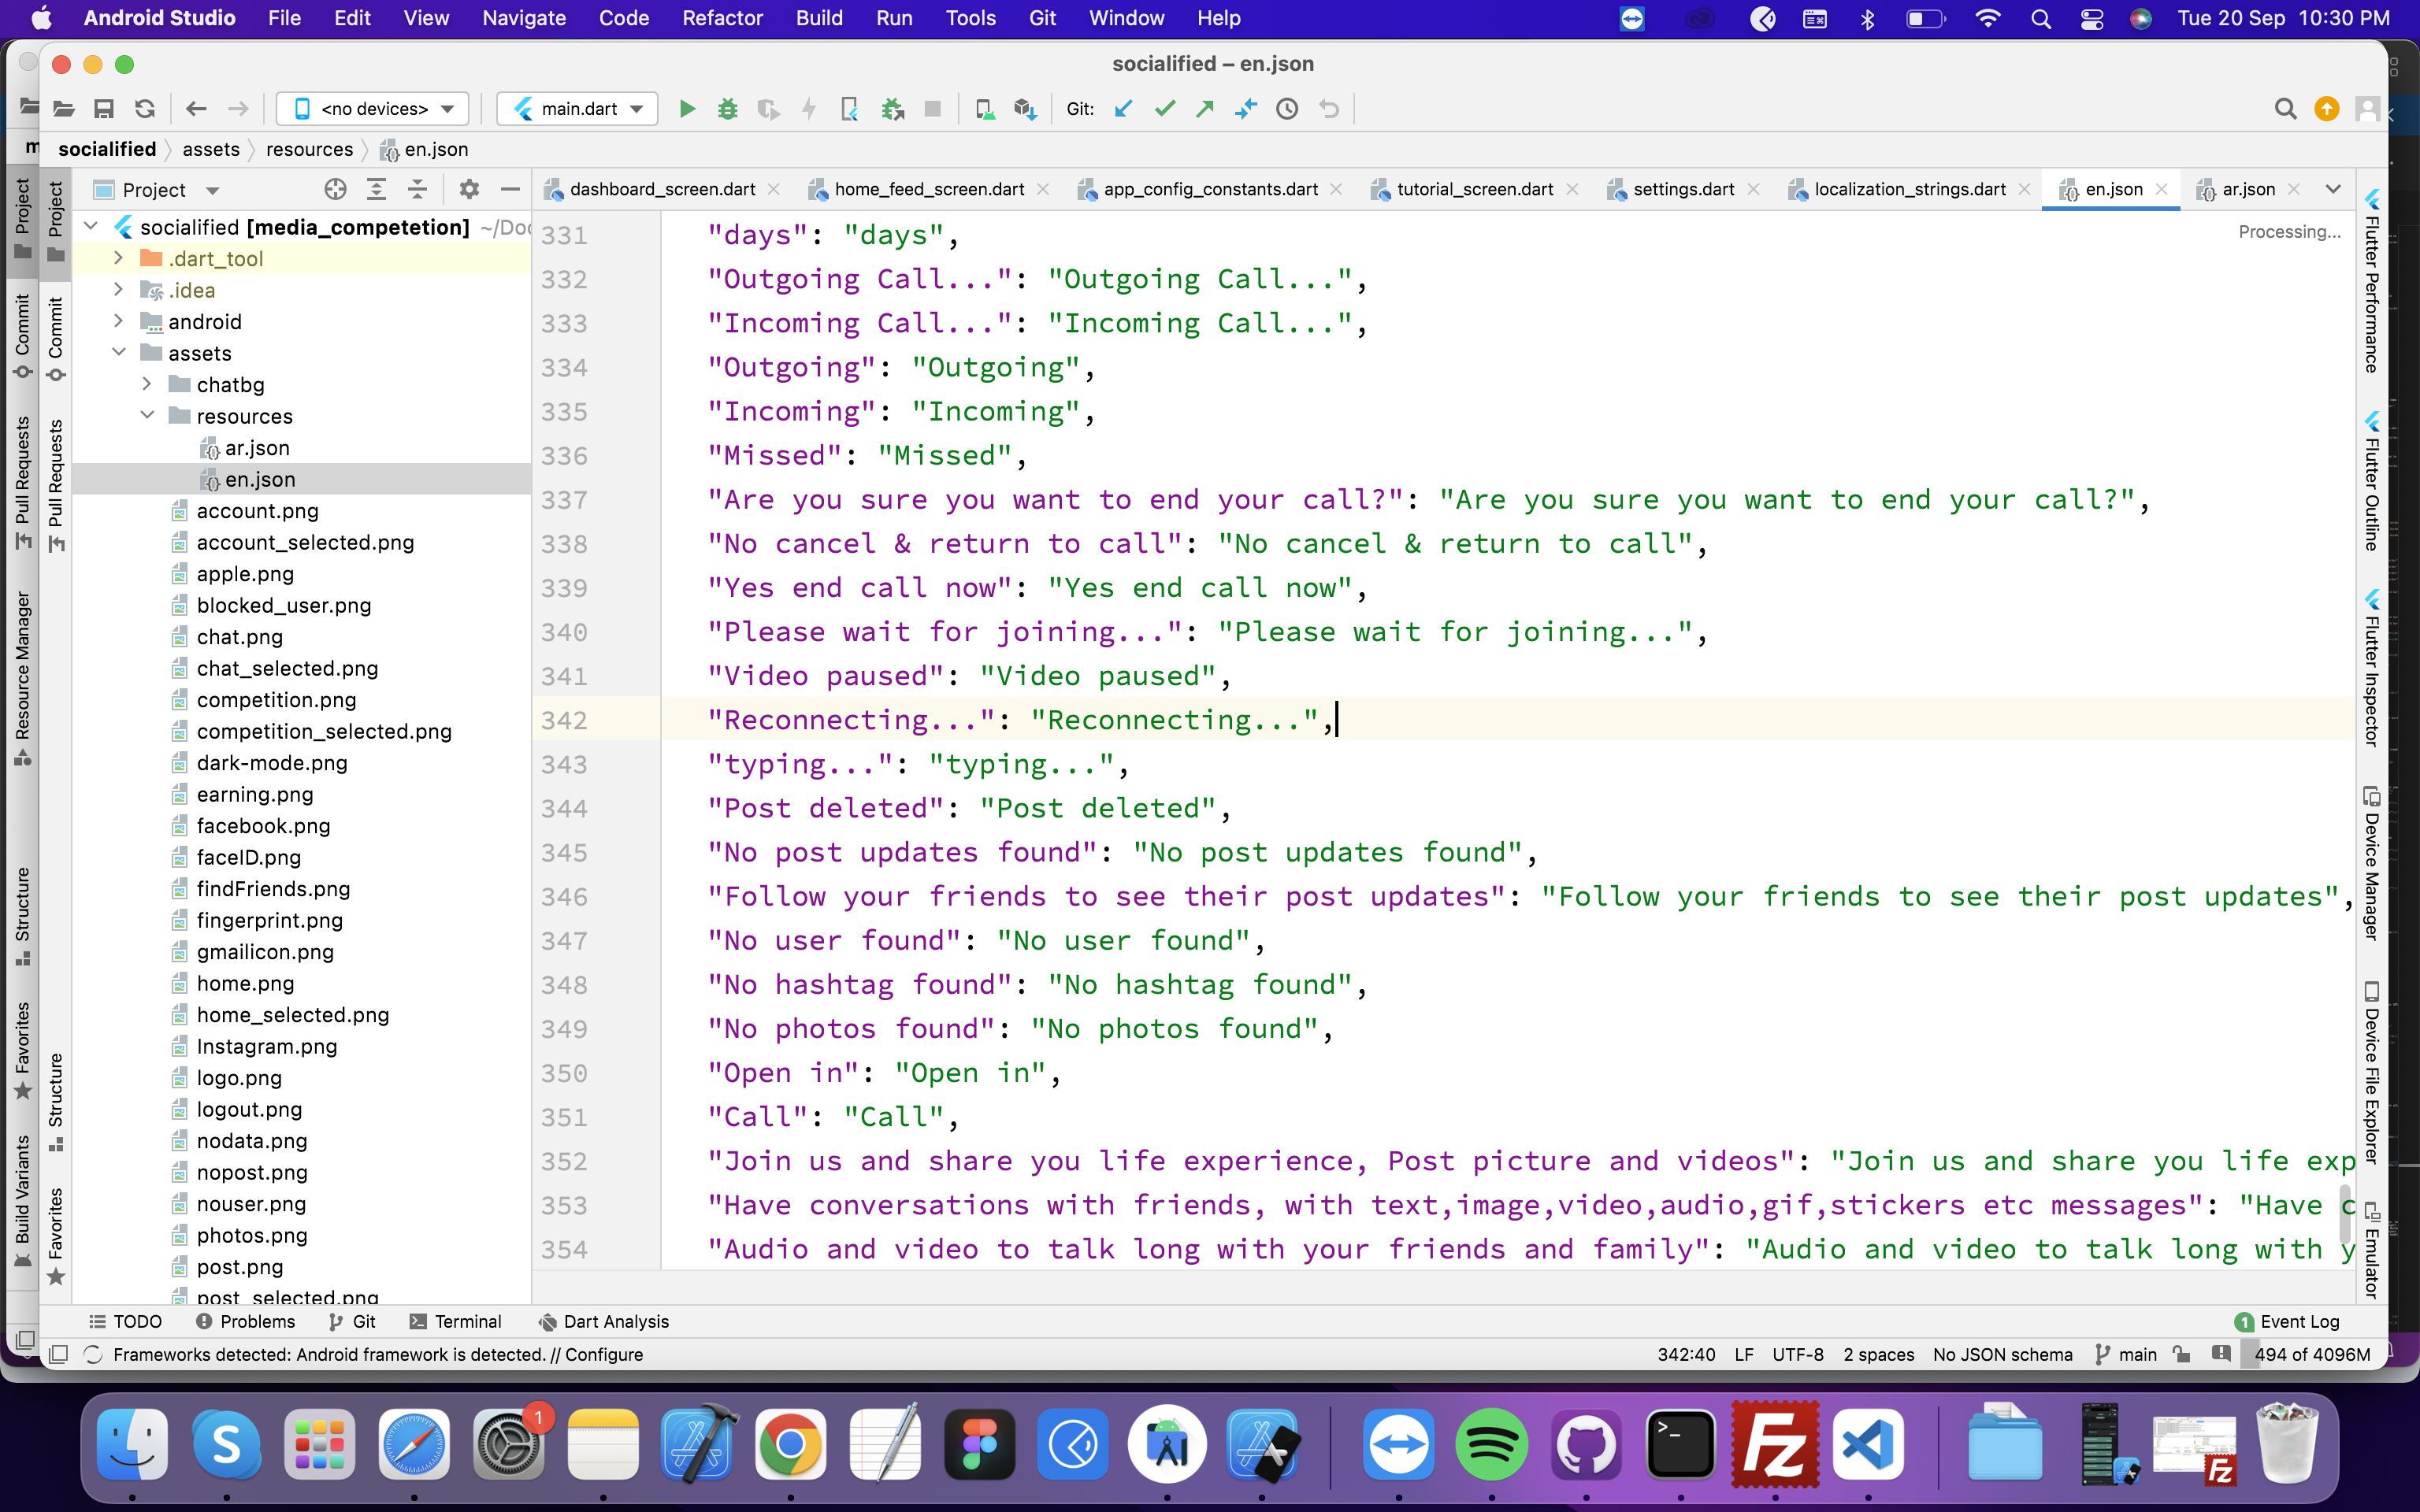
Change localization strings
Support
If this documentation doesn't answer your questions, So, Please send us Email.
Email : topiosappsworld@gmail.com
We are located in GMT +5:30 time zone and we answer all questions within 12-24 hours in weekdays. In some rare cases the waiting time can be to 48 hours. (except holiday seasons which might take longer).
Changelog
See what's new added, changed, fixed, improved or updated in the latest versions.
Version 1.8 (05 Mar, 2023)
- FixedVarious issues fixed
- FixedFixed issues related to google play console policy
- FixedRemoved unsupported libraries
Version 1.7 (18 Jan, 2023)
- Added Watch TV : Tv Streaming
- Added Chat Encryption - Now your chat is encrypted: Send gifts on live, user profile (Now available in regular licence)
- Added Club Enhancement : Private and Join request based club, User can create private and join request based clubs and can invite the users
- Added Enable/Disable any feature from Admin panel : Now you can remove any feature from app on run time from admin panel
- FixedReported issues fixed
Version 1.6 (30 Nov, 2022)
- Added FAQ
- Added Gifts: Send gifts on live, user profile (Now available in regular licence)
- Added Many more minor additions
- FixedReported issues fixed
Version 1.5 (23 Nov, 2022)
- Added Gifts: Send gifts on live, user profile
- Added Redeem Coin : Redeem coins into cash
- Added User verified tag : Request account verification with blue tick
- Added Azure Storage : Now you can store files on microsoft Azure storage
- Added Many more minor additions
- Fixed5+ reported issues fixed
Version 1.4 (27 Oct, 2022)
- Added Competitions : Join photo and video competition to earn real money..
- Added Random chat : Random chat with online users
- Added Clubs: Create and join clubs and post in clubs
- Added Links in chat : You can send link in chat now.
- Added In app purchase: in app purchase to buy coins for joining the competitions
- Added Reward ads: Rewarded ads to earn coins
- Added Update chat group
- Added Copy chat message
- Added Live stream statistics
- Added Pinch and zoom post image like Instagram
- Added Unread message badge
- Added Many more minor additions
- Fixed 5+ issues fixed
Version 1.3 (10 Oct, 2022)
- Added Local Storage : Added local storage, now you choose to store file on local server or AWS S3 .
- Added Group Chat : Group chat is enabled for this version.
- Added Star messages
- Added Links in chat : You can send link in chat now.
- Added Search in chat history
- Added Posting progress update in Home Screen
- Added Retry /Discard failed post easily
- Added Double tap to like
- Added Pull to refresh
- Added Mute/unmute audio in video post
- Added Pip view for video call
- Added Password strength checker
- Added Mention users in comment
- Added Share app with friends
- Added Force update app : Now app has abilty to force user to install leatest released version.
- Fixed Minor Issues
Version 1.2 (5 Oct, 2022)
- Added Ads : Google admob and facebook audience network is added.
- Added Animated Splash : Animated splash screen on the start of the app.
- Added Last seen : Now you can view last seen of user in chat screen.
- Added Ask for review : Now user can review and rete your app.
- Added Delete post : Now user can delete own post.
- Fixed Minor Issues
Version 1.1 (2 Oct, 2022)
- Added Share Drawing : Now you can draw on drawing pad and share it on chat with yours friends.
- Added Share Profile : Now you can share user profle on chat with yours friends.
- Fixed Live streaming issue
- Fixed Minor UI
Version 1.0 (1 October 2022)
Initial Release